

Oh, I just love the thought of creating a space that not only looks beautiful but also truly works for you! Have you ever looked at a blank wall and wished it could do more than just hold up the ceiling? I know I have. That’s why I’m so excited to share my ultimate DIY guide on how to create a wooden panel wall with shelves.
This project isn’t just about adding some wood to your wall; it’s about transforming a room, adding warmth, character, and much-needed storage all in one go. I promise, it’s more achievable than you might think, and I’m here to demystify every step of the way. Let’s make some magic happen in your home!
TABLE OF CONTENTS
Why a Wooden Panel Wall with Shelves is a Game-Changer
I truly believe a wooden panel wall with integrated shelves can completely elevate any room. It offers such a wonderful dual appeal, combining both stunning aesthetics and incredible functionality. Imagine the texture and warmth a paneled wall adds, instantly giving your space a custom, designer feel.
Beyond the undeniable beauty, the integrated shelves are where this project really shines. They provide invaluable storage for books, a perfect display spot for cherished decor, or a clever way to organize everyday essentials. It’s a DIY project that truly marries beauty with utility, and I think that’s just brilliant.
Discovering Your Perfect Panel Style
When I first started exploring wooden panel walls, I was surprised by how many different styles there are beyond just simple slats! Each one brings its own unique character to a room, and I love thinking about which style would best fit a particular aesthetic. Let me walk you through some of the most popular options.
| Panel Style | Characteristic Look | Aesthetic Fit |
|---|---|---|
| Slat Walls (Vertical) | Slim, evenly spaced vertical strips. Modern, clean lines. | Contemporary, minimalist, Scandinavian, adds height. |
| Slat Walls (Horizontal) | Slim, evenly spaced horizontal strips. Expansive feel. | Modern, mid-century, makes rooms feel wider. |
| Shiplap Walls | Overlapping horizontal boards with a small reveal (gap). Rustic chic. | Farmhouse, coastal, rustic, adds charm and texture. |
| Board and Batten Walls | Wide flat panels (boards) with narrower strips (battens) overlaying seams. Architectural. | Traditional, craftsman, modern farmhouse, adds classic structure. |
| VJ Panelling / Tongue and Groove Paneling | Interlocking boards creating a V-joint or tight seam. Classic and versatile. | Hamptons, provincial, traditional, adds subtle detail and elegance. |
| Solid Wood Planks / Plywood Panels | Large, continuous sections of wood or plywood, often stained or painted. | Industrial, contemporary, custom, offers a bolder, seamless look. |
Planning Your Dream Wooden Panel Wall with Shelves
I can’t stress enough how important thoughtful planning is for a successful outcome. Taking the time upfront to make key design decisions and consider all the practical aspects will save you so much hassle later on. This is where your vision really starts to take shape!
Full Wall, Accent Wall, or Half-Wall?
Deciding on the scope of your project is one of the first big steps. Do you want to cover an entire wall, creating a dramatic, immersive effect? Or would an accent wall, perhaps behind a bed or a sofa, be more fitting to draw attention to a specific area? A half-wall treatment, often seen with board and batten, can add architectural interest without overwhelming the space. I find each option truly changes the room’s overall feel.
Vertical vs. Horizontal Panels
The orientation of your panels has a significant visual impact. Vertical panels, especially slat walls, tend to draw the eye upwards, making ceilings appear higher and rooms feel taller. Horizontal panels, on the other hand, can make a room feel wider and longer, creating a sense of expansiveness. It’s all about playing with perspective to achieve your desired look.
Slat/Panel Dimensions and Spacing
The width of your panels and the spacing between them can dramatically alter the final aesthetic. Wider panels often give a more traditional or robust feel, while narrower slats are typically more modern. For slat walls, common dimensions I’ve seen include 1×2 inch or 1×3 inch slats, with spacing ranging from 1/2 inch to 2 inches. Remember, greater spacing uses less material but creates a more open look.
Working Around Existing Features
My walls are never perfectly blank, and I’m sure yours aren’t either! You’ll need to plan carefully around outlets, windows, corners, and door frames. I always measure these features precisely during the planning stage to ensure my panel cuts will be seamless. Sometimes, it means adjusting your panel layout slightly to avoid awkward slivers of wood or to center a panel around an outlet.
Choosing the Right Materials for Your Project
Selecting the right materials is crucial for both the look and longevity of your wooden panel wall with shelves. I always try to balance my budget with the aesthetic I’m aiming for, and I want to help you make informed choices too.
Wood Species & Alternatives
When it comes to wood, you have some wonderful options. Pine is a very popular choice because it’s affordable, easy to work with, and takes paint or stain beautifully. Oak offers a more premium, durable feel with a distinct grain, but it’s a bit pricier and harder to cut. Plywood can be a versatile, cost-effective option, especially for solid panels, but you’ll want to choose a good grade for a smooth finish. For a truly budget-friendly and smooth alternative, MDF (Medium-Density Fiberboard) is fantastic for painting. It’s incredibly stable and takes paint wonderfully, though it’s not as durable as solid wood and doesn’t handle moisture well.
Selecting Your Shelving Material
For the shelves themselves, you can either match your paneling material for a cohesive look or choose something contrasting for a bit of visual interest. Using the same wood species or MDF as your paneling creates a seamless flow. Alternatively, you could use a contrasting wood, like a darker stain on a lighter panel, or even different materials like metal or glass for a more eclectic style.
Finishing Products
Don’t forget the finishing touches! Stains will enhance the natural beauty of the wood grain, while paints offer endless color possibilities. A good primer is essential if you’re painting, especially on raw wood or MDF, to ensure an even, long-lasting finish. Finally, sealants like polycrylic or polyurethane will protect your beautiful work from everyday wear and tear.
Essential Tools for Creating Your Wooden Panel Wall with Shelves
Having the right tools makes all the difference, trust me! I’ve learned that a little preparation in the tool department goes a long way. Here’s a list, broken down into what I consider must-haves and some nice-to-haves that really ease the process.
Must-Haves:
- Measuring & Marking Tools:
- Tape Measure: Essential for all your dimensioning needs. I always keep a sturdy 25-foot one handy.
- Pencil: For marking cuts and stud locations.
- Level (long and short): Crucial for ensuring everything is perfectly straight and plumb. A 4-foot level is ideal for panels, and a smaller one for shelves.
- Speed Square / Combination Square: For marking precise 90-degree angles on your wood.
- Stud Finder: Absolutely vital for locating wall studs to securely fasten panels and especially shelves.
- Cutting Tools:
- Miter Saw: For making clean, accurate crosscuts on your panels and shelf boards. It’s a game-changer for precise angles.
- Jigsaw: Handy for cutting around outlets or other irregular shapes.
- Drilling & Fastening Tools:
- Cordless Drill/Driver: For pre-drilling holes and driving screws. Mine is my most used tool!
- Brad Nailer (electric or pneumatic) & Compressor: For attaching panels quickly and with minimal visible fasteners.
- Construction Adhesive (e.g., Liquid Nails): Provides extra holding power, especially helpful for panels that aren’t directly on studs.
- Wood Screws: For securing shelves into studs.
- Sanding & Finishing Tools:
- Orbital Sander & Sandpaper (various grits): For smoothing out cuts and preparing wood for finishing.
- Wood Filler: To fill nail holes and small gaps.
- Caulk Gun & Paintable Caulk: For sealing edges and gaps between panels and the wall/ceiling.
- Paint Brushes/Rollers or Stain Applicators: For applying your chosen finish.
- Safety Gear:
- Safety Glasses: Non-negotiable for protecting your eyes from dust and debris.
- Dust Mask: Important for sanding and cutting, especially with MDF.
- Hearing Protection: Crucial when using power saws and nailers.
Nice-to-Haves:
- Laser Level: Oh, a laser level! It makes marking a perfectly straight line across a long wall incredibly easy and accurate. This is my pro-tip for saving your back and ensuring a truly level installation.
- Table Saw: If you’re ripping down larger sheets of plywood, a table saw is incredibly efficient.
- Clamps: Useful for holding pieces in place while adhesive dries or for cutting.
- Paint Sprayer: For an ultra-smooth, professional finish on your painted panels.
Accurate Measurement & Calculation: Avoid Costly Mistakes!
I cannot emphasize enough how critical precise measurements are for this project. Rushing this step can lead to costly mistakes and a less-than-perfect finish. Let’s get it right from the start!
First, measure the height and width of your wall where the paneling will go. Measure in a few different spots, as walls are rarely perfectly square. Always use the largest measurement for height and width, and take notes.
Now, for calculating the wood you’ll need:
- For Panels:
- Divide the total width of your wall by the desired width of your individual panels plus the desired spacing. This will give you the approximate number of panels you’ll need.
- For example, if your wall is 120 inches wide, your panels are 3.5 inches wide, and your spacing is 1.5 inches:
- Total width per panel section = 3.5 + 1.5 = 5 inches.
- Number of panel sections = 120 inches / 5 inches = 24 panels.
- Multiply the number of panels by the height of your wall to get the total linear footage needed. Always add at least 10-15% for waste and mistakes.
- For Shelves:
- Measure the length of each shelf you plan to install.
- Add up all the shelf lengths to get the total linear footage. Again, add 10-15% extra for cuts.
Remember to factor in any windows, doors, or other obstructions you’ll be cutting around!
Preparation is Key: Getting Your Wood Ready
Proper preparation is truly the secret to a professional-looking finish. Trust me, putting in the effort now will save you headaches and extra work later on. This is where we ensure everything is ready to go up on the wall beautifully.
Wood Selection & Inspection
Before you even start cutting, take the time to inspect each piece of wood you’ve purchased. Look for straightness; warped or bowed boards can make installation incredibly frustrating and compromise the final look. Check for knots, cracks, or other defects that you might want to cut around or that could affect durability.
Sanding & Cutting
Once you’ve inspected your wood, it’s time to get it ready for installation. I always recommend sanding all sides of your panel pieces and shelf boards to a smooth finish, typically starting with 120-grit sandpaper and moving to 180 or 220-grit. This is much easier to do before they’re on the wall! Then, make all your precise cuts according to your measurements. Accuracy here is vital for a seamless look.
Pre-Finishing (Optional but Recommended)
This step can be a real time-saver, especially if you’re painting your panels. Applying a primer, stain, or even your first coat of paint before installation means less taping, less awkward brushwork on the wall, and often a more even finish. It also helps seal the wood, reducing the chance of warping later. I’ve found it makes the final touch-ups much quicker!
Building Your Wooden Panel Wall: Step-by-Step Installation
This is where the transformation really begins! I know it might seem like a big undertaking, but by breaking it down into manageable steps, you’ll be amazed at what you can achieve. I’ll guide you through the core process for getting your wooden panel wall firmly in place.
Prepare Your Wall Surface
Before anything goes up, your wall needs to be clean, dry, and in good condition. I like to wipe it down to remove any dust or grime. If you have significant holes or damage, patch them up and sand them smooth. If you’re painting the wall a dark color that might show through gaps in your paneling, or if you’re using MDF that needs a uniform base, consider priming the wall first.
Find and Mark Your Studs
This is a really important step for structural integrity, especially when you’re adding shelves. Use your stud finder to locate the vertical wooden studs within your wall. Mark their locations lightly with a pencil from floor to ceiling. Anchoring your panels and shelves directly into these studs ensures they are incredibly secure and can bear weight without issue.
Determine Your Layout & First Panel Placement
Now, let’s talk about the layout. I always like to do a dry run on paper or by marking lightly on the wall to visualize where each panel will go and where the shelves will integrate. It’s often best to start your paneling in a corner or by measuring from the center of the wall outwards to ensure symmetry, especially for accent walls. Use your long level to draw a perfectly plumb (vertical) line for your very first panel. This first piece sets the standard for everything that follows, so take your time!
Installing Your Panels
Once your first plumb line is set, you’re ready to start attaching panels.
- Cut: Make sure your pre-cut panels are ready.
- Adhesive: Apply a zigzag bead of construction adhesive to the back of the panel. This helps with long-term adhesion.
- Fasten: Align the panel precisely with your plumb line and press it firmly to the wall. Use your brad nailer to secure it into the studs you marked. If you can’t hit a stud, the adhesive will be your main anchor, but aim for studs whenever possible.
- Spacers: If you’re creating a slat wall or shiplap, use spacers (e.g., small pieces of scrap wood or tile spacers) between each panel to ensure consistent gaps.
- Level Check: Continuously check each panel with your level as you go. Slight deviations can quickly compound and throw off your entire project. For shiplap, simply interlock the panels, securing them through the tongue or lip into the studs.
Cutting Panels for Obstacles
You’ll inevitably encounter outlets, windows, and corners. For outlets, I always measure very carefully, marking the exact dimensions and location onto the panel piece. Then, I use a jigsaw to cut out the opening. For windows and doors, measure the exact opening and cut the panels to fit snugly around the trim. For corners, make sure your last panel on one wall meets cleanly with the first panel on the adjacent wall; sometimes a mitered edge (a 45-degree angle cut) can create a really professional-looking corner.
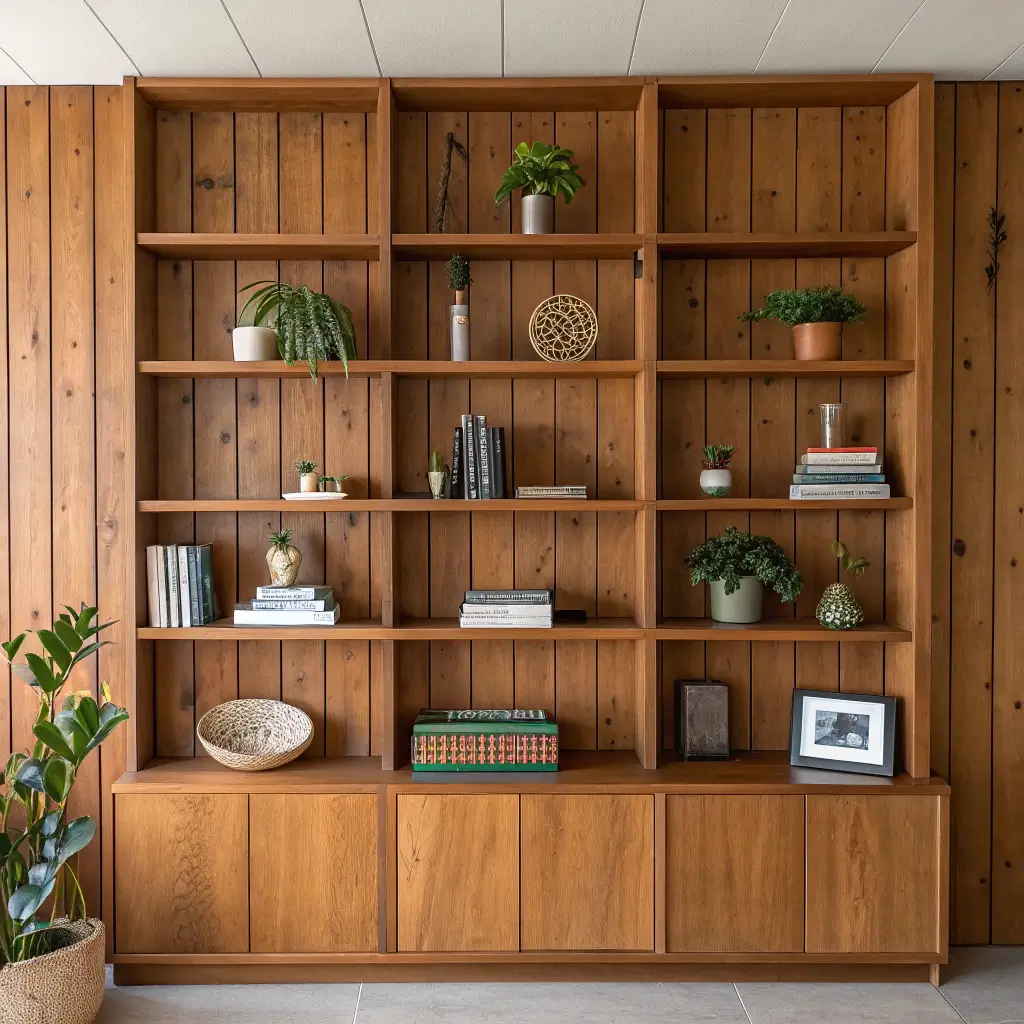
Integrating Shelves into Your Wooden Panel Wall
This is truly where your wooden panel wall becomes a statement piece, blending form and function seamlessly. Integrating shelves requires a bit of planning and the right attachment method to ensure they’re secure and can hold up your favorite items. Let me show you how!
| Shelf Integration Method | Difficulty | Typical Load Capacity | Suitability |
|---|---|---|---|
| Hidden Bracket / Floating Shelves | Medium | Moderate to High (if into studs) | Modern, minimalist, clean look. |
| Shelves with Visible Decorative Brackets | Easy-Medium | Moderate to High (if into studs) | Traditional, rustic, industrial, adds style. |
| Ledge-Style Shelves | Easy | Low (for lightweight items) | Minimalist display for small decor, photos, art. |
| **Shelves Built Into Panel Structure** | Advanced | Moderate to High (very custom) | Custom cabinetry feel, seamless integration. |
| Adjustable Shelving Systems | Medium | Moderate | Flexible display, adaptable to changing needs. |
Hidden Bracket / Floating Shelves
These shelves offer a wonderfully clean, modern look, making it seem like the shelf is floating directly out of the paneling. To install them, I first mark the exact location for my shelves. Then, I use a drill to create pilot holes for the floating shelf brackets, ensuring they go deep into the wall studs for maximum support. After securing the brackets, I slide the pre-drilled shelf board onto the protruding rods. It’s all about precise marking and drilling.
Shelves with Visible Decorative Brackets
If you love a more traditional, industrial, or even rustic aesthetic, visible decorative brackets are a fantastic choice. You’ll want to select brackets that complement your paneling style and finish. I always recommend marking the stud locations carefully, then attaching the brackets securely into the studs with screws. Once the brackets are firmly in place, you simply rest and then screw the shelf board onto the brackets from underneath.
Ledge-Style Shelves
These are super easy to create and are perfect for displaying lightweight items like photos, small plants, or thin art pieces. You can make them by simply attaching a piece of wood, maybe 3-4 inches deep, directly to your paneling. For better support, I try to fasten these into studs whenever possible, using wood screws, or by using a strong construction adhesive for very light items.
Shelves Built Into the Panel Structure
This is a more advanced but incredibly custom look, creating a seamless, built-in feel. If your paneling is thick enough (like solid wood planks or thicker plywood), you might route grooves or cut dado joints directly into the panels where the shelves will slide in. Alternatively, you can build a small frame or box structure that extends out from the wall before you install the surrounding panels. This creates dedicated alcoves or shelf units that are truly part of the paneling itself.
Adjustable Shelving Systems
For ultimate flexibility, you can incorporate adjustable shelf tracks or pegs into your panel design. This usually involves installing metal tracks (like those found in custom closets) vertically onto your studs before or during panel installation, and then cutting your panels to fit around them. Then, you can easily move shelves up and down using pins or clips. I find this especially useful for spaces where my display needs might change over time.
Load Bearing & Reinforcement
This is absolutely critical: always consider how much weight your shelves need to hold. The golden rule for load-bearing is to always anchor into wall studs. Hidden brackets, visible brackets, and even built-in shelf structures will be significantly stronger if they are securely screwed into the studs. If hitting a stud isn’t possible for a particular bracket, use heavy-duty wall anchors (toggle bolts or self-drilling anchors) rated for the weight you anticipate. For very heavy items, I might even add a piece of blocking (horizontal wood pieces) between the studs before the paneling goes up, just to create an extra secure anchor point behind the drywall. Don’t skip reinforcing for heavier items; it’s what makes your beautiful shelves truly functional and safe.
The Finishing Touches: Bringing It All Together
You’re almost there! These final steps are what truly transform a good DIY project into something that looks professionally done. It’s all about smoothing out the edges and creating that polished look.
Filling Gaps & Nail Holes
Now is the time to go back over your beautiful work. Use wood filler to carefully fill in all those tiny nail holes from your brad nailer. I also like to use paintable caulk along any seams where the paneling meets the ceiling, adjacent walls, or baseboards. This creates a really clean, finished line and hides any minor imperfections.
Final Sanding
Once your wood filler and caulk are completely dry, give everything a very light sanding with a fine-grit sandpaper (around 220-grit). This ensures all surfaces are perfectly smooth and ready for their final finish. Dust off all the sanding residue thoroughly before moving on.
Priming & Painting/Staining/Sealing
Finally, it’s time to bring your vision to life with color and protection!
- Prime: If you haven’t pre-primed, apply a high-quality primer, especially if you’re painting or working with MDF, to ensure excellent paint adhesion and an even finish.
- Paint/Stain: Apply your chosen paint or stain in thin, even coats, following the product instructions. Two coats are usually best for a durable, rich color.
- Seal: If you’re staining or painting in a moisture-prone area like a bathroom, I strongly recommend applying a clear sealant, such as a water-based polyurethane or polycrylic, for added protection against humidity and wear.
Troubleshooting Common Issues
Even with the best planning, sometimes little hiccups happen. Don’t worry, I’ve run into all sorts of things myself! Here are some common issues and my reassuring solutions.
- Uneven Walls: Oh, my nemesis! If your walls aren’t perfectly flat, your panels might not sit flush. I usually use a bit more construction adhesive in those dips and clamp the panel or use temporary brad nails in inconspicuous spots to hold it while the adhesive dries. A bit of caulk can also help blend minor inconsistencies.
- Wood Warping: This can happen if wood isn’t properly acclimatized to your home’s humidity before installation. If a panel warps slightly, try to secure it more firmly with nails into studs where possible. For minor warps, using strong construction adhesive and clamps can often pull it back into place as it dries.
- Panels Not Aligning: If you notice a panel isn’t perfectly plumb or level, sometimes you can gently nudge the next panel to compensate slightly. If it’s a significant misalignment, I find it’s better to carefully remove the offending panel, clean off the adhesive, and re-install it correctly. It’s frustrating, but a straight line is key!
- Shelves Sagging: This almost always points back to insufficient support. Check if your shelves are properly anchored into studs. If not, you might need to add more robust anchors or consider adding a central support bracket, especially for longer shelves or heavier items. Reinforcement is key here!
Safety First: Essential Precautions
Your safety is always my top priority! When you’re working with tools and materials, it’s really important to take every precaution to protect yourself and your home.
Always wear safety glasses to protect your eyes from flying debris and dust. A dust mask is also crucial, especially when sanding wood or cutting MDF, to prevent inhaling fine particles. When using power tools like miter saws or nail guns, put on hearing protection to prevent long-term damage.
Handle all power tools according to their instructions. Keep your work area clean and free of tripping hazards. And please, be extra mindful of electrical safety; always locate and avoid cutting into electrical wires in your walls. If you’re unsure, it’s always best to consult a professional.
Maintenance and Care for Your Wooden Panel Wall with Shelves
Once your beautiful wooden panel wall with shelves is complete, you’ll want to keep it looking its best for years to come. A little bit of care goes a long way!
Regular Cleaning
For general cleaning, I simply use a soft, damp cloth to wipe down the panels and shelves. If they’re painted or sealed, a mild, all-purpose cleaner diluted with water works well. Always avoid harsh chemicals or abrasive scrubbers, as these can damage the finish. For slat walls, a feather duster or vacuum with a brush attachment can help get into those nooks and crannies.
Addressing Scratches or Dents
Life happens, and sometimes your beautiful wood might get a little scratch or ding. For minor scratches on painted surfaces, a small touch-up with your leftover paint usually does the trick. For stained wood, you might be able to use a wood repair marker or a specific scratch repair kit. Deeper dents can sometimes be gently steamed out with a damp cloth and an iron, but always test in an inconspicuous spot first!
Re-finishing Over Time
Depending on wear and tear, and if you simply want a refresh, you might consider re-finishing your wall after several years. For painted surfaces, a light sanding and a fresh coat of paint will make it look brand new. For stained wood, you might need to lightly sand, re-stain, and then re-seal to bring back its original luster.
Cost & Time Breakdown
I know you’re probably wondering about the investment, both in terms of money and time. This project can vary quite a bit depending on your choices, but here’s a realistic range to help you plan:
Cost Breakdown:
- Materials (Wood, Shelves, Adhesive, Filler, Caulk): I usually estimate between $200 – $800 for an accent wall. If you choose premium hardwoods like oak or go for a very large wall, this could easily go up to $1000 – $2000+. MDF and pine are your budget-friendly heroes!
- Finishing Products (Paint/Stain, Primer, Sealant): Budget around $50 – $150.
- Tools (if purchasing): This is the most variable. If you need all the “must-have” power tools, it could be $300 – $800+. If you already have many tools or plan to rent, your cost will be much lower.
Time Breakdown:
- Planning & Design: Allow 2-4 hours (or more if you’re like me and love to visualize!).
- Material Shopping & Prep (Sanding, Cutting): Depending on the size of your project, this could be 4-10 hours.
- Installation (Panels & Shelves): For an average accent wall, I’d set aside 8-20 hours. This might be spread over a weekend or a few evenings.
- Finishing (Filling, Sanding, Painting/Staining): This part usually takes 4-12 hours, factoring in drying times between coats.
Overall, expect to spend anywhere from $300 to $1000+ and dedicate 1-3 full weekends or several evenings to complete a beautiful wooden panel wall with shelves. It’s an investment, but the payoff is so worth it!
Frequently Asked Questions About Wooden Panel Walls with Shelves
I always get so many wonderful questions about projects like this, so I’ve gathered some of the most common ones I hear!
- Can I install this on a textured wall? Yes, you definitely can! However, the textured surface will affect how well the adhesive grips and how flush your panels sit. For best results, I would recommend sanding down any heavily textured areas, like popcorn texture, or applying a skim coat of joint compound to create a smoother surface before installation.
- How do I hide wires and cables behind the paneling? This is a smart question! The best way is to plan for it. Before installing your paneling, you can run conduit or specific low-voltage wire channels directly on the wall and under the paneling. You can also drill small holes in your paneling for wires to pass through discreetly, or even route out channels on the back of thicker panels for wires to sit in.
- What’s the best way to clean my wooden panel wall? I find that a soft, slightly damp cloth is usually all you need for regular cleaning. For painted or sealed panels, a gentle all-purpose cleaner can be used. Avoid anything abrasive that could scratch the finish. For slat walls, a vacuum with a brush attachment works wonders for dust.
- How do I ensure my shelves are perfectly level? Always use a good quality level, both a long one for the overall span and a shorter one for individual checks. When marking your shelf locations, draw a perfectly level line. For floating shelves, make sure your brackets are installed level. For visible brackets, you can sometimes adjust the shelf slightly using shims under one side of the bracket before screwing it down.
- Can I remove the paneling later without damaging the wall too much? It’s possible, but it will likely involve some drywall repair. Because we use construction adhesive for strong adhesion, removing the panels will often pull off some of the drywall paper or even chunks of drywall. It’s usually not a quick fix, so plan your project to be a long-term addition.
Ready to Create Your Own Statement Wall?
Phew, we covered a lot of ground, didn’t we? I hope I’ve shown you that creating a wooden panel wall with shelves is a totally achievable and incredibly rewarding DIY project. Imagine the satisfaction of looking at that beautifully transformed wall, knowing you created it! It’s a truly special feeling.
I’m so excited for you to embark on this journey and bring such a beautiful, functional element into your home. Don’t be afraid to try; I truly believe if I can figure this out, so can you! If you have any questions, tips, or just want to share your project ideas, please leave a comment below. I absolutely love hearing from you and seeing your amazing work. Let’s make our homes feel like us, together! Welcome to the house with eva community!