

Your Dream Coop on a Dime
Imagine providing your backyard flock with a safe, comfortable home without emptying your wallet. The good news? It’s not just a dream! Across the country, thousands of resourceful chicken keepers are proving that a functional, durable low-cost DIY chicken coop is entirely achievable. In fact, many successful builders report constructing their entire coop for less than the cost of a single store-bought feeder, often leveraging clever budget hacks and readily available materials.
This comprehensive guide is your definitive resource, designed to empower you to build the ideal home for your chickens while saving a significant amount of money. You’ll discover everything from meticulous planning and ingenious material sourcing to step-by-step construction of a proven design, long-term maintenance, and smart budget-friendly upgrades. Get ready to transform your vision into a reality, demonstrating that a high-quality chicken coop doesn’t have to come with a high price tag.
TABLE OF CONTENTS
Essential Planning for Your Budget-Friendly Coop
Careful planning is the cornerstone of any successful building project, especially when you’re aiming for a low-cost DIY chicken coop. Skipping this crucial stage can lead to costly mistakes, wasted materials, and a coop that doesn’t meet your flock’s needs or local regulations.
Determining Flock Size & Coop Dimensions
Knowing your flock size is the first step. Chickens need adequate space to thrive, reducing stress and preventing health issues. As a general rule:
- Coop Interior (for roosting/nesting): Aim for at least 2-4 square feet per standard-sized chicken.
- Run (for outdoor exercise): Provide 8-10 square feet per standard-sized chicken.
Consider your future plans – will your flock grow? Building slightly larger now can prevent needing to expand or rebuild later.
Choosing the Right Location
The perfect spot for your budget chicken coop plans considers several factors:
- Sun & Shade: A balance is key. Summer shade from trees or structures protects from overheating, while winter sun exposure can help warm the coop.
- Drainage: Avoid low-lying areas where water collects. Good drainage prevents muddy runs and damp coop conditions, which can lead to illness.
- Security: Position the coop away from heavy foot traffic but within sight for easy monitoring. Consider proximity to your home for predator deterrence.
Navigating Local Regulations & Permits
This step is non-negotiable and often overlooked. Local ordinances dictate everything from how many chickens you can keep to the size, distance from property lines, and even aesthetic requirements of your coop.
How to Research Your Local Chicken Coop Laws Online:
- Start with Your Municipality’s Website: Look for sections on “zoning,” “animal control,” “bylaws,” or “building permits.”
- Search Specific Terms: Use “chicken keeping ordinance [your city/county]” or “backyard chickens [your city/county] regulations.”
- Contact Your Local Planning Department: If online information is unclear, a quick call or email to your city’s planning or animal control department can provide definitive answers.
- Community Forums: Local online groups for chicken keepers can offer insights, but always verify information with official sources.
Core Needs of a Coop
Regardless of how simple or cheap your homemade chicken coop is, it must meet these fundamental requirements:
- Roosts: Elevated perches for chickens to sleep on, protecting them from predators and parasites. Provide at least 8-10 inches of roosting space per bird.
- Nesting Boxes: Private, dark spaces for hens to lay eggs. Aim for one 12×12 inch box for every 3-4 hens.
- Ventilation: Crucial for air circulation, removing ammonia buildup, and preventing respiratory issues. Ensure upper and lower vents, but avoid direct drafts on roosting chickens.
- Predator-Proofing Basics: Secure latches, hardware cloth (not chicken wire!) for openings, and solid construction to deter common predators.
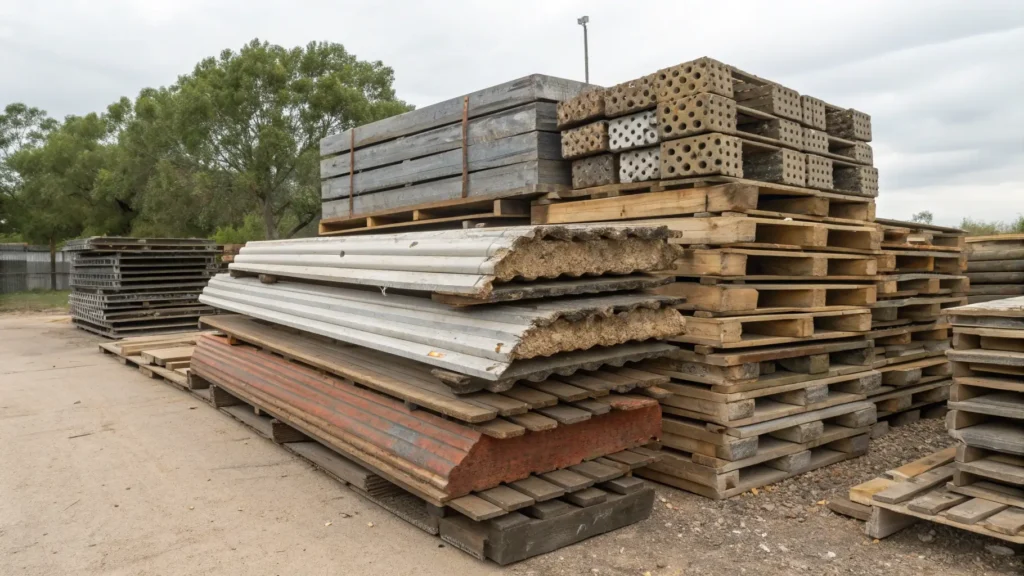
Smart Sourcing: Finding Free & Low-Cost Materials
The secret to a truly low-cost DIY chicken coop lies in smart material sourcing. With a little ingenuity and effort, you can significantly reduce your material costs, sometimes even building a coop for nearly free!
Top Sources for Free Materials
- Pallets: Excellent source of free lumber. Look for “HT” (heat-treated) stamps, avoiding “MB” (methyl bromide) treated pallets.
- Reclaimed Wood: Old fence boards, discarded deck wood, renovation scraps, or even old furniture pieces can be repurposed.
- Scrap Metal: Corrugated roofing sheets from old sheds, scrap siding, or metal signage can be used for roofing or cladding.
- Old Windows & Doors: Perfect for adding light, ventilation, and access points. Ensure they are secure and free of lead paint.
Where to Look
The hunt for free and cheap chicken coop materials can be an adventure!
- Craigslist/Facebook Marketplace (Free Section): Constantly updated listings for free building materials, appliances, and furniture.
- Construction Sites: With permission, you can often acquire scrap lumber, drywall, or roofing materials that would otherwise be discarded.
- Local Businesses: Hardware stores, lumber yards, appliance stores, and furniture shops often have damaged or excess pallets they’re happy to give away.
- Community Groups & Freecycle: Online groups are great for finding neighbors giving away old sheds, lumber, or gardening supplies.
Affordable New Materials
While aiming for free, some items are best bought new for safety and durability:
- Hardware Cloth: Essential for predator-proofing. Buy 1/2 inch or 1/4 inch galvanized hardware cloth. It’s an investment, but non-negotiable for security.
- Roofing Options: Roll roofing, tarps (heavy-duty), or salvaged corrugated metal are cheaper than shingles.
- Fasteners: Screws (exterior grade), nails, and hinges are relatively inexpensive and critical for structural integrity.
Evaluating Material Quality & Safety
Always inspect free materials carefully. Check for:
- Rot or Mold: Especially in wood.
- Pesticide/Chemical Stains: Avoid anything that looks suspicious or has an unusual odor.
- Sharp Edges/Protrusions: Ensure materials are safe for chickens.
- Structural Integrity: Is the material strong enough for its intended purpose?
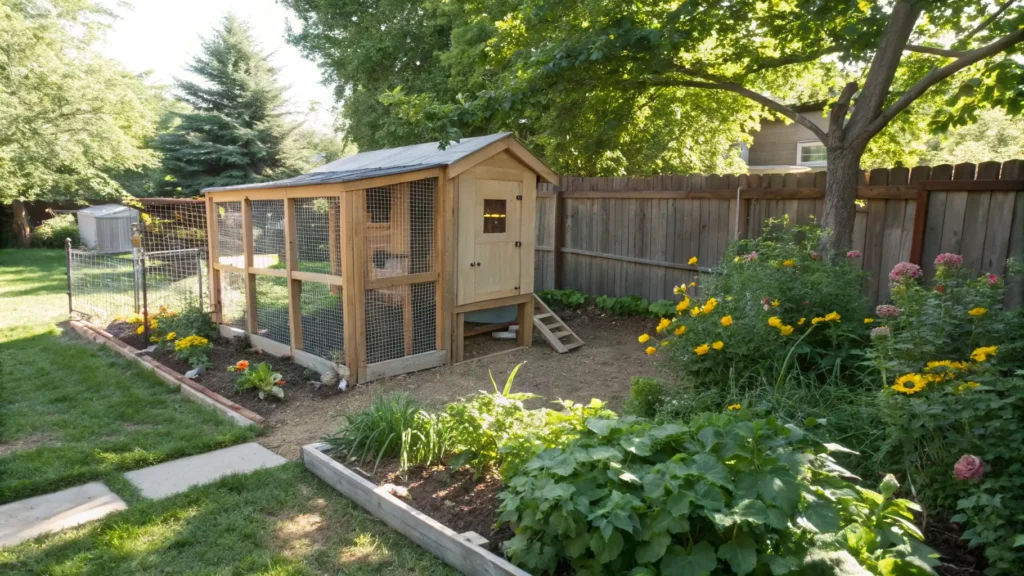
Top Low-Cost DIY Chicken Coop Designs & Plans (with Comparison)
Choosing the right design for your easy chicken coop plans is a blend of functionality, cost, and your building skill level. Here, we present a range of budget-friendly options, complete with a comparison to help you decide.
Design Overview & Photo Gallery
Here’s a look at popular low-cost designs that empower you to build a functional homemade chicken coop without breaking the bank:
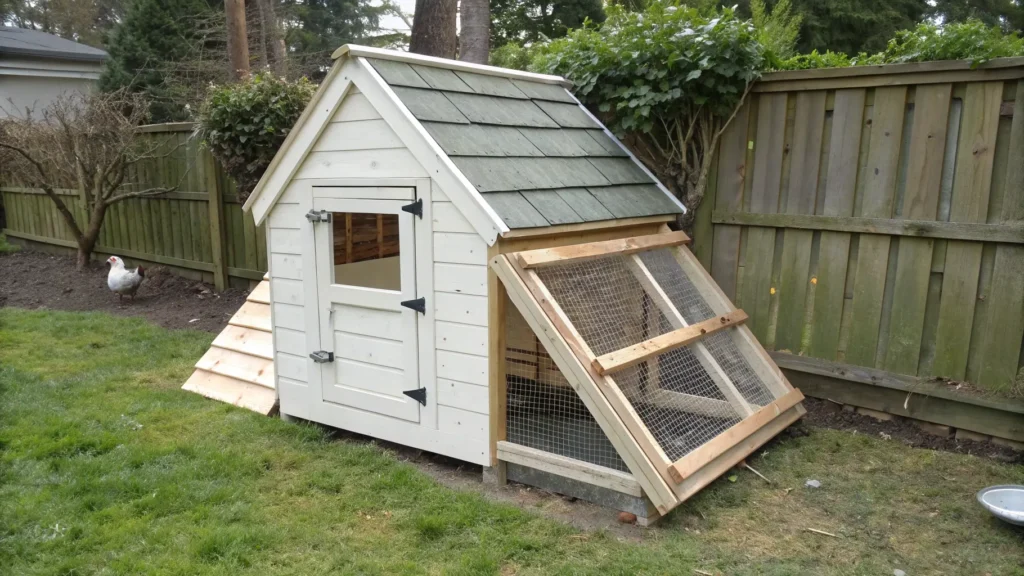
- A-Frame Coop: Simple, iconic design, often uses less material.
- Estimated Cost Range: $50 – $150
- Difficulty Level: Beginner
- Pros: Easy to build, good ventilation, often mobile.
- Cons: Limited head height, smaller capacity.
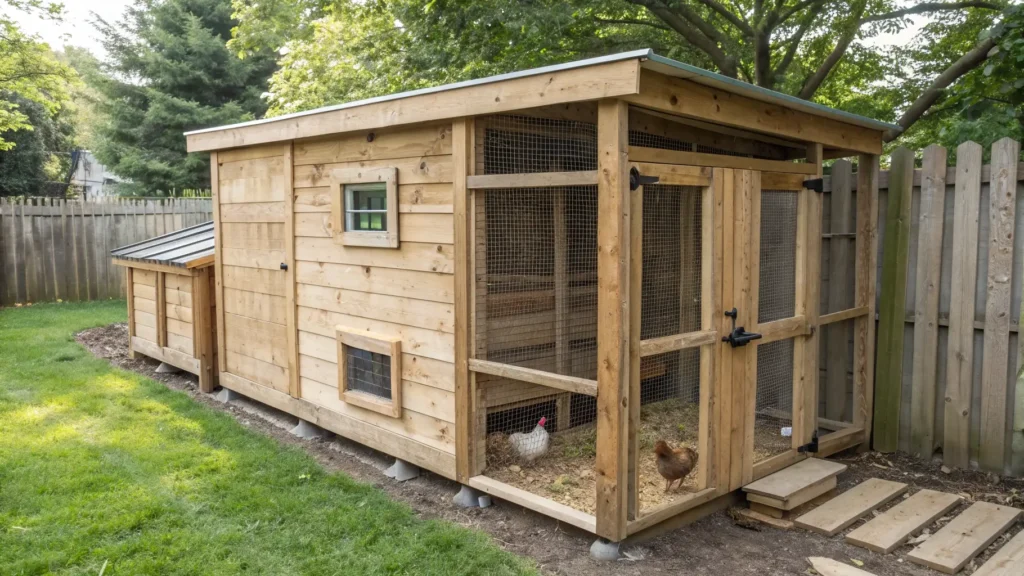
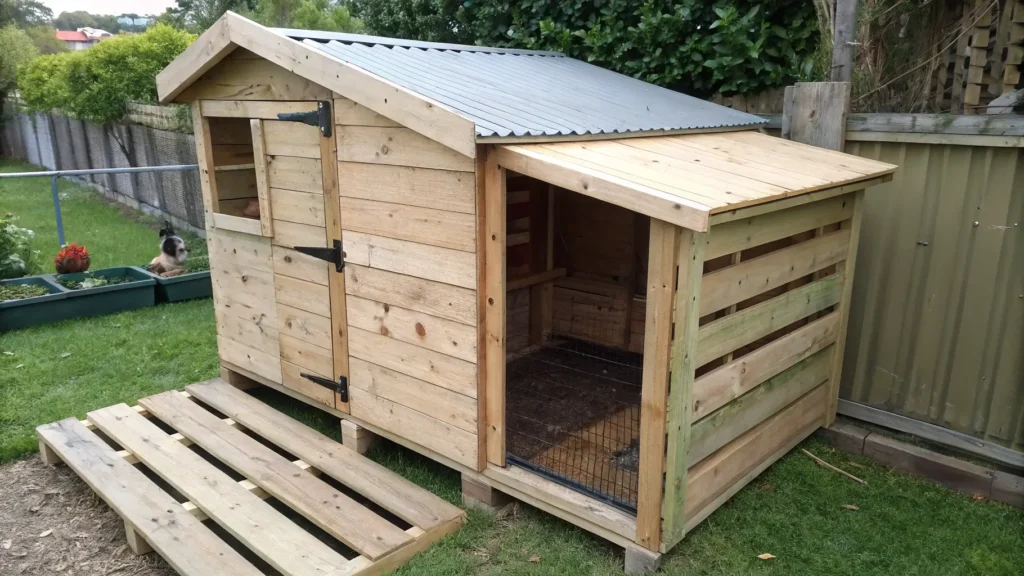
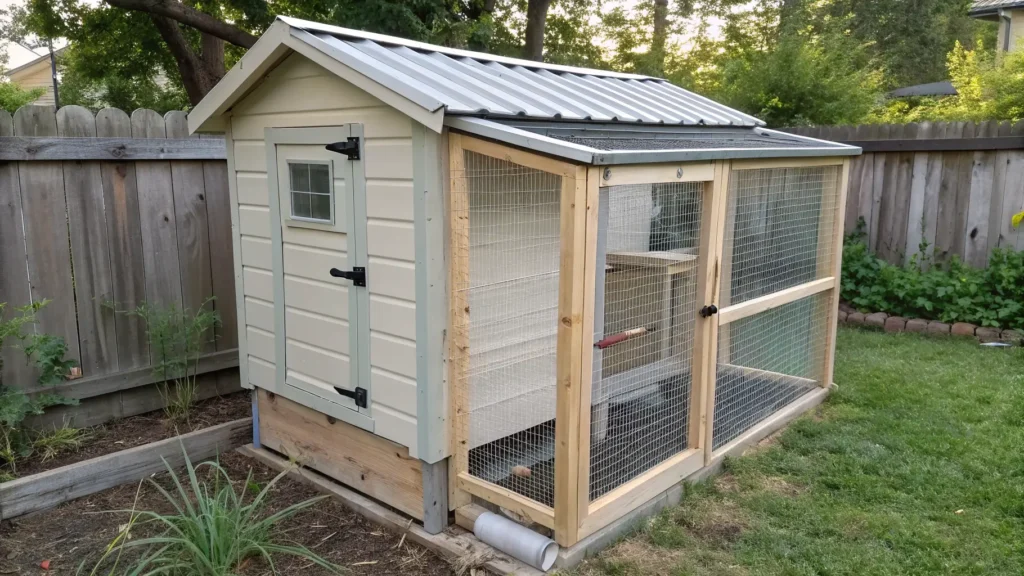
- Simple Shed Coop: More traditional, mimics a small shed.
- Estimated Cost Range: $100 – $300
- Difficulty Level: Intermediate
- Pros: More internal space, easier access for cleaning, customizable.
- Cons: Uses more materials, potentially heavier.
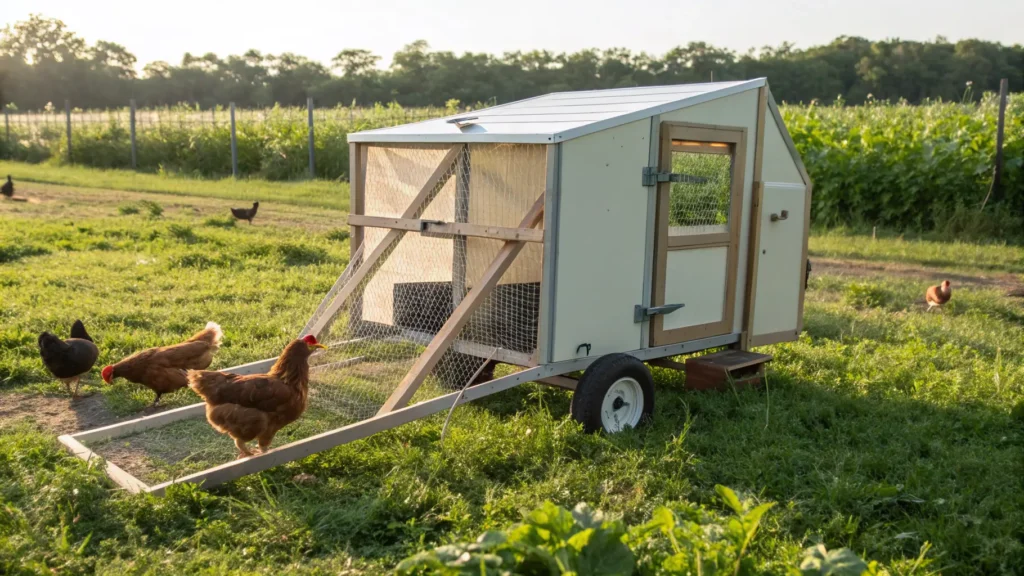
- Tractor Coop (Chicken Tractor): Mobile coop with an integrated run.
- Estimated Cost Range: $75 – $250
- Difficulty Level: Beginner to Intermediate
- Pros: Allows chickens to forage new ground, fertilizes yard, pest control.
- Cons: Needs to be moved regularly, limited protection in severe weather.
- Pallet Coop Variations: Utilizes free pallets as the primary building material.
- Estimated Cost Range: $0 – $100
- Difficulty Level: Intermediate (pallet deconstruction adds complexity)
- Pros: Extremely low material cost, strong structure, highly customizable.
- Cons: Requires effort to dismantle pallets, can be heavy.
- PVC Frame Coop: Lightweight, often covered with hardware cloth and tarp.
- Estimated Cost Range: $50 – $150
- Difficulty Level: Beginner
- Pros: Very lightweight, easy to move, quick to assemble.
- Cons: Less predator-resistant, requires careful anchoring, not as insulated.
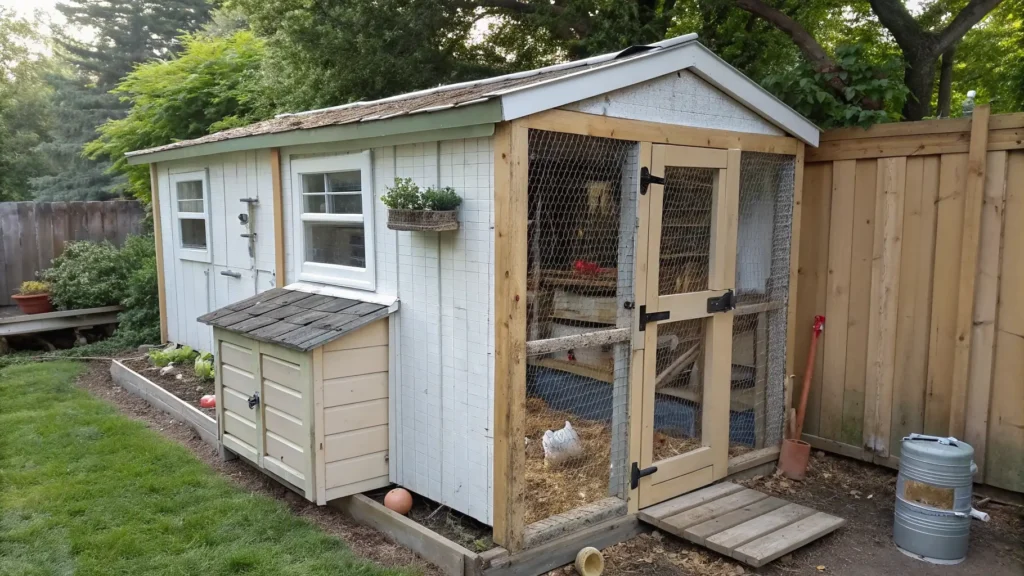
- Upcycled Structures: Transforming old dog houses, playhouses, or sheds.
- Estimated Cost Range: $0 – $100
- Difficulty Level: Beginner (if structure is sound)
- Pros: Minimal building required, often free structure.
- Cons: May need significant modifications, limited design flexibility.
| Design Type | Estimated Cost | Build Time | Skill Level | Required Tools | Ideal Flock Size |
|---|---|---|---|---|---|
| A-Frame | $50 – $150 | 1-2 days | Beginner | Hand saw, drill, hammer | 2-4 chickens |
| Simple Shed | $100 – $300 | 2-4 days | Intermediate | Circular saw, drill, level | 4-8 chickens |
| Tractor Coop | $75 – $250 | 2-3 days | Beg/Int | Hand saw, drill, casters | 3-6 chickens |
| Pallet Coop | $0 – $100 | 3-5 days | Intermediate | Pry bar, circular saw, drill | 4-8 chickens |
| PVC Frame | $50 – $150 | 1 day | Beginner | PVC cutter, drill, tape measure | 2-5 chickens |
| Upcycled Structure | $0 – $100 | 1-3 days | Beginner | Varies based on structure | Varies |
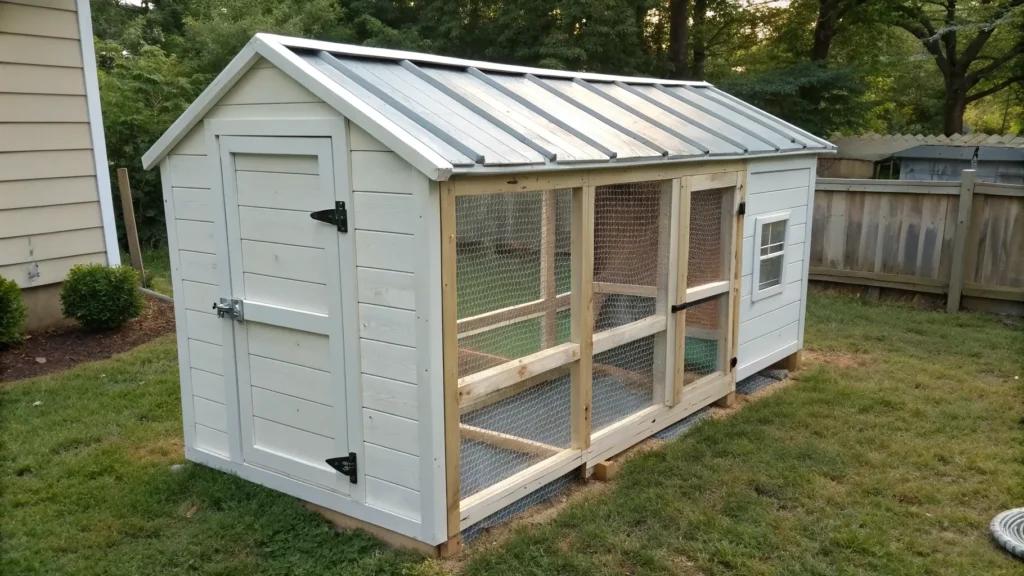
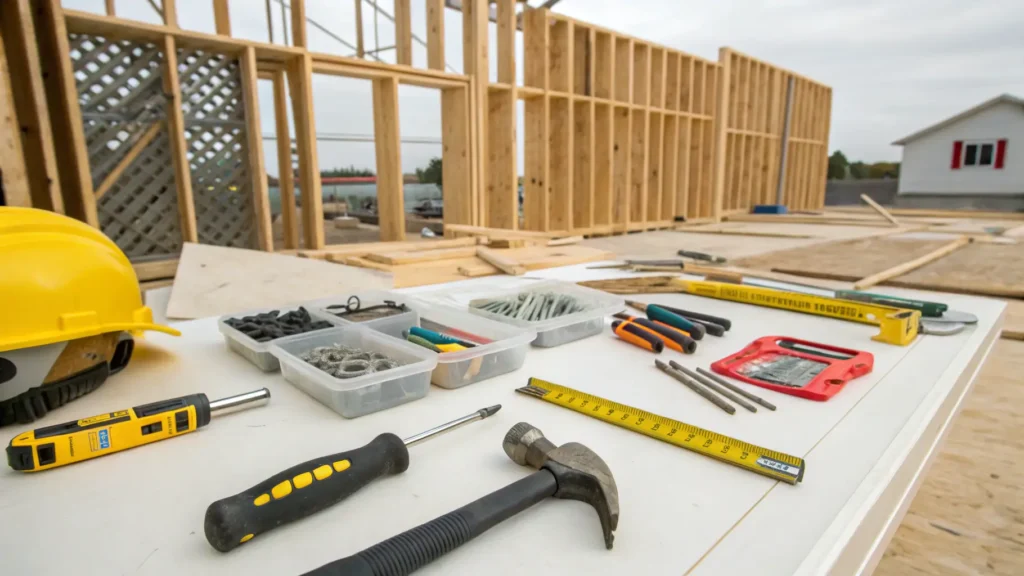
Step-by-Step Build: Your First Low-Cost Pallet & Reclaimed Wood Coop
This section provides a detailed guide for building a durable low-cost DIY chicken coop using pallets and reclaimed wood – a fantastic way to maximize savings without compromising quality. This design is robust, provides ample space, and is adaptable for various climates.
Tools & Materials List
(with budget-friendly alternatives)
Tools:
- Pry bar and hammer (for pallet deconstruction)
- Circular saw or hand saw
- Drill/driver with various bits
- Measuring tape, pencil, speed square
- Level
- Staple gun (for hardware cloth)
- Wire cutters
Materials:
- 6-8 Heat-treated wooden pallets (free from local businesses)
- Reclaimed wood for framing and cladding (old fence pickets, deck boards)
- 2x4s or 2x3s (can be reclaimed or low-cost new lumber for critical structural points)
- Hardware cloth (1/2 inch galvanized) – Essential new purchase!
- Roll roofing, tarps, or salvaged corrugated metal (for roofing)
- Exterior wood screws (various lengths) and nails
- Heavy-duty hinges (for door and nest box lid)
- Secure latches (predator-proof)
- Plexiglass or old window (for ventilation/light)
- Optional: Paint or sealant (exterior grade)
Step 1: Prepare Your Materials
- Pallet Breakdown: Carefully dismantle your pallets using a pry bar and hammer. Save all the boards and solid stringers. Wear gloves and eye protection.
- Budget Hack: Don’t discard broken or short pieces; they can be used for bracing or smaller components.
- Inspect & Clean: Remove all nails, sand rough edges, and clean the reclaimed wood. Treat if necessary for pests, but avoid harsh chemicals.
- Cut List: Refer to your downloadable cut list and begin cutting your lumber to size for the base, walls, and roof.
Step 2: Build the Base Frame
- Foundation: Create a sturdy rectangular base frame using 2x4s or the strongest pallet stringers. This will be the footprint of your coop.
- Elevate: Attach sturdy legs or place the base on concrete blocks to elevate the coop, preventing moisture damage and deterring burrowing predators.
- Budget Hack: Use cut-off sections of heavy-duty pallet stringers for legs.
Step 3: Construct the Walls & Door Frame
- Wall Frames: Build four wall frames using lighter pallet wood or reclaimed lumber, matching the dimensions from your plans.
- Attach to Base: Securely fasten the wall frames to the base frame.
- Door & Window Openings: Frame out openings for the main access door, chicken pop-door, and any windows you plan to incorporate.
- Budget Hack: Use old cabinet doors or shutters for your chicken pop-door and main access door if you can find them.
Step 4: Install Roofing
- Roof Frame: Build a simple A-frame or single-slope roof frame on top of your walls, creating an overhang to protect from rain.
- Attach Roofing Material: Secure your chosen budget roofing material (roll roofing, corrugated metal, or heavy tarp) to the frame. Overlap sections properly to prevent leaks.
- Budget Hack: Secure tarps with furring strips and screws rather than just staples for better longevity.
Step 5: Add Essential Features
- Roosts: Install smooth, rounded roosting bars inside the coop, elevated 1-2 feet off the ground.
- Nest Boxes: Construct simple nesting boxes from leftover wood, ensuring they are dark and easily accessible for egg collection.
- Ventilation: Cut openings for upper and lower vents. Cover all openings with 1/2 inch hardware cloth to prevent predator entry.
- Budget Hack: Use an old plastic milk crate turned on its side with a wooden front for a simple, cheap nesting box.
Step 6: Predator Proofing & Finishing Touches
- Hardware Cloth: Cover all windows, vents, and the pop-door opening with galvanized 1/2 inch hardware cloth, stapling it securely.
- Doors & Latches: Install your main door and chicken pop-door. Attach heavy-duty, predator-proof latches (e.g., barrel bolts or double-hook and eye).
- Exterior Finish: Consider painting or sealing your reclaimed wood to protect it from the elements and extend its lifespan.
- Budget Hack: Leftover exterior house paint or stain can often be found cheaply at hardware store “oops” sections or online marketplaces.
Essential Features & Upgrades on a Shoestring Budget
Even with a low-cost DIY chicken coop, you don’t have to sacrifice functionality or your flock’s comfort. Many essential features can be added using recycled items and clever DIY techniques.
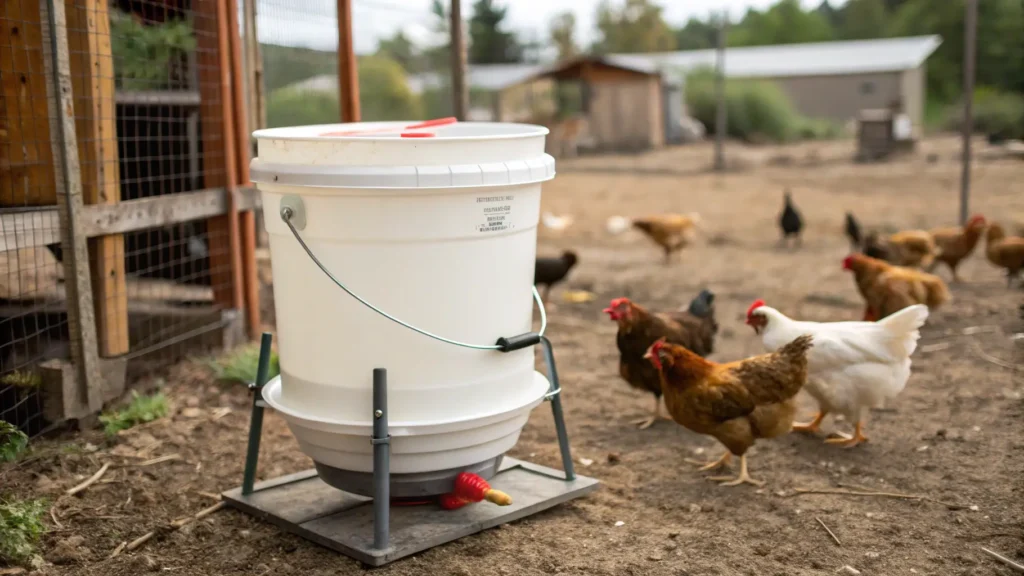
DIY Feeders & Waterers from Recycled Items
- PVC Feeders: A simple length of 3-4 inch PVC pipe, with a cap on the bottom and a feed port cut near the base, can gravity-feed chicken food.
- Bucket Waterers: A 5-gallon bucket with poultry nipples or a small tray attached to the bottom creates an excellent, clean water source.
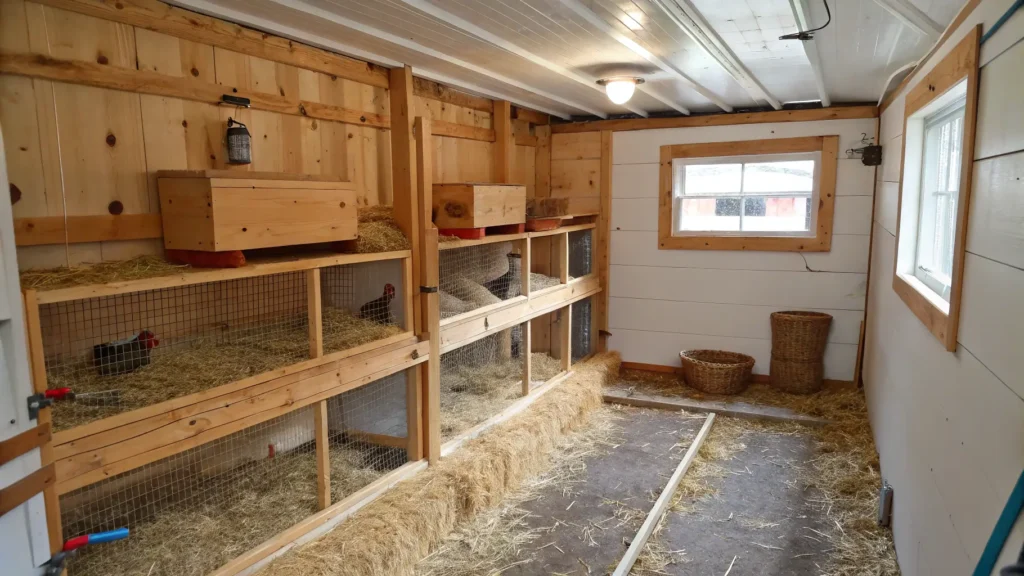
Budget-Friendly Roosting Bars & Nesting Boxes
- Roosting Bars: Use smooth, sturdy branches from your yard, old broom handles, or leftover 2×2 lumber. Ensure they are securely fastened and wide enough for chickens to comfortably perch.
- Nesting Boxes: Besides milk crates, old plastic bins, wooden wine boxes, or even tire sections can be transformed into cozy nesting spots. Line them with straw or pine shavings.
Smart Ventilation & Insulation Hacks
- Ventilation: Beyond hardware cloth-covered openings, consider small gaps under the eaves or a hinged vent at the peak of the roof. Use natural convection – warm air rises, so vents at the top help pull fresh air in from lower vents.
- Insulation: For colder climates, line walls with flattened cardboard boxes, old blankets, or even thick layers of newspaper between inner and outer wall layers. Just ensure it’s not accessible to pecking chickens.
Affordable Predator-Proofing Measures
- Skirt: Extend hardware cloth around the base of your coop and bury it 6-12 inches deep and 12-18 inches out to prevent digging predators.
- Secure Doors: Always double-check latches and ensure all openings are covered with 1/2-inch hardware cloth.
- Motion Lights/Alarms: Solar-powered motion-activated lights or a simple bell on the coop door can deter nocturnal predators.
Adding a Low-Cost Chicken Run
A secure run is vital.
- Frame: Use inexpensive fence posts, salvaged wood, or even thick bamboo poles for the frame.
- Covering: Hardware cloth is the best for security, but chain link fencing or strong garden netting can work for the top if secured against climbing predators.
- Dig Skirt: Bury hardware cloth around the perimeter of the run, just like the coop, to prevent digging.
Beyond the Build: Maintaining Your Low-Cost Coop for Longevity
Building a low-cost DIY chicken coop is a fantastic achievement, but its durability and functionality depend heavily on ongoing maintenance. While budget materials might save you money initially, smart upkeep ensures they last.
Regular Cleaning & Maintenance Schedule
Consistency is key to extending the life of your coop and keeping your flock healthy.
- Daily: Spot clean droppings, replenish food and water.
- Weekly: Change nesting box litter, rake the run, check for pests.
- Monthly: Deep clean coop interior, replace bedding, inspect for damage.
- Seasonally: Inspect roof, walls, and foundation for wear and tear, tighten screws, and refresh exterior sealants if needed.
Identifying & Repairing Common Wear & Tear on Budget Materials
Budget materials might show signs of wear sooner, but they are often easy to repair.
- Reclaimed Wood: Check for splintering, rot, or insect damage. Replace damaged sections or reinforce them.
- Tarps/Roll Roofing: Inspect for rips or tears, especially after strong winds. Patch with roofing tar or heavy-duty tape, or replace the section.
- Hardware Cloth: Look for bent or broken sections, especially near the ground. Repair immediately to maintain predator security.
Preventing Pests & Disease in a Low-Cost Setup
Good hygiene is your best defense.
- Ventilation: Ensure consistent airflow to prevent moisture buildup and reduce ammonia, which can lead to respiratory issues.
- Dry Bedding: Keep bedding dry to deter mites and other parasites. Use absorbent materials like pine shavings or chopped straw.
- Regular Inspections: Routinely check your chickens for mites, lice, and signs of illness. USDA.gov
When to Repair vs. Replace (Cost-Benefit Analysis)
- Repair: If the damage is localized, minor, and easily fixed with inexpensive materials (e.g., patching a small roof tear, replacing a single rotten board), repair is often the most cost-effective solution.
- Replace: If the structural integrity is compromised, widespread rot or pest infestation occurs, or constant repairs are draining your time and money, it’s time to consider replacing a section or even the entire coop. Factor in the cost of your time and effort.
Common Budget Coop Mistakes & How to Avoid Them
Building a low-cost DIY chicken coop is rewarding, but prioritizing budget can sometimes lead to pitfalls. Being aware of these common mistakes will save you time, money, and potential heartbreak.
- Underestimating Size/Ventilation: A cramped, poorly ventilated coop leads to stressed, unhealthy chickens and can cause issues like frostbite, respiratory problems, and ammonia buildup. Always err on the side of more space and ample, draft-free ventilation.
- Inadequate Predator Proofing: This is the most critical mistake. “Chicken wire” only keeps chickens in, it doesn’t keep predators out. Always use 1/2-inch or 1/4-inch galvanized hardware cloth, securely fastened, on all openings. Bury a hardware cloth skirt around the coop base.
- Neglecting Weather Protection: A homemade chicken coop needs to protect your flock from rain, snow, wind, and extreme temperatures. Ensure a waterproof roof, solid walls, and the ability to close off excessive drafts in winter.
- Using Unsafe Materials: Avoid treated wood (unless specifically “HT” for heat-treated pallets), wood with sharp splinters, or materials painted with lead-based paint. Always prioritize your flock’s safety.
- Overlooking Regulations: Failing to research local zoning laws can result in fines or being forced to dismantle your coop. Always check permits and ordinances first.
| Issue | Low-Cost Solution | Expert Tip |
|---|---|---|
| Damp/Smelly Coop | Improve ventilation with added screened vents. | “Add a layer of sweet PDZ or wood ash under bedding.” |
| Mites/Pests | Deep clean, use diatomaceous earth (food grade). | “Dust roosts regularly; use plastic roosts if possible.” |
| Predator Attack | Reinforce weak spots with hardware cloth, double latches. | “Bury a hardware cloth skirt; add motion lights.” |
| Leaky Roof | Patch with roofing tar or replace damaged section. | “Overlap roofing materials significantly.” |
| Wood Rot | Cut out and replace small rotten sections; seal new wood. | “Elevate coop base; ensure good drainage around coop.” |
FAQ: Your Low-Cost DIY Chicken Coop Questions Answered
We’ve compiled answers to the most common questions about building an affordable chicken coop, designed to help you confidently move forward with your project.
How much does a DIY coop really cost?
The cost of a low-cost DIY chicken coop can vary dramatically, from nearly free (if you source most materials for free, like pallets and reclaimed wood) to $200-$400 for a more substantial build using some new materials. Our featured pallet coop can often be built for under $100 for all new hardware, with the wood being free!
Can I build a coop for free?
Yes, it is absolutely possible to build a functional chicken coop for free! This requires diligent sourcing of materials like pallets, old fence boards, scrap lumber, and discarded windows/doors. The only costs might be for essential items like hardware cloth and screws, which are vital for safety and durability.
What’s the easiest budget coop for beginners?
The A-frame coop or a simple upcycled structure (like an old dog house or shed) are generally the easiest for beginners. They require fewer cuts, less complex framing, and can be assembled relatively quickly.
How long does it take to build a cheap coop?
Depending on your skill level, the complexity of the design, and the time spent sourcing materials, a low-cost DIY chicken coop can take anywhere from a weekend (for a very basic design or upcycled structure) to 3-5 days for a more involved project like our pallet coop.
Are pallet coops safe?
Yes, pallet coops can be very safe and durable if built correctly. Ensure you use heat-treated (HT) pallets, not chemically treated (MB) ones. Dismantle them carefully, remove all nails, and secure all joints properly. The robust nature of pallet wood makes for a strong structure when assembled well.
Conclusion: Build Your Dream Coop, Your Way
Embarking on the journey to build your own low-cost DIY chicken coop is an incredibly rewarding endeavor. You’ve now seen that creating a safe, functional, and aesthetically pleasing home for your flock doesn’t require a hefty budget. By meticulously planning, creatively sourcing materials, and following proven construction methods, you can achieve remarkable results.
Remember, this guide has provided you with the tools from detailed plans and comparison tables to essential budget hacks and maintenance tips to build with confidence. Whether you opt for a free pallet coop or a clever upcycled design, the satisfaction of a self-built coop, tailored perfectly to your chickens and your budget, is unmatched. Start planning today, gather your materials, and bring your vision of a low-cost DIY chicken coop to life. Your chickens (and your wallet) will thank you!