

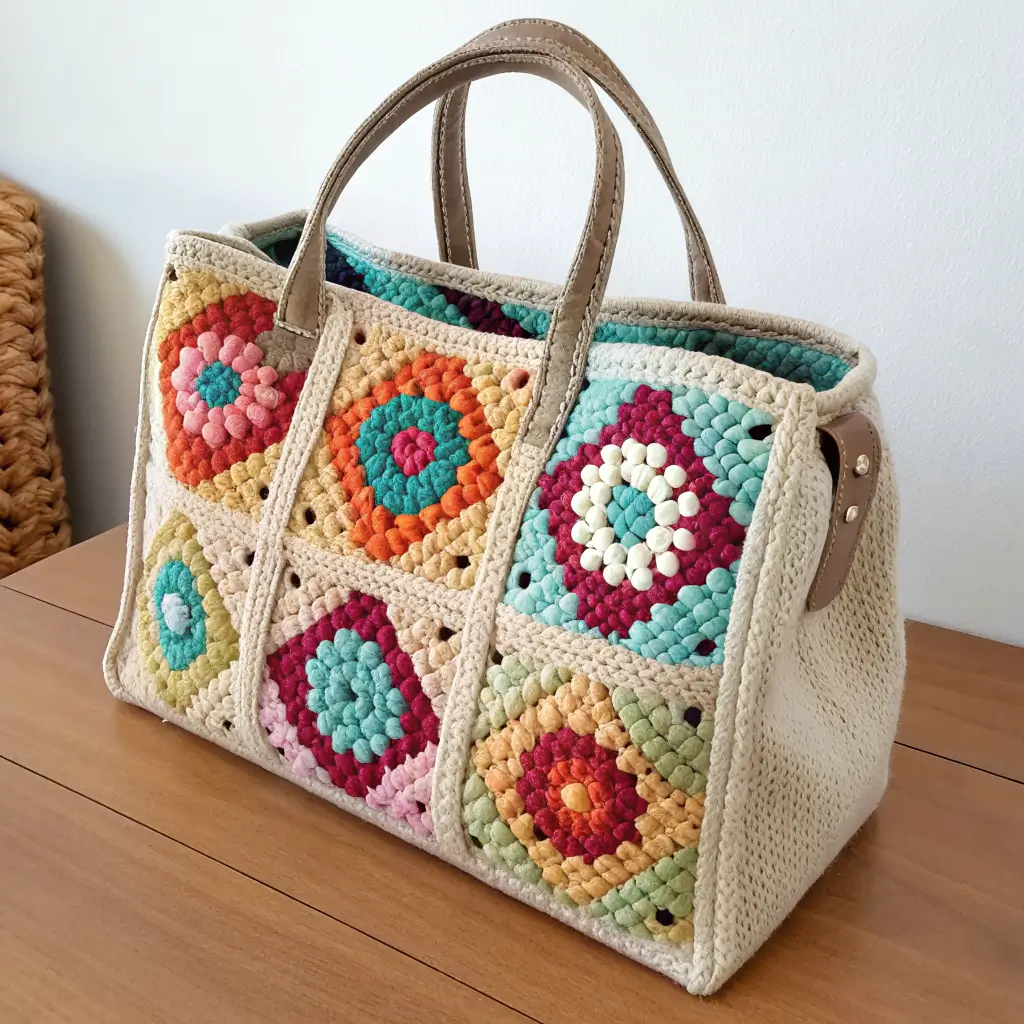
Oh, the sheer joy of a Granny Square Crochet Bag! I remember the first time I pieced one together, a patchwork of vibrant colors that seemed to tell its own story. It felt like I was creating a little bit of magic, something both beautiful and incredibly practical. If you’ve ever found yourself admiring those charming, handcrafted bags, or if you’re looking for a project that combines tradition with personal style, then you’ve landed in just the right spot. I’m here to walk you through every step of making your very own, whether you’re just picking up a hook for the first time or you’re a seasoned crocheter seeking fresh ideas. It’s a truly rewarding journey, and I’m so excited to share it with you!
TABLE OF CONTENTS
Why Every Crocheter Needs a Granny Square Crochet Bag
There’s something truly special about a Granny Square Crochet Bag that makes it a must-have project for any crafting enthusiast. For me, it’s the perfect blend of tradition and endless possibilities. These bags aren’t just stylish, they’re incredibly versatile and truly eco-friendly, allowing you to use up those lovely yarn scraps you’ve been saving.
I love how each square becomes a tiny canvas, and when joined, they transform into a unique statement piece. It’s a fantastic way to develop your crochet skills, moving from basic stitches to intricate assembly, all while creating something beautiful and completely customized to your taste. Plus, there’s nothing quite like the pride of carrying a bag you’ve made with your own hands.
Getting Started: The Essential Foundations for Your Granny Square Crochet Bag
Before we dive into the colorful world of granny squares, let’s make sure we have all our ducks in a row. Setting a solid foundation is key to a joyful and successful project, and I want you to feel confident every step of the way.
Skill Level & Key Stitches for Your Granny Square Crochet Bag
When it comes to crafting a Granny Square Crochet Bag, I think it’s a wonderfully accessible project. I consider it suitable for beginners who are comfortable with the absolute basics, or ambitious beginners ready for a slight challenge. You’ll primarily need to know just a few fundamental crochet stitches.
I always tell my friends that if you can master these, you’re golden:
- Chain (ch): The foundation of almost every crochet project.
- Slip Stitch (sl st): Used to join stitches or rounds.
- Single Crochet (sc): A basic, dense stitch.
- Double Crochet (dc): A taller, looser stitch that forms the classic granny square clusters.
Don’t worry if these sound intimidating; they are foundational stitches and surprisingly easy to learn with a little practice!
Gathering Your Supplies: Yarn, Hook, and Notions
Gathering your supplies is like preparing for a fun adventure. You’ll want to make sure you have everything you need before you start, so there are no interruptions to your creative flow!
Yarn Deep Dive
Choosing the right yarn for your Granny Square Crochet Bag is really important for its durability and how it holds its shape. I love experimenting with different types, but for a bag, you’ll want something sturdy. Yarn weight also impacts the final look and feel; a thicker yarn will create a larger, stiffer square, while a lighter weight will result in a more delicate, drapey bag.
Here’s a little comparison of some popular yarn types I’ve used for bags:
| Yarn Type | Pros | Cons | Best Uses |
|---|---|---|---|
| Cotton | Stiff, durable, great stitch definition, holds shape well. | Less soft, can be heavy when wet, limited stretch. | Market bags, structured totes, bags needing firmness. |
| Acrylic | Washable, wide color range, affordable, lightweight. | Can pill, less breathable, may stretch over time. | Everyday bags, kid’s bags, projects where washability is key. |
| Wool Blends | Good drape, warm feel, natural fibers, durable. | Can be expensive, may felt if washed incorrectly, not always vegan. | Fashion bags, structured but soft bags, winter accessories. |
Hook Size
Matching your hook size to your chosen yarn weight is vital. The yarn label usually provides a recommended hook size, but I always remind people that it’s just a suggestion. Your personal tension plays a huge role! A smaller hook creates a tighter, denser fabric, which is great for a bag that needs to hold its shape. A larger hook will result in a looser, more drapey fabric.
Essential Notions
Beyond yarn and hook, you’ll need a few trusty sidekicks:
- Tapestry Needle: For weaving in ends and joining squares neatly.
- Scissors: A small, sharp pair is a must-have.
- Stitch Markers: These are my best friends for keeping track of rounds or specific stitches, especially when I’m working on multiple squares.
- Tape Measure: For checking gauge and bag dimensions.
- Optional Items: Buttons, bag hardware (like D-rings for straps), or a fabric lining if you want to add an extra touch of polish.
Pro Tip
I always recommend using stitch markers, especially if you’re new to granny squares or working on a complex color pattern. They save so much frustration and help you keep your stitch counts accurate!
The Importance of Gauge for Your Crochet Bag
I know, I know, gauge swatches can feel like an extra step you want to skip. But trust me, for a Granny Square Crochet Bag, understanding gauge is crucial! Gauge simply refers to the number of stitches and rows per inch (or centimeter) in your crochet fabric. It ensures that your finished squares are the correct size and, consequently, your bag turns out exactly as you planned.
To make a gauge swatch, crochet a small square of your granny square pattern (say, 3-4 rounds). Then, lay it flat and measure it. If your square is larger than the pattern suggests, try a smaller hook. If it’s too small, try a larger hook. Adjusting your hook size is the easiest way to achieve the desired dimensions, and it makes all the difference for a well-proportioned bag.
Understanding Pattern Notes & Abbreviations
Crochet patterns have their own language, and once you learn it, it opens up a whole new world! Always read through the pattern notes first; they often contain important information like working with two strands of yarn, special stitch explanations, or specific construction tips.
Here’s a quick list of standard US crochet abbreviations you’ll often encounter:
- ch: chain
- sl st: slip stitch
- sc: single crochet
- dc: double crochet
- tr: treble crochet
- st(s): stitch(es)
- sp: space
- rnd: round
- yo: yarn over
- *** to *:** repeat instructions between asterisks
It’s also worth noting that crochet terms can differ between US and UK patterns. Most patterns will specify which terms they use, but if you’re ever unsure, a quick online search for “US to UK crochet term conversion” can clarify things in a jiffy!
Crafting Your Perfect Granny Square: The Building Block of Your Bag

Now for the fun part: making the stars of the show, the granny squares themselves! These little wonders are the building blocks of your beautiful Granny Square Crochet Bag.
The Classic Granny Square Pattern (Round-by-Round)
Let’s make a timeless, 6-round granny square. I find this size to be really versatile for bags.
Materials: Worsted weight yarn, H/5.0mm crochet hook (or size to achieve desired gauge).
Instructions (US Terms):
Round 1:
- Chain 4.
- Slip stitch into the first chain to form a ring.
- Chain 3 (counts as your first double crochet here and throughout).
- Work 2 double crochet (dc) into the ring.
- Chain 2.
- Work (3 dc, ch 2) into the ring 3 more times.
- Slip stitch to the top of the beginning chain 3 to join.
- (You should have 4 clusters of 3 dc, separated by 4 ch-2 spaces)
Round 2:
- Slip stitch into the next 2 dc stitches, then slip stitch into the first ch-2 space (this brings you to the corner).
- Chain 3, then work (2 dc, ch 2, 3 dc) into the same ch-2 space (this creates your first corner).
- Chain 1.
- Work (3 dc, ch 2, 3 dc) into the next ch-2 space (this is your second corner).
- Chain 1.
- Repeat from * for the remaining 2 corners.
- Slip stitch to the top of the beginning chain 3 to join.
- (You should now have 8 clusters of 3 dc, 4 ch-2 corner spaces, and 4 ch-1 side spaces)
Round 3:
- Slip stitch into the next 2 dc stitches, then slip stitch into the first ch-2 corner space.
- Chain 3, then work (2 dc, ch 2, 3 dc) into the same ch-2 space (your first corner).
- Chain 1.
- Work 3 dc into the next ch-1 space (this is your first side cluster).
- Chain 1.
- Work (3 dc, ch 2, 3 dc) into the next ch-2 space (your next corner).
- Chain 1.
- Work 3 dc into the next ch-1 space.
- Chain 1.
- Repeat from * around.
- Slip stitch to the top of the beginning chain 3 to join.
- (Each side now has 1 cluster, and each corner has a cluster-ch2-cluster setup.)
Round 4, 5 & 6:
- Continue in the same pattern. For each corner, you’ll work (3 dc, ch 2, 3 dc) into the ch-2 corner space. For each ch-1 space along the sides, you’ll work 3 dc into that space. Remember to chain 1 between all 3-dc clusters, except for the ch-2 in the corners. Each round will add one more 3-dc cluster to each side.
- Slip stitch to the top of the beginning chain 3 to join each round.
- Fasten off and weave in ends after Round 6, or continue for a larger square.
I always recommend checking out a quick video tutorial for creating the basic granny square, especially for those initial chains, slip stitches, and the first couple of rounds. Seeing it in action can make all the difference!
Mastering Color Changes in Your Granny Squares
One of the most delightful aspects of a Granny Square Crochet Bag is the opportunity for beautiful color changes! I’ve learned that making them seamless is key for a professional-looking finish.
When you’re ready to change color, work the last stitch of the current color up until the very last yarn over. Then, drop the old color, pick up the new color, and complete that final yarn over with the new color. This makes the transition smooth. I usually tie a small knot with the old and new yarn tails to secure them, then I weave in both ends neatly along the back of the work. Taking the time to weave in ends as you go, rather than at the very end, saves so much time and makes the final assembly much more enjoyable.
Blocking Your Granny Squares: Why & How
Blocking is one of those steps that can truly elevate your crochet project, and for granny squares, it’s a game-changer! I swear by it. Blocking is the process of wetting or steaming your finished crochet pieces and then shaping them to specific dimensions while they dry.
Why should you block your granny squares?
- Even out stitches: It helps relax the yarn fibers, making your stitches look more uniform and consistent.
- Square up edges: It makes your squares perfectly square, which is essential for seamless joining and a professional-looking Granny Square Crochet Bag.
- Improve drape: It can enhance the fabric’s flow and feel.
Here’s a simple “how-to” for wet or steam blocking:
Wet Blocking:
- Soak: Immerse your granny squares completely in lukewarm water (with a tiny bit of wool wash if desired) for about 20-30 minutes.
- Squeeze: Gently squeeze out excess water. Do not wring or twist, as this can distort the stitches.
- Roll: Roll your squares in a clean towel and press firmly to absorb more water.
- Pin: Lay your squares flat on a blocking mat or a padded surface. Gently stretch and pin each square to its desired dimensions, making sure the edges are straight and the corners are square.
- Dry: Allow them to air dry completely, which can take 24-48 hours depending on humidity and yarn type.
Steam Blocking (for acrylics or blends that don’t love water):
- Pin: Pin your dry granny squares to your desired dimensions on a heat-safe surface.
- Steam: Hold a steam iron a few inches above the fabric (do NOT touch the iron directly to the crochet, especially acrylic, as it can melt!). Allow the steam to penetrate the fibers.
- Dry: Let the squares cool and dry completely before unpinning.
I always say, don’t skip this step; it really makes a difference before you assemble your bag!
Exploring Granny Square Variations for Your Unique Bag
While the classic granny square is wonderful, the beauty of a Granny Square Crochet Bag is how much you can personalize it! I love how many variations there are to explore. You don’t have to stick to just one type of square.
You could try:
- Solid Granny Squares: These are worked similarly but without the chain spaces along the sides, creating a denser, more fabric-like square.
- Sunburst Granny Squares: These feature a central puff stitch or popcorn stitch that radiates out like a sun, adding beautiful texture.
- Floral Granny Squares: Some patterns incorporate petals and leaves, turning each square into a little garden.
I encourage you to get creative! Look for inspiration online, in books, or even by just experimenting with different stitch combinations. Mixing and matching different squares can make your Granny Square Crochet Bag truly unique and a reflection of your own style.
Assembling Your Granny Square Crochet Bag: Bringing It All Together
This is the magical moment when your individual squares start to transform into a beautiful, functional bag. It’s so satisfying to see your vision come to life!
Laying Out Your Design: Planning Your Bag’s Shape
Before you start joining, I always recommend taking a moment to plan your design. This is like sketching out your blueprint!
- Simple Tote: For a basic tote, you might just need two large panels of joined squares for the front and back, and then a strip of squares for the sides and bottom.
- Rectangular Bottom Bag: This might involve a flat rectangle for the base, with squares joined upwards for the sides.
- Crossbody: Consider how the strap will attach and the overall proportion for comfortable wear.
I find it incredibly helpful to lay all my finished, blocked squares out on the floor or a large table. This allows me to experiment with color placement and square arrangement until I’m happy with the overall look of my Granny Square Crochet Bag. You can even take a photo to refer back to as you join!
Choosing Your Joining Method: A Comparative Guide
The way you join your squares impacts both the look and the feel of your finished Granny Square Crochet Bag. There are several popular methods, each with its own charm.
Here’s a little guide to help you choose:
| Joining Method | Description | Pros | Cons | Best Suited For |
|---|---|---|---|---|
| Join-as-you-go (JAYGO) | Squares are joined to each other as you crochet the final round of the second square. | No extra sewing, seamless look, flexible, saves time. | Requires attention to detail during crocheting. | Projects needing minimal seams, a continuous fabric look. |
| Slip Stitch Seam | Joining squares with a row of slip stitches through the back loops. | Creates a subtle, flat ridge, sturdy, good for structural items. | Can be tedious, adds a distinct line. | Bags needing firm seams, defined sections. |
| Whip Stitch | Using a tapestry needle, sewing through both loops of adjacent squares. | Invisible on one side, clean, strong, easy to learn. | Creates a ridge on the wrong side, requires sewing. | Garments, blankets, reversible items if done carefully. |
| Invisible Join | Using a tapestry needle, weaving yarn through specific loops to create a nearly invisible seam. | Almost undetectable, smooth, professional finish. | More time-consuming, requires precision. | Items where a pristine, seamless appearance is paramount. |
For a classic, seamless look, I often lean towards the Join-as-you-go (JAYGO) method for a Granny Square Crochet Bag. Here’s a brief overview:
Join-as-you-go (JAYGO) Basics: When you’re crocheting the final round of a new square, instead of chaining in the corner or between clusters, you’ll use a slip stitch or single crochet into the corresponding corner or chain space of an already completed square. This stitches the two squares together as you finish the current square. It’s a bit like crocheting and sewing at the same time!
For other joining methods like the slip stitch seam or whip stitch, I highly recommend finding short video tutorials. Seeing the needle or hook placement in action often clarifies everything perfectly.
Customizing Your Bag Size: Beyond the Pattern
One of the great things about making a Granny Square Crochet Bag is that you’re the designer! You can absolutely adjust the overall size to fit your needs, even if the pattern you’re following specifies a certain number of squares.
Here are a few ways I like to customize bag size:
- Change the number of squares: The most straightforward way! If you want a bigger bag, simply make more squares and arrange them in a larger grid. For a smaller bag, use fewer squares.
- Alter individual square size: You can add or subtract rounds from your granny squares to make them larger or smaller. Just remember that changing square size will impact your total yarn usage.
- Add more border rounds: Once your squares are joined and the main bag body is formed, you can crochet extra rounds of single crochet or double crochet around the top edge or even around the entire perimeter of the assembled bag. This is a fantastic way to add a few extra inches to the height and create a sturdy opening.
Don’t be afraid to play around with these options until your bag feels just right for you!
Bringing Your Bag to Life: Straps, Closures, and Lining
These final touches are what truly transform a collection of beautiful squares into a polished, durable, and functional accessory. This is where your Granny Square Crochet Bag really comes to life!
Constructing the Bag Body
Once all your squares are joined, you’ll begin to shape the bag. This usually involves folding your flat panels and joining the side and bottom seams using your chosen joining method (slip stitch, whip stitch, or JAYGO). If you have a separate bottom panel, you’ll attach that to the side panels. The key is to ensure all seams are secure and even, creating a sturdy base and sides for your bag. Refer back to your layout plan to guide this construction process.
Creating and Attaching the Perfect Straps
Straps are crucial for both the functionality and the look of your Granny Square Crochet Bag. I typically crochet my straps for a cohesive, handmade feel.
Here’s how I often make sturdy crocheted straps:
- Single Crochet Straps: Chain a length that feels comfortable for your desired strap drop (crossbody, shoulder, etc.). Then, single crochet into the second chain from the hook and in each chain across. Turn, chain 1, and single crochet across again. Repeat this for several rows until the strap is your desired width (2-4 rows usually works well). This creates a very dense, sturdy strap.
- Braided Straps: If you prefer a softer, more bohemian look, you can make three long chains or lengths of yarn, braid them tightly, and then secure the ends.
Attaching Straps:
- Crochet-on Method: Simply single crochet the ends of your strap directly onto the top edge of your bag, centering them evenly on the front and back panels. Make sure to work through both the strap and the bag fabric for a secure hold.
- Sewing Method: Use a tapestry needle and matching yarn to firmly stitch the strap ends to the inside top edge of your bag. Reinforce these attachment points with several passes to prevent stretching or tearing. I also sometimes add a small square of fabric on the inside for extra reinforcement if the bag is going to carry heavy items.
I always suggest watching a video for strap creation and attachment; seeing how to securely join them really helps build confidence!
Adding Practical Closures & Hardware
Elevating the functionality of your Granny Square Crochet Bag with closures and hardware is a fantastic idea. I love how these small additions can make a huge difference in convenience and security.
- Zippers: Adding a zipper provides the most secure closure. You can hand-sew a zipper tape to the inside top edge of your finished bag, or if you’re comfortable with a sewing machine, you can machine-sew it into a fabric lining before inserting the lining into your bag. It requires precision, but it’s very rewarding!
- Magnetic Snaps: These are a popular choice because they’re easy to install and provide a quick, simple closure. They usually come with prongs that you press through the fabric and bend to secure. I like to add a small fabric patch behind the snaps for extra reinforcement.
- Buttons and Loops: For a charming, rustic touch, you can crochet a small chain loop on one side of the bag’s opening and sew a decorative button onto the opposite side.
- Decorative Hardware: Don’t forget the fun bits! Adding D-rings to your bag for attaching a detachable strap or tassels, or even a cute charm, can truly personalize your creation. I usually attach D-rings by slip stitching around them with a sturdy yarn or by sewing them into the bag’s top seam.
The Finishing Touch: How to Line Your Granny Square Crochet Bag
Adding a fabric lining to your Granny Square Crochet Bag is, in my opinion, the ultimate finishing touch. It’s a major step that takes your handmade item from beautiful to truly professional and functional!
Why Line Your Bag?
- Prevents Stretching: Crochet fabric can stretch over time, especially with heavier contents. A lining provides structure and prevents your bag from losing its shape.
- Protects Contents: Small items won’t slip through the stitches, and your belongings will be safer from dirt or snags.
- Adds Structure: It gives your bag a more refined, polished look and feel, and can even make it stand up better.
Materials for Lining:
- Fabric: Choose a sturdy, non-stretch fabric like quilting cotton, canvas, or even an old pair of jeans! Matching thread is also crucial.
- Sewing Machine (Optional): While hand-sewing is perfectly fine, a machine makes it quicker.
- Pins: To hold your fabric in place.
- Scissors: Sharp fabric scissors are a must.
- Iron: For pressing seams.
Step-by-Step Lining Process:
- Measuring and Cutting Fabric:
- Lay your finished, assembled crochet bag flat.
- Measure the exact width and height of your bag.
- Cut two pieces of lining fabric for the main body:
- Width: Bag width + 1 inch (for seam allowance).
- Height: Bag height + 1 inch (for seam allowance).
- If your bag has a separate bottom, measure and cut a corresponding rectangle for the base, adding 1 inch seam allowance to all sides.
- Optional Pocket: For a simple slip pocket, cut a rectangle of fabric. Fold in half, right sides together, and stitch the sides and bottom, leaving an opening for turning. Trim corners, turn right side out, press, and topstitch the top edge. Set aside.
- Constructing the Lining:
- Place your two main lining pieces right sides together.
- Stitch down both sides and across the bottom, using a 1/2-inch seam allowance. If your bag has a separate bottom, stitch the two main lining pieces down the sides, then stitch the bottom panel to the main pieces, forming a box.
- Press open all seams.
- If you made a pocket, decide where you want it inside your lining. Pin and stitch the pocket onto one of the lining panels before sewing up the side seams of the lining. Stitch around three sides of the pocket, leaving the top open.
- Attaching the Lining (Hand-Sewn Technique):
- Turn your fabric lining wrong side out and slip it inside your crochet bag.
- Adjust the lining so it fits snugly and smoothly inside the bag, with the raw top edge of the lining just below the top edge of your crochet bag (usually about 1/2 inch to 1 inch).
- Fold the raw top edge of the lining inward by 1/2 inch and press.
- Pin the folded edge of the lining to the inside of your crochet bag, making sure to hide all raw edges.
- Using a needle and strong matching thread, hand-stitch the lining securely to the crochet bag using small, invisible stitches (like a slip stitch or whip stitch that catches only a small loop of the crochet). Go all the way around the opening.
(For a machine-sewn technique, you would typically sew the lining and bag opening together right sides together, then turn, but for a detailed guide within a crochet article, I find hand-sewing is often more accessible and less intimidating for crafters.)
Adding a lining takes a bit more time, but I promise you, the finished product will feel so much more professional and last much longer. Seeing how to attach a lining can be really helpful, so I suggest checking out short video clips for key sewing steps if you can!
Caring for Your Handmade Granny Square Crochet Bag
You’ve poured your time and love into creating a beautiful Granny Square Crochet Bag, so you’ll want to make sure it lasts! Proper care is essential for maintaining its beauty and longevity.
- Washing Techniques:
- Hand Wash (Recommended): I almost always recommend hand washing handmade crochet bags, especially if they’re made with wool blends or delicate yarns. Fill a basin with cool water and a small amount of gentle, wool-safe detergent. Submerge the bag and gently squeeze the suds through. Do not wring or twist. Rinse thoroughly until the water runs clear.
- Delicate Machine Cycle (Use with Caution): For bags made with acrylic or sturdy cotton, you might be able to machine wash on a delicate cycle with cold water. Always place the bag in a mesh laundry bag to protect it from stretching or snagging.
- Drying Methods:
- Reshape and Air Dry: After washing, gently roll the bag in a clean towel to absorb excess water. Then, reshape the bag to its original dimensions and lay it flat on a clean, dry surface or a mesh drying rack. Avoid hanging, as this can cause stretching. Let it air dry completely, away from direct sunlight or heat.
- Storage Tips:
- Stuff for Shape: When not in use, I sometimes lightly stuff my bags with tissue paper or a small cushion to help them maintain their shape.
- Flat Storage: Store your bag flat or upright on a shelf, rather than hanging it, to prevent stretching of the straps or body.
Remember to consider the specific yarn type you used; acrylics are generally more forgiving with washing, while wools require more gentle care.
Troubleshooting Common Granny Square Crochet Bag Issues
Even the most seasoned crocheters run into little bumps along the road, and I’m no exception! It’s all part of the creative process. If you encounter any issues with your Granny Square Crochet Bag, please know that these are normal challenges, and there’s almost always a friendly fix.
- Uneven Squares:
- The Fix: This is often a tension issue. Try to be consistent with how tightly you pull your yarn. Blocking (as discussed earlier) works wonders for evening out slightly uneven squares and making them uniform before joining.
- Bag Stretching or Losing Shape:
- The Fix: This is common with softer yarns or if the bag is carrying heavy items. Ensure your yarn choice is sturdy (cotton is great!). Adding a fabric lining is the absolute best solution for providing structure and preventing stretching. Also, don’t overfill your bag!
- Holes in Seams:
- The Fix: When joining squares, make sure you’re consistently catching both loops of the corresponding stitches on each square. If you find a small hole after joining, you can simply use a tapestry needle and a small piece of matching yarn to carefully stitch it closed.
- Yarn Tangles or Knots:
- The Fix: Oh, the dreaded yarn tangle! I find using a yarn bowl or even placing your skein in a small basket helps keep it from rolling away and getting tangled. If you get a knot, take a deep breath, gently work it loose, and don’t pull too hard, which can tighten it further. Sometimes, cutting the yarn and rejoining is the least frustrating option.
Remember, every “mistake” is just an opportunity to learn and grow. Don’t let these little hiccups discourage you from completing your beautiful bag!
Valuing Your Craft: The Heart of Handmade
As someone who pours my heart into making things, I deeply believe in the value of handmade craft. When you create a Granny Square Crochet Bag, you’re not just making an item; you’re investing your time, skill, and love into something unique. This process itself is a slow, mindful antidote to our fast-paced world, and that’s something truly precious.
I encourage you to appreciate your own craftsmanship. Take a moment to admire the stitches, the colors you chose, and the effort you put in. If you ever consider selling your handmade goods, remember to ethically price your items to reflect not just the cost of materials, but also the hours of your skill and dedication. Choosing to create something by hand is a sustainable and personal joy, a beautiful way to express yourself and connect with a tradition of making.
Frequently Asked Questions (FAQ) About Granny Square Crochet Bags
Here are some common questions I hear about making Granny Square Crochet Bags:
- Can I use different yarn weights than the pattern suggests? Yes, absolutely! Just be aware that changing the yarn weight will affect the size of your individual squares and, consequently, the final size of your bag. You’ll also likely need to adjust your hook size to match the new yarn weight and achieve a good gauge.
- How do I make my bag stiffer? To make your bag stiffer, I recommend using a durable yarn like cotton or even a double strand of acrylic. The most effective way, however, is to add a fabric lining. Some people also use fabric stiffener, but a lining provides better long-term structure.
- Can I machine wash my crochet bag? It depends on the yarn! Acrylic and some sturdy cottons can often be machine washed on a delicate cycle in cold water, preferably in a mesh laundry bag. Wool or wool blends usually require hand washing to prevent felting and shrinking. Always check your yarn label for care instructions.
- How many squares do I need for a basic tote bag? This varies greatly depending on the size of your squares and your desired bag dimensions. For a simple tote using a standard 6-round granny square (around 4-5 inches), I might use 6 squares for the front, 6 for the back, and then a few more for the bottom and sides, totaling around 16-20 squares. It’s always best to lay out your squares and plan your design first!
- What if my squares aren’t perfectly square? Don’t worry, this is very common! Blocking your squares (wet or steam blocking) is the best way to gently persuade them into a perfect square shape and even out any inconsistencies before you join them.
Your Unique Granny Square Crochet Bag Awaits!
Well, my friend, you now have all the tools and knowledge you need to embark on the wonderful journey of creating your very own Granny Square Crochet Bag. I truly believe that the process of making something with your own hands is one of the most satisfying experiences, and seeing your vision come to life in a beautiful, functional item is just the icing on the cake.
Remember, every stitch is a step in your unique creative story. Don’t be afraid to experiment with colors, try different joining methods, or add your own personal flair. Your bag is going to be a true reflection of you! I’m so excited for you to complete your project. Please, share your progress, ask any lingering questions in the comments below, or even share photos of your finished bags or favorite granny square variations. I can’t wait to see what you create!