

I remember the feeling so clearly: that little flutter in my stomach as I kicked off the ground and flew towards the sky on our old backyard swing. There’s a simple, undeniable magic to it, a feeling of pure freedom that stays with you. I wanted to capture that magic again, and I figured, why not build it myself?
This guide is my way of sharing everything I’ve learned. It’s a complete resource packed with several DIY swing projects, from the classic tree swing you can build in an afternoon to a cozy porch bench perfect for lazy evenings. My goal is to give you clear, easy-to-follow steps and all the safety know-how you need to build with confidence. Let’s create some new memories.
TABLE OF CONTENTS
Safety First! Critical Checks Before Starting Your DIY Swing Project
Before we dive into the creative part, let’s talk about the most important thing: safety. I know it’s tempting to jump right into building, but getting this part right ensures your swing will be a source of joy, not worry. Taking a few extra minutes to check these things is absolutely essential for a secure and long-lasting build.
First, choose a safe location. If you’re planning a tree swing, find a sturdy, healthy, and mature hardwood branch at least 8 inches in diameter. The branch should show no signs of disease or cracking. Ensure there’s a clear radius of at least 6 feet around the swing path, free from fences, walls, or other obstacles. The ground beneath should be soft, like grass or mulch, not concrete. This is an important consideration when you create beautiful garden design plans for your yard.
Next, you have to consider weight limits. Think about who will be using the swing. A swing meant for a small child needs different support than one intended for adults. The hardware you choose, the rope’s tensile strength, and the branch or beam’s sturdiness all contribute to the final weight capacity. Always err on the side of caution and over-engineer it for strength.
Finally, selecting the right hardware and knots is non-negotiable. Use hardware specifically rated for swings, like heavy-duty eye bolts and swing hangers. Never just toss a rope over a branch, as the friction will wear it out quickly. Learning a few reliable knots, like a bowline or a running bowline, will ensure your rope is securely fastened and won’t come undone.

Essential Tools & Materials for Your DIY Swing Projects
Let’s gather our toolkit. You don’t need a professional workshop, but having the right tools and materials on hand makes many satisfying DIY projects much smoother. For most of these builds, you’ll rely on a few key power tools like a drill, a circular or miter saw, and an orbital sander. A tape measure, level, and socket wrench set are also must-haves.
Now for the materials. The wood, rope, and hardware you choose will determine your swing’s look, durability, and safety. I’ve put together a few tables to help you compare the most common options and choose what’s best for your specific project and budget.
Table 1: Choosing the Right Wood
| Wood Type | Best For | Cost | Rot-Resistance |
|---|---|---|---|
| Pressure-Treated | A-Frames, structural parts | Low | High |
| Cedar | Seats, backrests, visible parts | Medium | High |
| Redwood | High-end seats, decorative elements | High | Very High |
| Douglas Fir | Budget-friendly frames and seats | Low-Medium | Low (needs sealing) |
Table 2: Selecting the Safest Rope
| Rope Type | Pros | Cons | Weather Resistance |
|---|---|---|---|
| Polypropylene | Floats, weather-resistant, affordable | Can degrade in UV light over time | High |
| Manila | Classic look, good grip, strong | Can shrink when wet, prone to rot | Low |
| Nylon | Very strong, resists abrasion/UV | Stretches, can be slippery when wet | Very High |
Table 3: Picking Durable Hardware
| Hardware Finish | Pro | Con | Best Use |
|---|---|---|---|
| Galvanized | Affordable, corrosion-resistant | Coating can wear off over time | General outdoor use |
| Stainless Steel | Superior rust/corrosion resistance | More expensive | Coastal areas, high-moisture climates |
Project 1: The Classic & Easy DIY Tree Swing (Beginner)
This is the project that started it all for me. A simple plank of wood, a strong rope, and a sturdy branch are all you need. It’s the perfect weekend project to bring a little bit of classic fun to your backyard, and it’s incredibly rewarding.
- Project Snapshot
- Difficulty: Easy
- Estimated Cost: $20 – $40
- Estimated Time: 1-2 hours
Tools & Materials List
- One piece of 2×6 or 2×8 wood, cut to about 24 inches long
- 50 feet of high-quality rope (Nylon or Polypropylene)
- Drill with a 1-inch spade bit
- Orbital sander with medium and fine-grit sandpaper
- Outdoor-rated wood sealer or exterior paint
- Tape measure & pencil
Step-by-Step Instructions
- Cut and Sand the Seat: Cut your wood plank to your desired length; I find 24 inches is comfortable. Thoroughly sand all surfaces and edges until they are completely smooth to prevent any splinters.
- Drill the Holes: Measure and mark two points on each end of the plank, about 1.5 inches from the sides and 1.5 inches from the ends. Use your drill and spade bit to create four clean holes for the rope.
- Finish the Wood: Apply several coats of a durable outdoor sealer or paint to protect the wood from the elements. Let it dry completely according to the manufacturer’s instructions.
- Attach the Rope: Cut your rope into two equal lengths. For each side, thread one end of the rope up through one hole and down through the other, leaving a loop on top. Secure the rope underneath with a strong knot, like a double figure-eight, on each end.
Project 2: The Nostalgic DIY Tire Swing (Beginner/Intermediate)
There’s something so resourceful and fun about turning an old tire into a swing; it’s a great way to unlock the amazing secrets of garden whimsy in your own backyard. This is a fantastic eco-friendly project. You can hang it vertically for a classic ride or horizontally, which is a bit more work but creates a comfortable nest-like seat.
- Project Snapshot
- Difficulty: Easy (Vertical) / Intermediate (Horizontal)
- Estimated Cost: $15 – $50
- Estimated Time: 2-4 hours
Tools & Materials List
- A sturdy, clean used tire (check for exposed steel belts)
- Rope or heavy-duty chain
- For horizontal: 3-4 heavy-duty eye bolts with washers and nuts
- Drill
- Socket wrench
- Soap and water
Step-by-Step Instructions (Vertical Swing)
- Clean the Tire: Scrub the tire thoroughly inside and out with soap and water to remove any dirt and grime.
- Drill a Drainage Hole: Drill a few small holes in what will be the bottom of the tire to allow rainwater to drain out.
- Attach the Rope: Tie one end of a strong rope securely around the top of the tire using a bowline knot or another reliable hitch. It’s ready to hang!
Step-by-Step Instructions (Horizontal Swing)
- Clean and Drill: Clean the tire thoroughly. Drill several drainage holes in the bottom surface (the part that will face the ground).
- Mark Mounting Points: Evenly space 3 or 4 points around the top sidewall of the tire. This is where you will attach your hardware.
- Install Eye Bolts: Drill holes at your marked points and securely install the eye bolts, using large washers on both sides of the tire wall to distribute the load. Tighten the nuts firmly.
- Attach Chains or Ropes: Attach equal lengths of chain or rope to each eye bolt, bringing them together at a single point above the swing using a heavy-duty ring or connector.
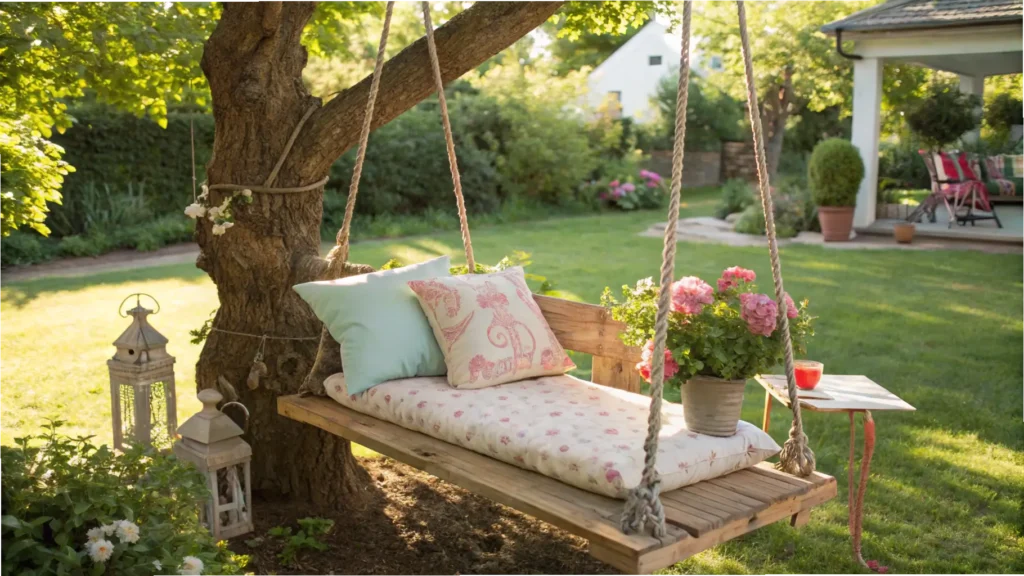
Project 3: A Cozy DIY Porch Swing Bench (Intermediate)
This project is a bit more ambitious, but trust me, the result is so worth it. Building your own porch swing bench creates a beautiful, custom piece of furniture that becomes the heart of your outdoor living space. Imagine morning coffees or quiet evenings spent gently swaying here.
- Project Snapshot
- Difficulty: Intermediate
- Estimated Cost: $100 – $200
- Estimated Time: 1 weekend
Tools, Materials & Cut List
- Tools: Miter saw, drill, orbital sander, tape measure, square, clamps, socket wrench.
- Hardware: 4 heavy-duty eye bolts, exterior wood screws (2.5″ and 1.5″), exterior wood glue, chain kit for porch swings.
- Lumber (using 2x4s and 1x4s):
- Frame: (2) 2x4s @ 48″, (3) 2x4s @ 18″
- Back Support: (2) 2x4s @ 20″ (with angled cuts)
- Seat & Back Slats: (10) 1x4s @ 48″
- Armrests: (2) 1x4s @ 22″
Step-by-Step Instructions
- Build the Seat Frame: Create a rectangle using your 48″ and 18″ 2x4s. Place one 18″ piece at each end and the third one in the center for support. Use wood glue and 2.5″ exterior screws to assemble.
- Attach the Back Supports: Cut the bottom of your two 20″ back support pieces at a slight angle (around 10-15 degrees) so they will lean back comfortably. Attach them securely to the inside of the rear 48″ frame piece.
- Assemble the Seat and Back: Begin attaching your 1×4 slats, starting with the seat. Leave a small gap (about the width of a pencil) between each slat for drainage. Use glue and 1.5″ screws. Do the same for the back, attaching the slats to the angled supports.
- Add Armrests and Finish: Attach the 1×4 armrests on top of the side frame and back supports. Give the entire swing a final, thorough sanding and apply several coats of your chosen outdoor paint or sealer. Install eye bolts into the frame’s corners once dry.
Project 4: The Ultimate Backyard DIY A-Frame Swing (Advanced)
For those who want a permanent, standalone swing set without a suitable tree, this is the ultimate project. While it requires more materials and precision, building your own A-frame is incredibly satisfying. This is a simplified design that is strong, stable, and more approachable than many complex plans you might find.
- Project Snapshot
- Difficulty: Advanced
- Estimated Cost: $200 – $350
- Estimated Time: 1-2 weekends
Tools, Materials & Cut List
- Tools: Miter saw, drill, level, socket wrench, post-hole digger, shovel.
- Hardware: Heavy-duty A-frame brackets, swing hangers, lag bolts, carriage bolts, concrete mix.
- Lumber (Pressure-Treated):
- Legs: (4) 4x4s @ 10 ft
- Top Beam: (1) 4×6 @ 12 ft
- Cross Brace: (1) 2×6 @ 8 ft (to be cut)
Step-by-Step Instructions
- Assemble the A-Frames: On a flat surface, lay two 4×4 legs into one of the A-frame brackets. Secure them with the specified lag bolts. Repeat for the other side to create two identical A-frames.
- Attach the Top Beam: Carefully lift the 4×6 top beam and slide it through the openings in both A-frame brackets. Have a helper for this step! Stand the entire structure up and ensure it’s level before securing the beam to the brackets with bolts.
- Add the Cross Brace: Measure and cut a 2×6 cross brace to fit horizontally between the legs on one side, about a third of the way up. This adds crucial lateral stability. Secure it with carriage bolts.
- Anchor the Structure: Position the swing set in its final location. Dig holes for each of the four legs, about 2 feet deep. Place the legs in the holes, ensure the entire frame is perfectly level, and fill the holes with mixed concrete. Let it cure completely for at least 48 hours before use.
- Install Swing Hangers: Once the concrete is cured, drill holes through the top beam and install your heavy-duty swing hangers according to their instructions.
How to Properly Hang Your DIY Swing
Building your swing is a huge accomplishment, but hanging it safely is just as critical. The method depends entirely on where you plan to put it. Let’s cover the three most common scenarios.
Hanging from a Tree Branch
Never just loop a rope over a branch. The friction will quickly wear through the rope and damage the tree. Instead, use wide (2-3 inch) nylon tree swing straps. These wrap around the branch and distribute the load, protecting both the tree bark and your rope. Alternatively, for a more permanent installation, you can drill a hole all the way through the branch and use a heavy-duty eye bolt with washers and nuts on both ends.
Hanging from a Porch Ceiling or Exposed Beam
The absolute key here is to locate a strong, structural ceiling joist or beam. Never attach a swing hanger to just the ceiling drywall or plywood sheathing. I use a stud finder to locate the center of the joist. For a standard porch swing bench, you will need to locate two joists. Use heavy-duty, purpose-built porch swing hangers and bolt them directly into the center of the joists.
Anchoring an A-Frame Swing Set
For any A-frame structure, stability is everything. The best method for permanent safety is setting the legs in concrete footers, as described in the project guide. This prevents the frame from lifting, shifting, or tipping during vigorous swinging. If you need a less permanent solution, you can use ground anchors, which are large corkscrew-like stakes that twist deep into the ground and attach to the frame’s legs.
Frequently Asked Questions About DIY Swing Projects
I get a lot of questions about these projects, so I’ve gathered the most common ones here to help you on your way.
What is the best and most durable wood for an outdoor swing? For durability and rot resistance, Cedar is an excellent choice for seats and visible parts. For the structural frame of something like an A-frame, pressure-treated lumber is cost-effective and extremely durable.
What type of rope is safest for a tree swing? I recommend a high-quality, UV-resistant synthetic rope like Nylon. It has superior strength and weather resistance compared to natural fiber ropes like manila, which can rot over time. Polypropylene is another good, affordable option.
How much does it cost to build a simple DIY swing? A very simple DIY tree swing using a single plank of wood and rope can be built for as little as $20 to $40. More complex projects like a porch swing or an A-frame will cost significantly more, depending on your choice of materials.
How high off the ground should a swing be? A good rule of thumb is to have the seat of the swing about 18 to 24 inches off the ground. This allows most users to sit down comfortably and still have enough clearance to swing freely without their feet dragging.
Conclusion
There is such a deep sense of satisfaction that comes from stepping back and seeing something you built with your own two hands. A swing isn’t just wood and rope; it’s an invitation to relax, to play, and to make memories. I hope this guide has given you the confidence to start your own project and bring a little more joy to your backyard.
I’d love to see what you create! Share your finished DIY swing projects in the comments below, or ask any questions you have – I’m here to help you succeed