

The crisp air, the vibrant foliage, the cozy feeling – autumn is a season of unparalleled beauty. What better way to welcome its charm than with a DIY fall wreath adorning your door or gracing your mantel? Creating your own autumn masterpiece isn’t just a craft project; it’s an opportunity to infuse your home with personalized warmth and creativity. This comprehensive guide will equip you with inspiring DIY fall wreath ideas, offer detailed, skill-level-specific video tutorials, provide sustainable crafting tips, and share expert insights, making you a master of autumn decor.
TABLE OF CONTENTS
The Allure of DIY Fall Wreaths: Why Craft Your Own?
There’s a unique satisfaction in transforming simple materials into a beautiful decoration that reflects the season. Crafting DIY fall wreaths offers a multitude of benefits that extend far beyond aesthetics, addressing the “why” behind the widespread appeal of handmade autumn decor. It’s an act of creation that enriches your home and soul.
Firstly, personalization is paramount. Unlike store-bought options, your handmade fall wreath can be tailored precisely to your home’s aesthetic and your personal taste, making it truly unique. Secondly, it’s a fantastic way to save money on seasonal decorations, often utilizing budget-friendly materials or even items foraged from nature. Many crafters also find the process deeply therapeutic, offering a mindful escape from daily stressors.
Beyond the immediate benefits, sustainability plays a growing role. By choosing natural elements or upcycling materials, you contribute to eco-friendly decor. Moreover, the act of crafting creates lasting memories, whether you’re working solo or enjoying a creative session with family and friends. Ultimately, a custom DIY fall wreath instantly sets the perfect autumn mood, welcoming guests with handmade charm.
- “There’s nothing quite like seeing your own creation greet you at the door every day. It feels so much more ‘homey’ than anything I could buy.” – A recent first-time crafter.
Essential Tools & Materials for Your Fall Wreath Project
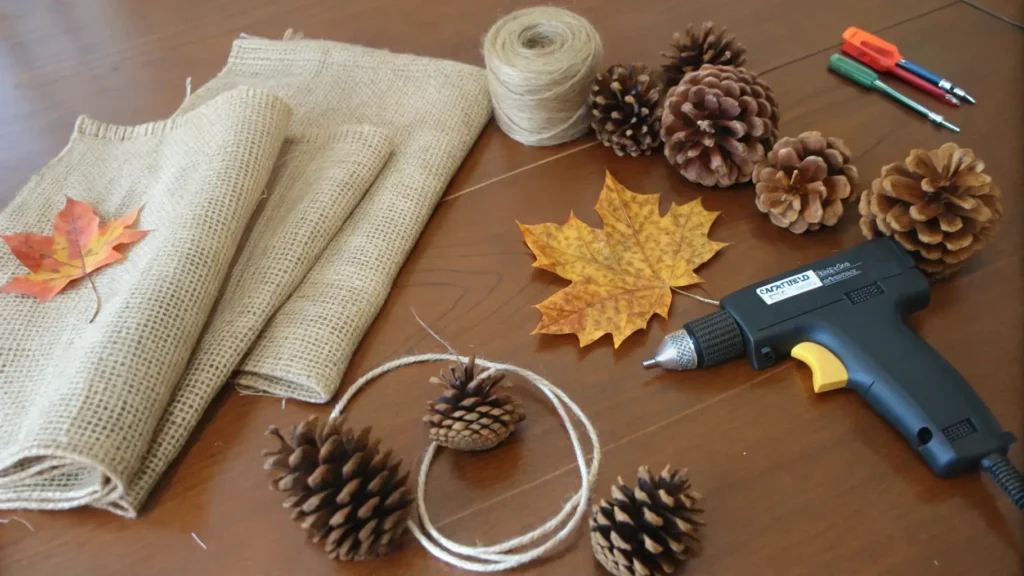
Before you dive into crafting your perfect DIY fall wreath, gathering the right tools and materials is crucial. This foundational step ensures a smooth and enjoyable crafting experience, addressing a core “how-to” aspect of wreath making. Many of these items are versatile and can be used for numerous fall craft projects.
Your basic toolkit should include a hot glue gun (and plenty of glue sticks), wire cutters for floral stems, sharp scissors for fabric and ribbon, and possibly floral wire or twine for securing elements.
For materials, the possibilities are endless! Common choices for DIY fall wreaths include:
- Faux Florals & Greenery: Sunflowers, dahlias, mums, eucalyptus, autumn leaves.
- Berries: Red, orange, or deep purple berries add pops of color.
- Ribbons: Burlap, plaid, velvet, or satin ribbons in fall hues.
- Natural Elements: Pinecones, acorns, dried oranges, wheat stalks, small gourds, twigs.
- Fabric: Burlap, plaid fabric scraps, felt.
You can source these materials from craft stores, dollar stores, or even by foraging responsibly in nature. Don’t forget to explore upcycling options by repurposing old fabrics, jewelry, or even broken decorations.
Choosing Your Wreath Form
The wreath form is the foundation of your DIY fall wreath, a decision that significantly impacts the final look and the materials you’ll use. Understanding the different types available will help you select the best base for your vision.
| Wreath Form Type | Pros | Cons | Recommended Projects |
|---|---|---|---|
| Grapevine | Natural, rustic look; easy to attach. | Can be messy; gaps may show. | Rustic, farmhouse, naturalistic, sparse designs. |
| Wire | Sturdy, good for bulkier materials. | Requires more coverage; less aesthetic. | Fabric strip, yarn-wrapped, heavy floral designs. |
| Foam | Smooth base, easy to paint/cover. | Can be bulky; expensive. | Fabric-wrapped, moss-covered, delicate floral. |
| Straw | Affordable, good for natural feel. | Can shed; requires full coverage. | Burlap, fabric-covered, heavy embellishment. |
Step-by-Step DIY Fall Wreath Tutorials (Beginner to Intermediate)
This section dives into the practical “how-to,” providing detailed instructions to help you create stunning DIY fall wreaths. Each tutorial includes specific material lists, clear steps, and a skill level indicator, ensuring you can tackle a project tailored to your crafting ability.
Project 1: The Rustic Burlap & Pinecone Wreath (Beginner)
This classic rustic burlap wreath is perfect for beginners and adds an instant touch of farmhouse charm.
Skill Level: Beginner
Materials Recipe Card:
- 18-inch wire or straw wreath form
- 5-6 yards of 6-inch wide burlap ribbon
- 20-30 small to medium pinecones
- Hot glue gun and glue sticks
- Wire cutters (if needed for pinecones)
- Optional: Twine, small faux berries, or a rustic sign
Instructions:
- Prepare Your Form: If using a straw form, wrap it tightly with a thin layer of burlap or fabric to prevent shedding.
- Attach Burlap Base: Secure one end of the burlap ribbon to the back of the wreath form with hot glue. Begin to loop the burlap around the form, creating poufs. Push the loops tightly together, securing with dabs of hot glue on the back as you go. Continue until the entire form is covered and fluffy.
- Arrange Pinecones: Lay out your pinecones to visualize your design. You can group them, create a cluster, or distribute them evenly.
- Glue Pinecones: Using ample hot glue, attach the pinecones firmly to the burlap base. Hold each pinecone in place for a few seconds until the glue sets.
- Add Embellishments (Optional): Tuck in small clusters of faux berries or tie a simple twine bow. If adding a sign, attach it securely with hot glue or wire.
- Finishing Touch: Add a loop of burlap or twine to the back for hanging.
Project 2: Elegant Autumn Leaf & Berry Wreath (Beginner/Intermediate)
Embrace nature’s palette with this beautiful autumn leaf and berry wreath, using realistic faux botanicals for lasting beauty.
Skill Level: Beginner/Intermediate
Materials Recipe Card:
- 18-inch grapevine wreath form
- 2-3 bunches of faux autumn leaves (maple, oak, aspen)
- 2-3 sprigs of faux fall berries (cranberry, hypericum)
- 1-2 small faux sunflowers or mums (optional)
- Hot glue gun and glue sticks
- Wire cutters
Instructions:
- Prepare Grapevine: Inspect your grapevine form for any loose twigs and trim as needed.
- Create a Base Layer: Using wire cutters, separate the leaves into smaller bunches or individual stems. Begin by gluing larger leaf bunches evenly around the grapevine form, aiming for a full, natural-looking base. Glue stems into the grapevine twists for added security.
- Add Berries: Tuck in sprigs of faux berries, distributing them for color and texture contrast. Secure with hot glue.
- Introduce Focal Points (Optional): If using, strategically place one or two faux sunflowers or mums. These can be off-center or clustered for visual interest.
- Fill Gaps: Use individual leaves or smaller berry clusters to fill any sparse areas, ensuring a lush appearance.
- Check for Security: Gently tug on all elements to ensure they are firmly attached. Add more glue if necessary.
- Hanging: Use the natural twists of the grapevine or add a loop of twine for hanging.
Project 3: Modern Farmhouse Fabric Strip Wreath (Intermediate)
This unique modern farmhouse wreath utilizes fabric scraps for a charmingly textured, contemporary look.
Skill Level: Intermediate
Materials Recipe Card:
- 16-inch wire wreath form
- Assortment of fall-colored fabric scraps (plaids, solids, small prints) – approximately 1/4 yard each of 4-5 different fabrics
- Sharp scissors or rotary cutter
- Optional: Small wooden sign, faux cotton bolls, or a simple bow
Instructions:
- Cut Fabric Strips: Cut your fabric into strips approximately 1-1.5 inches wide and 8-10 inches long. You’ll need many strips, so prepare a good pile.
- Tie Fabric onto Form: Take one fabric strip, fold it in half, and loop it around one section of the wire wreath form. Pull the ends of the fabric through the loop to create a knot. Push the knot tightly against the wire.
- Alternate Fabrics: Continue tying fabric strips onto the wire form, alternating colors and patterns to create a visually interesting texture. Push the knots tightly together so they cover the wire form completely.
- Fluff and Shape: Once the entire wire form is covered, gently fluff and arrange the fabric strips to create a full, voluminous wreath.
- Add Embellishments (Optional): Attach faux cotton bolls, a small wooden “Gather” sign, or a simple burlap bow with hot glue or by tying them into the fabric strips.
- Finishing Touch: Add a loop of sturdy twine or wire to the back for hanging.
Pro-Tip: Making Your Wreath Last (Durability & Storage)
To enjoy your DIY fall wreath for many seasons, proper care and storage are essential. Investing a little extra time in these steps can significantly extend its lifespan.
Best practices for securing elements: Always use generous amounts of hot glue, especially for heavier items like pinecones. For elements like berries or leaves, consider wrapping floral wire around their stems and then securing the wire to the wreath form or another element.
Protecting from weather: If your wreath is displayed outdoors, ensure materials are weather-resistant (e.g., plastic faux florals, sealed natural items). Consider spraying your wreath with a clear acrylic sealant or UV protectant spray to minimize fading and water damage. Bring delicate wreaths indoors during heavy rain or strong winds.
Proper storage tips for off-season:
- Clean: Gently dust your wreath with a soft brush or a hairdryer on a cool, low setting.
- Wrap: Cover your wreath loosely with a plastic bag, an old pillowcase, or cling wrap to protect it from dust and moisture.
- Box: Store your wreath in a sturdy box that’s slightly larger than the wreath itself, preventing crushing. Wreath storage boxes are also available.
- Store Flat or Hung: If storing flat, ensure nothing is stacked on top. If hanging, use a strong hanger that won’t distort the wreath’s shape. Keep it in a cool, dry place like a closet or attic.
Quick repair techniques: Keep a small stash of your wreath’s materials and a hot glue gun handy. If an element comes loose, reattach it promptly. For small tears in fabric, a dab of fabric glue can work wonders.
30+ Inspiring DIY Fall Wreath Ideas: A Gallery of Styles
Beyond the detailed tutorials, sometimes all you need is a spark of inspiration. Our curated gallery of over 30 gorgeous DIY fall wreath ideas offers a diverse range of styles, from rustic charm to modern minimalism, ensuring there’s an autumn masterpiece for every taste. Each idea is accompanied by a stunning image, a brief description, key materials, and a “Skill Level” tag to guide your next project.
Farmhouse & Rustic Charm
These farmhouse fall wreaths embody warmth and tradition, often utilizing natural textures and simple designs.
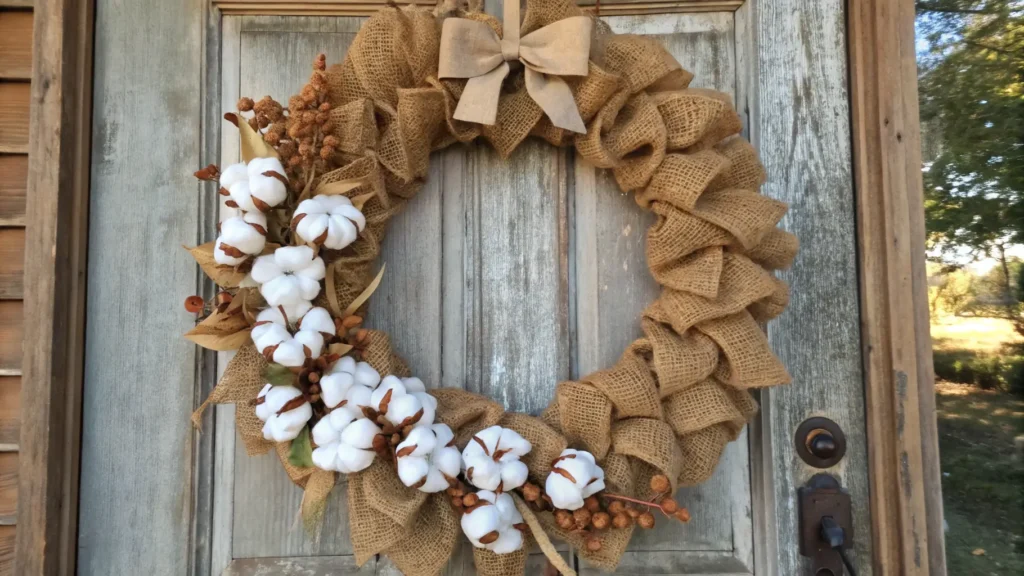
- Burlap & Cotton Wreath: A soft burlap base adorned with faux cotton bolls and a simple checkered ribbon.
- Key Materials: Burlap, cotton bolls, plaid ribbon.
- Skill Level: Beginner
- Wheat Sheaf Wreath: Bundles of dried wheat tied tightly onto a circular form, perhaps with a rustic twine bow.
- Key Materials: Dried wheat, twine.
- Skill Level: Beginner
- Distressed Wood Sign Wreath: A grapevine wreath embellished with faux leaves, berries, and a small, distressed wooden sign (e.g., “Gather,” “Welcome”).
- Key Materials: Grapevine wreath, faux leaves/berries, wooden sign.
- Skill Level: Intermediate
- Pinecone & Acorn Cluster Wreath: A simple grapevine base with strategically placed clusters of pinecones and faux acorns, highlighting natural textures.
- Key Materials: Grapevine wreath, pinecones, faux acorns.
- Skill Level: Beginner
Nature’s Bounty
Celebrate the outdoors with nature-inspired fall wreaths using real or faux elements found in abundance during autumn.
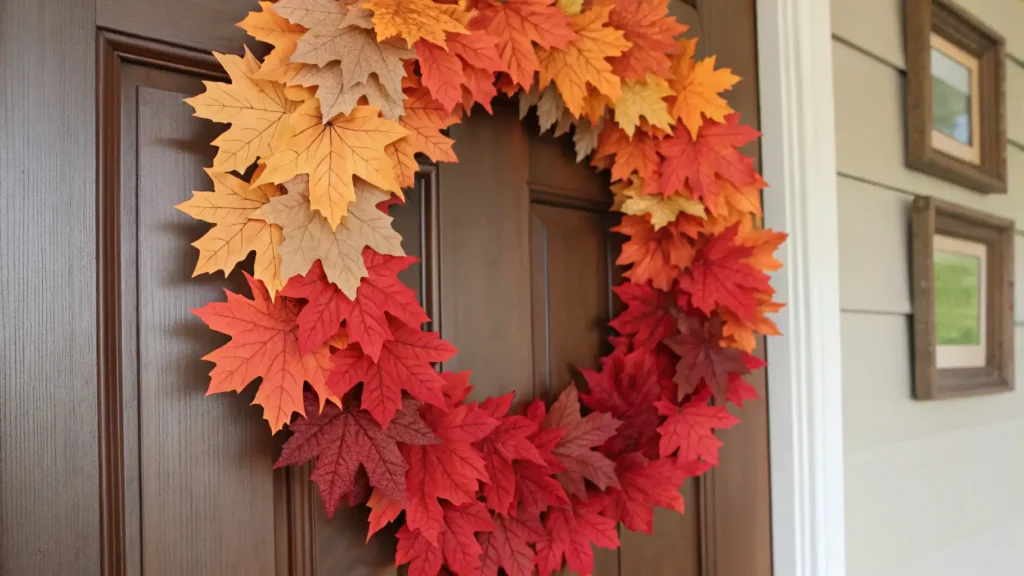
- Maple Leaf Ombre Wreath: A foam wreath form fully covered with faux maple leaves arranged from green to deep red.
- Key Materials: Foam form, faux maple leaves.
- Skill Level: Intermediate
- Dried Orange Slice & Cinnamon Stick Wreath: A fragrant and beautiful wreath featuring dried citrus slices, cinnamon sticks, and small faux berries.
- Key Materials: Dried orange slices, cinnamon sticks, faux berries, grapevine wreath.
- Skill Level: Intermediate
- Foraged Woodland Wreath: A wild and organic design using collected twigs, moss, small branches, and perhaps a single bold flower.
- Key Materials: Twigs, moss, foraged elements.
- Skill Level: Intermediate
- Corn Husk Wreath: Dried corn husks dyed or left natural, folded and glued to create a textured, layered wreath.
- Key Materials: Corn husks, straw form.
- Skill Level: Intermediate
Modern & Minimalist
For those who appreciate clean lines and understated elegance, these modern fall wreaths offer a sophisticated take on autumn decor.
- Hoop Wreath with Minimal Greenery: A simple metal or wooden hoop adorned with a small cluster of faux eucalyptus and one or two subtle fall leaves.
- Key Materials: Metal/wooden hoop, faux eucalyptus, fall leaves.
- Skill Level: Beginner
- White Pumpkin & Lamb’s Ear Wreath: A serene design using faux white mini pumpkins and the soft, dusty green of lamb’s ear foliage.
- Key Materials: Grapevine wreath, faux white pumpkins, lamb’s ear.
- Skill Level: Beginner
- Geometric Wood Bead Wreath: A unique wreath crafted from geometric wood beads strung together, with a small tassel or single feather accent.
- Key Materials: Wood beads, string, tassel/feather.
- Skill Level: Intermediate
- Monochromatic Berry Wreath: A simple wire wreath form densely covered with faux berries all in a single deep autumn color (e.g., burgundy or bronze).
- Key Materials: Wire form, faux berries (single color).
- Skill Level: Intermediate
Sustainable & Upcycled
Craft with a conscience! These sustainable DIY fall wreaths leverage recycled materials, found objects, and natural, foraged items, offering eco-friendly fall craft projects.
- Scrap Fabric Rag Wreath: Utilize old t-shirts, sheets, or fabric scraps cut into strips and tied to a wire form for a soft, textured look.
- Key Materials: Fabric scraps, wire wreath form.
- Skill Level: Beginner
- Wine Cork Wreath: Glue wine corks onto a foam or straw form in various patterns for a unique, upcycled statement.
- Key Materials: Wine corks, foam/straw form, hot glue.
- Skill Level: Intermediate
- Pinecone and Nut Wreath: Gather fallen pinecones, acorns, and other nuts, then glue them tightly onto a sturdy wreath form.
- Key Materials: Foraged pinecones, acorns, nuts, sturdy wreath form.
- Skill Level: Beginner
- Book Page Wreath: Old book pages cut into leaf shapes or rolled into rosettes and glued onto a cardboard form.
- Key Materials: Old book pages, cardboard, hot glue.
- Skill Level: Intermediate
Quick & Easy Last-Minute Wreaths
Short on time but still want festive decor? These quick & easy DIY fall wreaths can be assembled in a flash!
- Plaid Ribbon Loop Wreath: Simply loop and secure wide plaid ribbon around a wire form, creating a fluffy, full wreath in minutes.
- Key Materials: Wide plaid ribbon, wire form.
- Skill Level: Beginner
- Simple Berry Branch Wreath: Purchase a pre-made berry garland and simply shape it into a circle, securing the ends.
- Key Materials: Faux berry garland.
- Skill Level: Beginner
- One-Bunch Floral Wreath: Choose one lush bunch of faux fall flowers and greenery, wire it to a simple grapevine or wire hoop.
- Key Materials: Grapevine/wire hoop, one large floral bunch.
- Skill Level: Beginner
- Yarn Wrapped Wreath: Quickly wrap a foam wreath form entirely with thick, chunky autumn-colored yarn, then add a single simple embellishment.
- Key Materials: Foam wreath form, chunky yarn, one embellishment (e.g., large faux leaf).
- Skill Level: Beginner
Displaying Your Fall Masterpiece: Beyond the Front Door
Your beautiful DIY fall wreath deserves to be seen! While the front door is a classic choice, don’t limit its potential. Creative placement can enhance your home’s autumn ambiance throughout.
Front door considerations: If hanging outdoors, ensure your wreath is secured to withstand wind. Use an over-the-door wreath hanger to avoid damage. For unsealed wood doors, be mindful of any materials that could bleed color.
Indoor display ideas:
- Mantel Magic: Lean a larger wreath against the fireplace mantel, perhaps layered with garland, candles, and other fall decor.
- Wall Art: Treat your wreath as a piece of art. Hang it above a console table, in a dining room, or in a cozy reading nook.
- Mirror Reflection: Hang a wreath directly onto a large mirror, allowing its beauty to be reflected and amplify light.
- Interior Doors & Cabinets: Add a touch of fall to bedroom doors, pantry doors, or even large kitchen cabinet fronts.
- Window Dressing: Suspend smaller wreaths in windows using suction cup hooks for a charming view from inside and out.
Pairing with other fall decor: Coordinate your wreath’s colors and textures with existing throws, pillows, and centerpieces for a cohesive look. A rustic wreath pairs beautifully with distressed wood accents and pumpkin displays, while a modern wreath might complement sleek metallic vases and minimalist arrangements.
Consider adding subtle elements to transition your wreath for upcoming holidays.
Your DIY Fall Wreath Questions Answered (FAQ)
We’ve gathered and answered some of the most common questions crafters have about making DIY fall wreaths, drawing insights from popular crafting forums and social media groups.
Q: How long does it typically take to make a DIY fall wreath? A: The time varies greatly depending on the complexity and your skill level. A simple ribbon or pinecone wreath might take 30 minutes to an hour. More elaborate floral or fabric wreaths could take 2-4 hours. Our skill-level tags in the tutorials give you an idea.
Q: Should I use fresh or faux materials for my fall wreath? A: Faux materials (leaves, berries, flowers) offer durability, longevity, and are often more budget-friendly in the long run, allowing you to reuse your wreath for multiple seasons. Fresh materials provide an authentic scent and texture but will wilt and require replacement, making them better for short-term display. Many crafters use a mix, perhaps adding fresh accent pieces to a faux base.
Q: How much does it cost to make a DIY fall wreath? A: The cost can range from under $10 (using mostly foraged or upcycled materials) to $50-$100 for wreaths with high-quality faux florals and specific forms. Shopping sales, using coupons, and gathering natural elements are great ways to keep costs down.
Q: What’s the best way to attach a wreath to a door without damage? A: An over-the-door wreath hanger is the safest option as it doesn’t require drilling or adhesive on the door itself. For glass doors or windows, heavy-duty suction cup hooks work well. If you have a metal door, a strong magnetic hook can be an excellent choice.
Q: How do I clean my DIY fall wreath? A: For most faux material wreaths, a gentle dusting with a soft brush, a feather duster, or a hairdryer on a cool, low setting is usually sufficient. For more stubborn dust, a slightly damp cloth can be used on non-fabric elements, but always test a small, inconspicuous area first.
Q: What if I’m not crafty? Can I still make a beautiful fall wreath? A: Absolutely! Many of the DIY fall wreath ideas in this guide, especially those marked “Beginner,” are designed for new crafters. Start with simple projects like the rustic burlap wreath, follow our step-by-step tutorials, and embrace the process. As one crafter shared, “I thought I had zero crafting ability, but with a good tutorial, I surprised myself! The key is patience and not being afraid to try.”
Craft Your Autumn Story
You’re now equipped with an abundance of inspiration, detailed instructions, and expert tips to create your very own DIY fall wreath. From the cozy charm of a rustic design to the understated elegance of a modern arrangement, the possibilities are endless. Embrace the joy of crafting, personalize your autumn decor, and make your home a welcoming sanctuary this season. So grab your glue gun, gather your materials, and start crafting your unique autumn story today.