

Ready to transform your kitchen scraps and garden waste into rich, nutrient-dense soil? Building your own DIY compost bin is a profoundly rewarding step towards sustainable living, offering countless benefits for your garden and the planet. This isn’t just another guide; it’s the definitive, interactive resource designed to walk you through every step, from selecting the perfect design to mastering advanced composting techniques. Whether you’re a complete beginner seeking a quick solution or a seasoned homesteader aiming for a high-capacity system, our expert insights, free plans, and dynamic tools will empower you to create the ideal composter for your needs.
TABLE OF CONTENTS
Why Build Your Own Compost Bin? The Sustainable Choice & Unseen Benefits
Creating your own DIY compost bin isn’t just about saving money on store-bought fertilizer; it’s a powerful act of environmental stewardship. Beyond the obvious benefits, composting significantly reduces your carbon footprint and enriches your local ecosystem.
Consider the profound ecological impact: Diverting organic waste from landfills dramatically cuts methane emissions, a potent greenhouse gas. Your finished compost then becomes a soil-building powerhouse, sequestering carbon, improving water retention, and reducing the need for chemical fertilizers. Economically, you gain a constant supply of free, organic fertilizer, turning “waste” into a valuable resource. The process itself is educational, fostering a deeper connection to nature’s cycles and encouraging self-sufficiency.
Find Your Perfect DIY Composter: An Interactive Selection Tool
Choosing the right homemade composter for your specific situation is the first crucial step. The “perfect” bin depends entirely on your unique circumstances and goals. Factors like available space, your budget, current skill level, desired composting capacity, and even local climate considerations all play a role.
Before we dive into detailed plans, let’s briefly consider the main types:
- Wire Mesh: Super easy, low cost, ideal for small spaces.
- Plastic Barrel Tumbler: Efficient aeration, quicker results, good for medium volume.
- Pallet Bin: Cost-effective (often free materials), scalable, popular for varied uses.
- Cinder Block: Permanent, high volume, excellent heat retention.
Quick & Easy DIY Compost Bins for Beginners
For those new to composting or with limited time and resources, these easy DIY compost bin options are perfect. They require minimal tools, often use reclaimed materials, and can be constructed quickly, getting you started on your composting journey today.
Simple Wire Mesh Composter (The 15-Minute Solution)
- Difficulty: 1/5 (Super Easy)
- Estimated Time: 15-30 minutes
- Estimated Cost: $10-$30
- Materials: 3-6 feet of fencing wire (2-3 ft high), zip ties or heavy-duty garden stakes.
- Tools: Wire cutters, measuring tape.
This is the ultimate entry-level homemade composter, ideal for small gardens or temporary use. Its open structure allows for excellent aeration.
- Cut the Wire: Use wire cutters to create a length of fencing (e.g., 10-12 feet for a decent-sized bin).
- Form a Circle: Bring the ends of the wire together to form a cylinder.
- Secure the Seam: Use zip ties or small pieces of wire to firmly fasten the ends together. If using stakes, push them into the ground around the base for added stability.

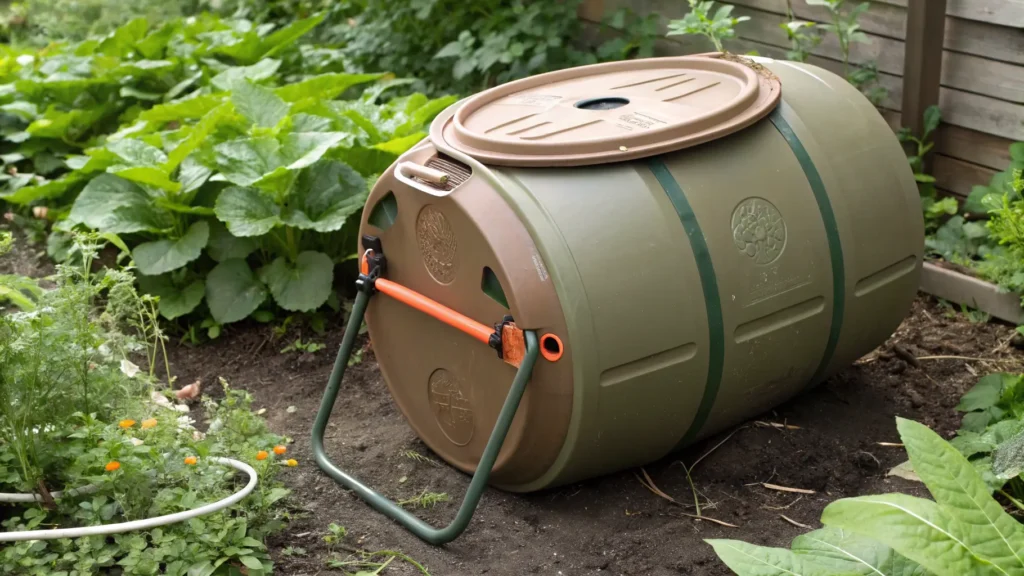
Upcycled Plastic Barrel Tumbler (Effortless Aeration)
- Difficulty: 2/5 (Easy-Moderate)
- Estimated Time: 2-4 hours
- Estimated Cost: $30-$70 (depending on barrel source and stand materials)
- Materials: 55-gallon food-grade plastic barrel, a sturdy metal or PVC pipe (longer than the barrel’s width), components for a stand (e.g., lumber, sawhorses, or metal frame), screws/bolts, drill bits, hinges, latch.
- Tools: Drill, saw (for stand), measuring tape, wrench.
An upcycled plastic barrel composter is an excellent choice for efficient mixing and faster decomposition, thanks to its tumbling action. It’s an accessible step up from a static bin.
- Source Your Barrel: Crucially, ensure your barrel is food-grade to avoid chemical contamination. Look for HDPE plastic marked with a “2.”
- Clean Thoroughly: Wash the barrel inside and out.
- Drill Air Holes: Drill numerous 1/2-inch holes evenly across the barrel’s surface for aeration.
- Create an Access Door: Cut a rectangular opening (approx. 12×18 inches) on one side of the barrel. Attach it with hinges and a latch to serve as a door.
- Install the Axle: Drill a hole precisely through the center of each end of the barrel. Insert your sturdy pipe (axle) through these holes, ensuring it can rotate freely.
- Build the Stand: Construct a robust stand that will support the barrel horizontally and allow it to rotate. Ensure the stand is stable and elevated enough for easy turning and compost removal.
- Mount the Barrel: Place the barrel onto the stand, ensuring the axle rests securely in the stand’s supports. Secure the lid of the barrel to prevent it from coming off during tumbling.
Basic Pallet Composter (Modular & Free Materials)
- Difficulty: 2/5 (Easy-Moderate)
- Estimated Time: 1-2 hours
- Estimated Cost: $0-$20 (if pallets are free)
- Materials: 4-5 heat-treated (marked “HT”) wooden pallets, heavy-gauge wire, zip ties, or wood screws/nails.
- Tools: Wire cutters, drill/screwdriver, hammer.
A pallet compost bin is a popular, cost-effective, and versatile option. Pallets are often available for free, making this a budget-friendly project that can be easily expanded.
- Source Safe Pallets: Only use heat-treated (HT stamped) pallets. Avoid “MB” (methyl bromide) treated pallets, as they contain toxic chemicals. Many local businesses or construction sites may give them away.
- Prepare Pallets: Ensure pallets are clean and free of excessive damage.
- Arrange the Walls: Stand four pallets upright to form a square or rectangle.
- Secure the Corners: Use heavy-gauge wire, zip ties, or wood screws to firmly attach the pallets at each corner. For a single bay, three walls can be sufficient, leaving one side open for access.
- Optional Front Panel: If you desire a removable front, use a fifth pallet cut to size or a simple piece of wire mesh secured with hooks.
- Stabilize: For added stability, consider driving short rebar stakes into the ground through the bottom pallet gaps.
Building Robust & High-Capacity Compost Systems
For serious gardeners, homesteaders, or anyone with significant organic waste, a high-capacity and durable DIY compost bin is essential. These robust systems are designed for long-term use and efficient, large-scale composting.
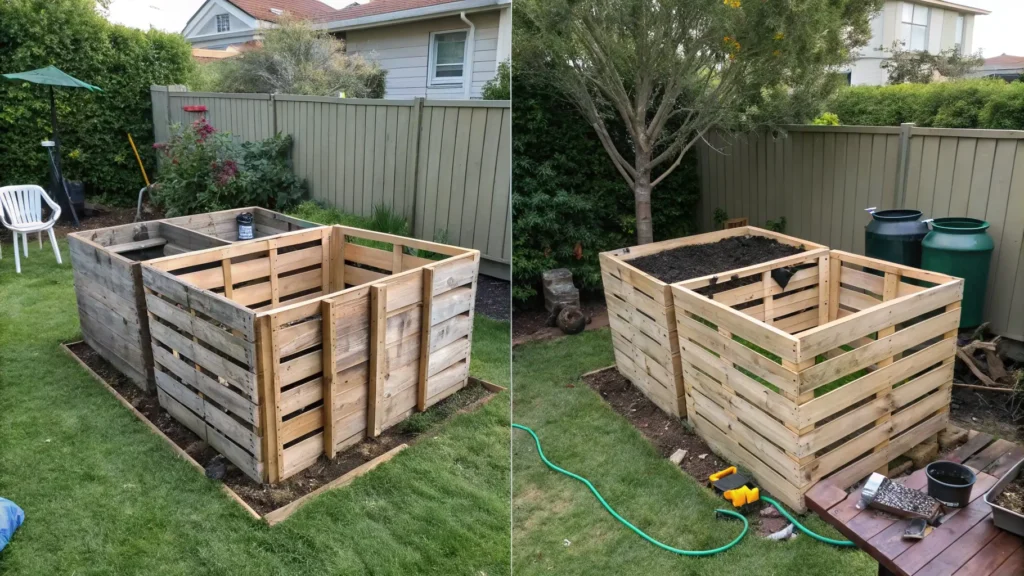
The Classic 3-Bin Pallet Composter (The Hot Composting Powerhouse)
- Difficulty: 3/5 (Moderate)
- Estimated Time: 4-8 hours
- Estimated Cost: $0-$50 (if pallets are free, otherwise factor in pallet cost or new lumber)
- Materials: 9-12 heat-treated wooden pallets, fence posts or sturdy 4×4 lumber (for corner stability), heavy-duty screws/bolts, gravel (for drainage).
- Tools: Drill, saw, measuring tape, level, post-hole digger (if using posts).
This 3-bin compost system is the gold standard for hot composting, allowing you to process large volumes of material continuously. It’s ideal for achieving consistent high temperatures, leading to faster compost.
- Site Selection: Choose a level, well-drained area with some shade.
- Lay Out the Footprint: Arrange three pallets side-by-side for the back wall.
- Install Corner Posts (Optional but Recommended): Dig holes and set in sturdy posts at each corner and between each bin section for maximum stability.
- Attach Back Pallets: Securely attach the three back pallets to the posts and to each other.
- Add Side Walls: Attach pallets for the side walls, creating three distinct bays.
- Create Dividing Walls: Use additional pallets to form the two internal dividing walls between the bins.
- Front Panels: For each bay, you can use a pallet cut to size as a removable front, or simply stack loose boards that can be easily removed for turning.
- Reinforce: Use additional screws or hardware to reinforce all joints.
- Hot Composting Principles: This system allows for sequential composting. Start a new pile in Bin 1, turn it into Bin 2 as it decomposes, and move the nearly finished compost to Bin 3 for curing. This continuous workflow maintains optimal conditions for hot composting.
- Expert Tip: To maintain optimal hot composting temperatures (130-160°F or 55-70°C), ensure a balanced mix of greens and browns, consistent moisture (like a wrung-out sponge), and regular turning to aerate the pile.
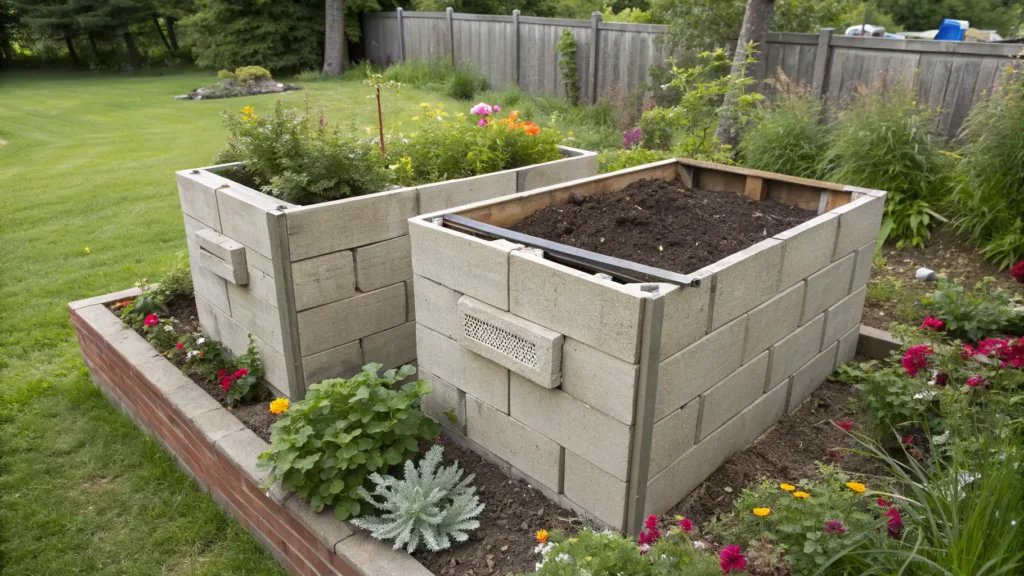
Durable Cinder Block Composter (Permanent & High Volume)
- Difficulty: 3/5 (Moderate-Advanced)
- Estimated Time: 6-12 hours
- Estimated Cost: $100-$300 (depending on the number of blocks and optional mortar)
- Materials: Cinder blocks (quantity depends on size), optional rebar, optional mortar, gravel for drainage.
- Tools: Level, string line, shovel, wheelbarrow, trowel (if mortaring).
A cinder block compost bin offers a highly durable, permanent, and high-volume solution. Its mass helps retain heat, aiding decomposition, and it can become an attractive, integrated feature in your garden landscape.
- Site Preparation: Choose a level, well-drained spot. Lay down a base layer of gravel for excellent drainage.
- Layout: Mark out the footprint for a single, double, or triple-bay system. A common layout for a single bay is roughly 3×3 feet.
- First Course: Lay the first course of cinder blocks directly on the prepared ground, ensuring they are level. Use a string line to keep rows straight.
- Subsequent Courses: Stack blocks without mortar (dry stacking) for an easier build and better aeration, or use mortar for a truly permanent, sturdy structure. Overlap blocks like bricks for stability.
- Corner Reinforcement (Optional): If dry-stacking, you can insert rebar through the block holes at the corners for added stability.
- Wall Height: Build walls 3-4 feet high.
- Access: Leave the front open, or create removable front panels by stacking blocks without mortar.
- Drainage Considerations: The hollow cores of cinder blocks offer some natural aeration. Ensure good base drainage. Considerations for Site Preparation: A solid, level foundation is crucial. Integrate your cinder block compost bin thoughtfully into your garden design; it can serve as a retaining wall or a focal point.
Mastering the Art of Composting: Best Practices & Troubleshooting
Building your DIY compost bin is just the beginning. Mastering the art of composting means understanding the fundamental principles and knowing how to troubleshoot common issues to ensure a healthy, productive pile.
The Perfect Mix: Browns, Greens, & Moisture Balance
Successful composting hinges on a balanced blend of carbon-rich “browns” and nitrogen-rich “greens,” along with proper moisture.
- Browns (Carbon): Dead leaves, straw, wood chips, shredded paper, cardboard, sawdust. They provide energy for microorganisms and create bulk.
- Greens (Nitrogen): Kitchen scraps (fruit/veg peels, coffee grounds, tea bags), grass clippings, fresh plant trimmings, manure. They provide the protein for the microbes.
- Ideal C:N Ratio: Aim for roughly 25-30 parts carbon to 1 part nitrogen. A simple rule of thumb is a 50/50 mix by volume of browns and greens.
- Moisture Management: Your compost pile should be consistently damp, like a wrung-out sponge. Too dry, and decomposition slows; too wet, and it can become anaerobic and smelly.
- Compostable Items: Most fruit and vegetable scraps, coffee grounds, tea bags, eggshells, yard trimmings, dried leaves, shredded newspaper, untreated wood chips.
- Non-Compostable Items: Meat, dairy, oily foods (attract pests, cause odors), pet waste (pathogens), diseased plants, treated wood, glossy paper, plastics.
Turning & Aeration Techniques for Faster Compost
Aeration is vital for healthy, fast composting. It provides oxygen to the beneficial aerobic microbes that break down organic matter, preventing foul odors and speeding up the process.
- Why Turn? Turning distributes moisture, introduces oxygen, breaks up clumps, and moves outer, cooler material into the hot center.
- How Often? For hot composting (like in a 3-bin system), turn every few days to maintain high temperatures. For slower, cold composting, turn every 1-2 weeks.
- Turning Methods:
- Pitchfork: The classic method for manual turning. Turn the entire pile, moving outer material to the center.
- Compost Aerator: A specialized tool with a corkscrew or hinged blades that you push into the pile and pull up, creating air channels.
- Simple Stick/Rebar: For smaller piles, simply poking deep holes can help.
- Signs of Good Airflow: An earthy smell, active decomposition, and a warm interior.
Solving (Smells, Pests, & Slowdowns)
Even with the best intentions, you might encounter issues. Here’s how to troubleshoot common compost bin problems:
- Foul Odors (Rotten Egg/Ammonia):
- Cause: Too much nitrogen (greens), too much moisture, or lack of oxygen.
- Solution: Add more browns (shredded cardboard, dry leaves), turn the pile to aerate, and if too wet, spread it out slightly to dry.
- Attracting Pests (Rodents, Flies):
- Cause: Exposed food scraps, meat/dairy, or open bin access.
- Solution: Always bury kitchen scraps deep within the pile. Avoid meat/dairy. Use a closed bin (like a tumbler or a pallet bin with mesh sides) for better pest control.
- Compost Not Heating Up/Slow Decomposition:
- Cause: Lack of nitrogen, insufficient moisture, insufficient mass, or poor aeration.
- Solution: Add more greens, moisten the pile, consolidate materials if too small, and turn regularly. Ensure your pile is at least 3x3x3 feet for optimal heat generation.
- Overly Dry Pile:
- Cause: Not enough moisture.
- Solution: Water the pile gently, especially during dry spells, until it reaches the wrung-out sponge consistency.
- Overly Wet/Slimy Pile:
- Cause: Too much moisture, not enough browns.
- Solution: Add absorbent browns (sawdust, shredded paper), turn frequently to aerate, and cover the pile during heavy rain.
Advanced Insights & Maximizing Your Composting Impact
Moving beyond the basics, a deeper understanding of composting unlocks its full potential, transforming your garden and enhancing your overall sustainable living efforts.
Compost isn’t just about N-P-K (nitrogen, phosphorus, potassium); it’s a living ecosystem. Billions of microbes, fungi, and beneficial bacteria work tirelessly to break down organic matter. These microscopic powerhouses create humic acids and provide essential micronutrients that are often lacking in synthetic fertilizers. This biological activity significantly improves soil structure, aids in disease suppression, and dramatically increases water retention, leading to healthier, more resilient plants.
Consider the words of renowned soil scientist, Dr. Elaine Ingham: “When you add compost to soil, you’re not just adding nutrients; you’re adding life. This living biology is what truly regenerates soil, making it self-sustaining and incredibly fertile.”
To truly maximize your impact:
- Compost Tea: Brew nutrient-rich compost tea to give your plants a liquid boost of beneficial microbes.
- Soil Percolation Test: Conduct a simple percolation test on your finished compost to observe its incredible water retention capabilities. Dig a small hole, fill with water, and time how long it takes to drain. Compare this to your native soil.
- Local Regulations: While composting is generally encouraged, larger DIY compost bin structures, especially in urban areas, may have local regulations or HOA guidelines regarding placement or size. Always check with your local authorities or homeowners’ association to ensure compliance.
DIY Compost Bin FAQs
Here are answers to some of the most common questions about building and using a DIY compost bin.
Q: How long does it take to make compost?
A: It varies greatly. Hot composting in a well-managed 3-bin system can yield finished compost in 2-3 months. Cold composting (static piles) can take anywhere from 6 months to 2 years.
Q: Can I compost X, Y, Z?
A: Generally, yes for fruit and vegetable scraps, coffee grounds, eggshells, and yard waste. Avoid meat, dairy, bones, oily foods, diseased plants, and pet waste to prevent odors and pests. For a detailed list, refer to “The Perfect Mix” section.
Q: Where is the best place to put a compost bin?
A: Choose a level, well-drained spot, ideally somewhat shaded to prevent drying out. Keep it easily accessible for adding materials and turning, but also consider proximity to your garden and any potential odors.
Q: What size compost bin do I need for my family/garden?
A: For a typical family and small garden, a single 3x3x3 foot bin (like a basic pallet or wire mesh bin) is often sufficient. Larger gardens or homesteads benefit from multiple bays or larger systems like the 3-bin pallet or cinder block designs.
Q: How do I make a compost bin smell better?
A: Most bad smells indicate an imbalance. Add more browns, turn the pile to increase aeration, and ensure you’re burying all food scraps. Avoid meat and dairy. Refer to the “Solving Common Compost Bin Problems” section for more detailed solutions.
Q: Do I need a lid for my DIY compost bin?
A: A lid is beneficial for regulating moisture (preventing drying out or becoming waterlogged) and deterring pests. While wire mesh bins often don’t have a formal lid, tumblers and some pallet/cinder block systems can incorporate one.
FOR MORE INFORMATION :
How to Build an Easy DIY Compost Bin
Start Your Composting Journey Today!
Building your own DIY compost bin is a significant step toward a more sustainable and fruitful garden. We’ve equipped you with the knowledge, free plans, and expert tips to construct a variety of composters, from the quick 15-minute wire mesh solution to the powerful 3-bin pallet system. By transforming your organic waste into nutrient-rich “black gold,” you’re not only enriching your soil but also contributing to a healthier planet. Take the plunge, choose your ideal design, and witness the magic of composting unfold in your own backyard. Your garden – and the Earth – will thank you for it!