

Embarking on the journey to build your own chicken coop is a rewarding endeavor, promising fresh eggs, healthier birds, and the satisfaction of a custom-built home for your flock. This comprehensive guide is your ultimate resource, empowering you to construct the perfect DIY chicken coop that meets your specific needs, budget, and aesthetic preferences. We’ll delve into everything from foundational planning and smart features to detailed plans and sustainable practices, ensuring your project is a resounding success from start to finish.
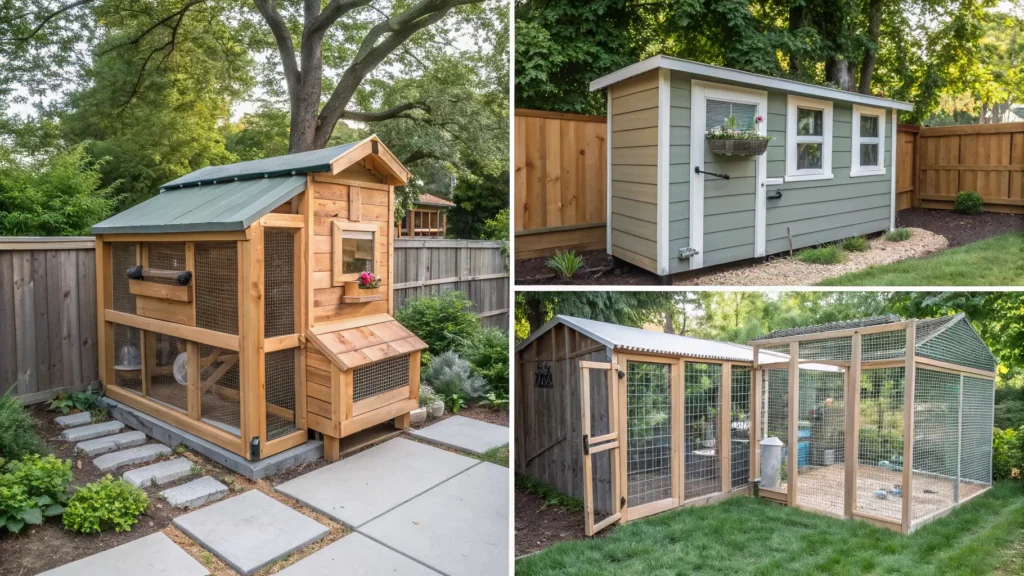
TABLE OF CONTENTS
Why Build Your Own Chicken Coop?
Building your own DIY chicken coop offers a multitude of benefits beyond simply housing your birds. It’s an investment in your flock’s well-being and your peace of mind.
- Cost Savings: While there’s an initial outlay for materials, constructing your own coop can significantly reduce costs compared to purchasing pre-made or custom-built structures.
- Customization: Tailor every aspect from size and layout to features and aesthetics to perfectly fit your flock, backyard space, and personal style.
- Fresh, Healthy Eggs: Providing a clean, secure, and comfortable environment for your chickens directly contributes to their health and consistent egg production.
- Enhanced Animal Welfare: You control the quality of materials and design, ensuring ample space, proper ventilation, and robust predator protection for your birds.
- Sustainability & Empowerment: It’s a hands-on project that connects you to sustainable living and provides immense satisfaction. You can build this, and this guide will show you how, covering a variety of plans, advanced features, and eco-friendly solutions.
Essential Planning: Before You Build Your Dream Coop
Careful planning is the bedrock of any successful DIY chicken coop project. Before you even pick up a hammer, consider these crucial factors to avoid costly mistakes and ensure your coop serves your flock for years to come.
- Flock Size & Space Requirements: Accurately determine how many chickens you plan to keep. This dictates the necessary coop and run dimensions to prevent overcrowding and stress.
- Choosing the Ideal Location: Select a spot that offers protection from harsh weather, good drainage, and convenient access for daily chores. Consider sun exposure for warmth in winter and shade in summer.
- Understanding Local Regulations: Navigating zoning laws, homeowner association (HOA) rules, and permit requirements is crucial to avoid legal issues.
- Climate Considerations: Design for your local climate. Proper ventilation is key for hot climates, while insulation and draft protection are vital in colder regions.
- Setting a Realistic Budget: Factor in the cost of materials, tools (if you need to buy or rent them), and the time commitment involved.
How to Determine the Perfect Coop Size for Your Flock
One of the most common questions is, “How big does my coop need to be?” Getting the dimensions right is paramount for your flock’s health and happiness.
- Minimum Square Footage: Aim for at least 2-4 square feet per standard-sized chicken inside the coop, and 8-10 square feet per bird in the outdoor run. Bantam breeds may require slightly less, while larger breeds need more.
- Importance of Sufficient Run Space: The outdoor run is where chickens spend most of their active hours. Generous space prevents boredom, pecking order issues, and allows for natural foraging behaviors.
- Headroom and Ergonomics: Ensure the coop is tall enough for you to comfortably stand or at least bend over inside, making cleaning and egg collection much easier.
Navigating Local Regulations: Zoning, HOAs & Permits
This step is often overlooked but is absolutely essential. Generic advice isn’t enough; you need to know how to find your specific local rules before you build your own chicken coop.
- Common Regulatory Concerns: Look for rules regarding coop setbacks from property lines, maximum structure height, noise ordinances, and the total number of chickens allowed.
- Resources for Finding Local Information: Start with your city or county planning department website. University extension offices can also be valuable resources. Check your HOA documents thoroughly if applicable.
- Steps for Obtaining Necessary Permits: If your coop is a certain size or permanent structure, you may need a building permit. This usually involves submitting plans and undergoing inspections.
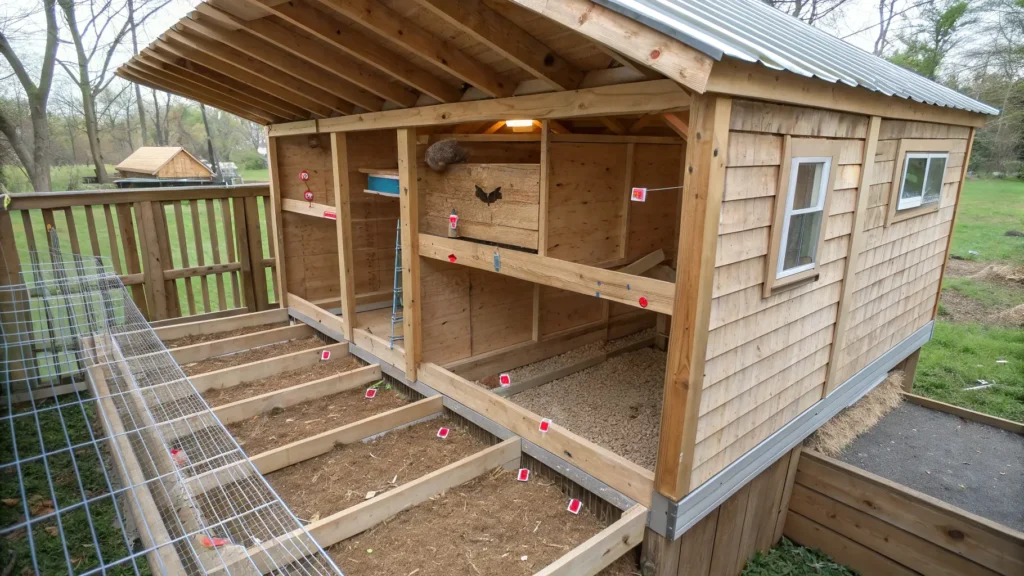
The Anatomy of a Great Coop: Essential Components Explained
A truly functional and safe DIY chicken coop isn’t just a box; it’s a carefully designed home with specific components that meet your flock’s needs.
- Nesting Boxes: Provide a safe, dark, and quiet place for hens to lay eggs. Aim for one nesting box per 3-4 hens.
- Dimensions: Roughly 12x12x12 inches.
- Placement: Raised off the ground but easily accessible.
- Material: Wood is common, but plastic or metal can be easier to clean.
- Roosting Bars: Chickens instinctively roost at night to feel safe from ground predators. These bars should be sturdy and comfortable.
- Height: At least 2-3 feet off the ground.
- Diameter: 2×2 inch lumber with rounded edges, or a sturdy branch.
- Material: Wood is best. Avoid smooth, round dowels which can cause foot problems.
- Spacing: At least 8-10 inches of linear space per bird, with 12-15 inches between bars if multiple are used.
- Ventilation: Crucial for air quality, temperature control, and preventing respiratory issues.
- Cross-Ventilation: Openings on opposing walls for airflow.
- Predator-Proof Openings: Cover all vents with hardware cloth.
- Avoiding Drafts: Vents should be above roosting bars, preventing direct drafts on sleeping birds.
- Predator Proofing: This is non-negotiable. Chickens are vulnerable to many predators.
- Hardware Cloth vs. Chicken Wire: Always use 1/2-inch or 1/4-inch hardware cloth, not chicken wire, as chicken wire only keeps chickens in, not predators out.
- Burying Skirt: Bury hardware cloth 12-18 inches deep around the perimeter to prevent digging predators.
- Secure Latches: Use multiple, strong, and difficult-to-open latches.
- Flooring Options & Bedding: Choose a floor that is easy to clean and supports good hygiene.
- Dirt: Natural but harder to clean thoroughly.
- Wood/Linoleum: Easier to clean, but ensure it’s sealed and protected.
- Bedding: Pine shavings, straw, or hemp are common absorbent options.
- Feeders and Waterers: Essential for daily nutrition and hydration.
- Types: Hanging feeders reduce waste, nipple waterers keep water clean.
- Placement: Keep them off the ground to prevent contamination and at chest height for the chickens.
- Hygiene: Clean regularly to prevent mold and bacterial growth.
Designing Optimal Nesting Boxes & Roosting Bars
These two features are central to your hens’ comfort and productivity. Thoughtful design here pays dividends.
- Recommended Dimensions and Materials: For nesting boxes, a 12x12x12 inch cube works for most breeds. Wood provides good insulation, but consider removable plastic inserts for easier cleaning. Roosting bars should be sturdy wood, 2x2s with rounded edges are ideal, positioned higher than nesting boxes.
- Proper Height and Accessibility: Nesting boxes should be elevated 18-24 inches off the ground to keep them clean, while still allowing easy access for hens and egg collection for you. Roosts should be the highest point in the coop for chicken hierarchy and safety.
- Tips for Encouraging Egg-Laying: Keep nesting boxes clean, dark, and lined with soft bedding. Placing a “fake” egg (ceramic or golf ball) can encourage new layers.
Advanced Predator-Proofing Strategies
Securing your flock is paramount. Don’t cut corners on predator proofing your DIY chicken coop. Go beyond the basics to ensure ultimate safety.
- Specific Materials: Always use 1/2-inch or 1/4-inch galvanized hardware cloth, which is stronger than chicken wire and has smaller openings. Use this for all windows, vents, and the run perimeter.
- Double-Latching Mechanisms and Reinforced Doors: Predators are smart. Use heavy-duty barrel bolts or padlocks, and consider adding a secondary latch. Reinforce doors with extra framing or metal plating.
- Preventing Digging: An apron of hardware cloth buried 12-18 inches deep and extended outwards 12 inches from the coop perimeter is highly effective. Alternatively, a concrete perimeter or a solid foundation can prevent digging.
- Addressing Aerial Predators: For open runs, consider covering the top with hardware cloth, aviary netting, or even a solid roof to deter hawks and owls.
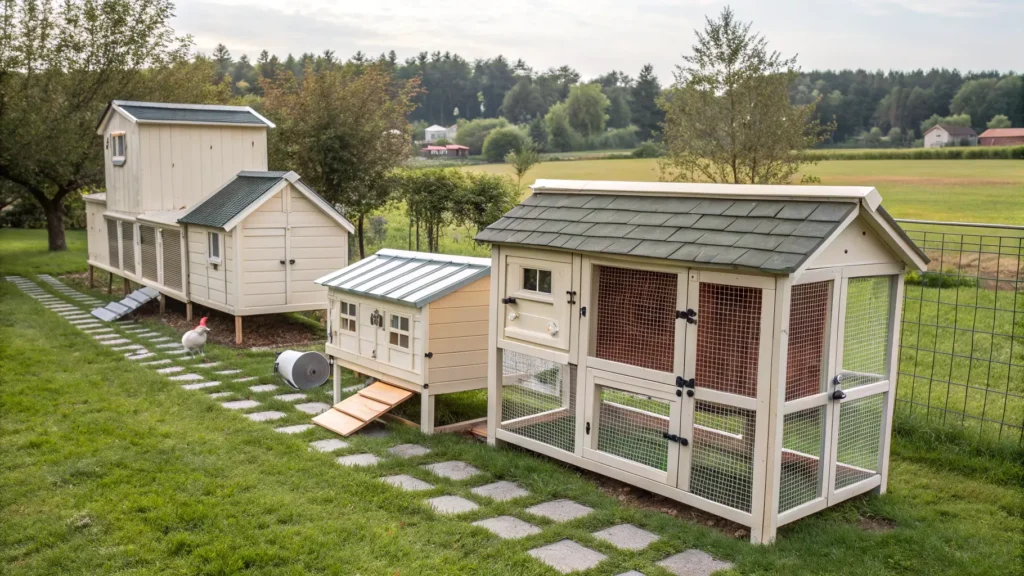
Your Blueprint: Detailed DIY Chicken Coop Plans (7+ Diverse Designs)
This section is the heart of our guide, providing a wealth of inspiration and practical instructions to build your own chicken coop. We’ve curated over 7 diverse, fully detailed plans, each tailored to different needs, flock sizes, and skill levels. Every plan includes a precise materials list, detailed cut list, step-by-step instructions with clear visuals, an estimated cost breakdown, and an interactive “Material Cost Estimator” for that specific plan.
Plan 1: The Beginner-Friendly A-Frame Coop (Small Flock, Easy Build)
Perfect for first-time builders and small backyard flocks (2-4 chickens). This plan prioritizes simplicity and a compact footprint.
- Key Features: Simple construction, minimal tools required, easily movable.
- Estimated Cost: $100 – $250 (depending on material choice).
- Materials List & Cut List
- Step-by-Step Instructions
Plan 2: Budget-Savvy Pallet Coop (Cost-Effective & Reclaimed Materials)
This plan is ideal for those looking to maximize cost savings by utilizing reclaimed materials. Suitable for small to medium flocks (3-6 chickens).
- Key Features: Focus on sourcing and preparing reclaimed materials, simple design, eco-friendly.
- Estimated Cost: $50 – $150 (heavily dependent on free material availability).
- Materials List & Cut List:
- Step-by-Step Instructions
Plan 3: Robust Walk-In Coop (Medium to Large Flock, Durable Design)
Designed for medium to large flocks (6-12+ chickens) and those desiring a more permanent, human-accessible structure.
- Key Features: Sturdy framing, weather-resistant roofing, human-friendly access for easy cleaning and egg collection.
- Estimated Cost: $400 – $800+
- Materials List & Cut List
- Step-by-Step Instructions
Plan 4: The Efficient Chicken Tractor (Mobile & Pasture Management)
Perfect for those who want to rotate their flock through different areas of their yard or garden, offering fresh forage and natural pest control. Ideal for small to medium flocks (4-8 chickens).
- Key Features: Lightweight construction, sturdy wheel design, benefits of pasture rotation.
- Estimated Cost: $250 – $500
- Materials List & Cut List
- Step-by-Step Instructions
Plan 5: Modern & Aesthetic Backyard Coop (Stylish & Functional)
For keepers who want their DIY chicken coop to be a seamless, attractive addition to their backyard landscape. Suitable for small to medium flocks (3-6 chickens).
- Key Features: Focus on clean lines, high-quality material choices (e.g., cedar accents, corrugated metal roofing), and contemporary design elements.
- Estimated Cost: $350 – $700+
- Materials List & Cut List
- Step-by-Step Instructions
Plan 6: The Expandable Modular Coop System (Future-Proof Design)
This innovative plan offers true flexibility, allowing you to easily expand your coop as your flock grows or your needs change. Suitable for 4-15+ chickens.
- Key Features: Sectional design, standardized connections, ability to add modules (e.g., extra run, brooding area, storage).
- Estimated Cost: $300 – $600 (base module)
- Materials List & Cut List
- Step-by-Step Instructions
Plan 7: Tiny Urban Coop (Micro-Flock & Space-Saving Solution)
Specifically designed for extremely small city lots, patios, or even balconies, this plan makes chicken keeping accessible in compact spaces. Ideal for micro-flocks (2-3 chickens).
- Key Features: Ultra-compact footprint, multi-functional design (e.g., integrated planter box, vertical nesting), clever space-saving elements.
- Estimated Cost: $150 – $350
- Materials List & Cut List
- Step-by-Step Instructions
Granular Cost Analysis & Smart Material Sourcing
Understanding the true cost of your DIY chicken coop and how to source materials intelligently is key to staying within budget. We go beyond basic estimates to give you a granular breakdown.
- Detailed Breakdown of Costs by Material Type:
- Wood: Framing lumber (2x4s, 2x2s), plywood, siding (cedar, T1-11, reclaimed pallets).
- Hardware: Screws, nails, hinges, latches, handles, galvanized hardware cloth.
- Roofing: Metal sheeting, asphalt shingles, polycarbonate panels.
- Foundation: Concrete blocks, gravel, treated lumber.
- Miscellaneous: Paint, stain, sealants, nesting box material, feeders, waterers.
- Comparison of New vs. Salvaged Material Costs:
- New: Offers consistency, specific dimensions, and often higher durability, but at a higher price.
- Salvaged: Significantly reduces costs, but requires more effort in sourcing, cleaning, and sometimes adapting to non-standard sizes.
- Impact of Material Quality on Price & Durability:
- Budget Tier: Often uses basic pine lumber, repurposed materials, and simpler hardware. Lower upfront cost, but potentially shorter lifespan or more maintenance.
- Standard Tier: Pressure-treated lumber for ground contact, quality plywood, asphalt shingles. Good balance of cost and durability.
- Premium Tier: Cedar or redwood for siding, metal roofing, advanced hardware. Higher cost, but superior aesthetics and longevity.
- Tools and Equipment Needed:
- Essentials: Tape measure, saw (hand or power), drill, hammer, level, safety glasses.
- Optional (but helpful): Miter saw, jigsaw, pneumatic nail gun, clamps. Consider renting specialized tools for short-term projects.
- Regional Variations in Material Prices: Costs can fluctuate significantly based on your geographic location. Always check local hardware stores and lumberyards.
Integrating Smart & Sustainable Coop Features
Take your DIY chicken coop to the next level by incorporating smart technologies and sustainable practices that enhance efficiency, convenience, and eco-friendliness. This is where innovation truly meets practicality.
- Automatic Coop Doors: Automate your flock’s entry and exit, providing convenience and security.
- Types: Light-sensor, timer-based, or remote-controlled.
- DIY Solutions: Simple motors combined with timers or sensors.
- Safety Features: Obstruction sensors to prevent injury.
- Solar Power: Harness the sun’s energy for off-grid solutions.
- Simple Setups: Small solar panels can power LED lighting, small fans for ventilation, or an automatic door.
- Benefits: Reduces electricity bills, provides light during winter, powers ventilation without external wiring.
- Rainwater Harvesting Systems: Collect rainwater from your coop roof for your chickens’ water supply.
- Components: Guttering, downspout, filter, and collection barrel/tank.
- Benefits: Reduces reliance on municipal water, provides natural water for your flock.
- Passive Ventilation and Heating Design: Design your coop to naturally regulate temperature.
- Ventilation: Strategic placement of high and low vents for convection airflow.
- Heating: Southern-facing windows for passive solar gain in winter, thermal mass materials.
- On-Site Composting for Coop Waste: Turn chicken litter into valuable garden compost.
- Methods: Deep litter method, separate composting bins adjacent to the coop.
- Benefits: Reduces waste, creates nutrient-rich soil amendment.
- Choosing Eco-Friendly, Non-Toxic Building Materials: Select materials safe for your chickens and the environment.
- Examples: Untreated wood, natural paints/sealants, recycled plastic components.
- Smart Monitoring Systems: Keep an eye on your flock and coop conditions remotely.
- Temperature/Humidity Sensors: Monitor environmental conditions.
- Camera Options: IP cameras for live viewing and security.
- Feed/Water Sensors: Alerts when supplies are low.
DIY Automatic Coop Doors & Smart Monitoring Systems
These upgrades bring modern convenience and enhanced security to your DIY chicken coop.
- Components Required: A small 12V DC motor, a gear reduction box, a timer or light sensor, a limit switch, and a power source (battery, solar panel).
- Step-by-Step Installation Guide (Basic System)
- Benefits of Automated Systems: Unmatched convenience for busy schedules, consistent opening/closing times, and improved predator protection when you’re away.
Eco-Friendly Materials & Sustainable Coop Management
Building a sustainable DIY chicken coop benefits both your chickens and the planet.
- Best Practices for Sourcing Reclaimed and Recycled Materials: Look for pallets, old fence boards, reclaimed windows, and salvaged roofing. Always ensure materials are free of lead paint or toxic chemicals.
- Non-Toxic Sealants, Paints, and Finishes: Use food-grade mineral oil for wood, natural milk paints, or zero-VOC (volatile organic compound) paints.
- Designing for Passive Climate Control: Orient the coop to face south for maximum winter sun, use overhangs for summer shade, and incorporate generous but controllable ventilation.
- Integrating Waste Management: Implement the deep litter method (building up layers of bedding over months) or create dedicated composting bins for chicken manure and soiled bedding.
Maintenance, Troubleshooting & Ensuring Coop Longevity
A well-built DIY chicken coop requires ongoing care to remain a healthy and safe home for your flock. Proactive maintenance prevents major problems down the line.
- Routine Cleaning Schedules:
- Daily: Spot clean droppings, replenish food and water.
- Weekly: Change bedding in nesting boxes, rake out soiled bedding from coop floor.
- Monthly/Seasonally: Deep clean coop (remove all bedding, scrub surfaces, disinfect), check for pests.
- Common Pest Control Strategies:
- Mites/Lice: Regularly inspect chickens, use natural dust baths (diatomaceous earth), or specific treatments if necessary.
- Rodents: Keep feed in sealed containers, elevate feeders, ensure all gaps in coop are sealed.
- Flies: Manage manure, ensure good ventilation, use fly traps.
- Weatherproofing and Seasonal Preparations:
- Winter: Ensure drafts are sealed, but maintain high ventilation. Consider adding straw bales around the exterior for insulation.
- Summer: Maximize cross-ventilation, provide ample shade, ensure plenty of fresh, cool water.
- Troubleshooting Common Structural Issues:
- Leaks: Inspect roofing, caulk seams, check for damaged shingles or panels.
- Drafts: Seal gaps around windows and doors, ensure vents are controllable.
- Sagging: Check structural integrity of supports and framing, reinforce as needed.
- Repairing Wear and Tear: Address minor repairs promptly, such as loose hardware cloth, broken latches, or rotting wood, before they become major issues.
FOR MORE INFORMATION : 38 DIY Chicken Coop Plans and Ideas, from Weekend Projects to Dream Coops
Frequently Asked Questions (FAQ)
Here are answers to some of the most common questions about building your own DIY chicken coop.
- Can I use XYZ wood for my chicken coop?
- Generally, untreated lumber like pine, fir, or cedar is safe for interior surfaces where chickens will peck. Pressure-treated lumber is safe for exterior structural components that contact the ground, but avoid using it where chickens might peck it directly. Reclaimed wood is fine, but ensure it’s free of lead paint, chemicals, or excessive rot.
- How long does it take to build a DIY chicken coop?
- This varies greatly by plan complexity and your skill level. A simple A-frame might take a weekend, while a robust walk-in coop could take several weekends or even weeks. Planning time also needs to be factored in.
- What tools do I absolutely need to build a chicken coop?
- A tape measure, pencil, circular saw (or hand saw), drill, hammer, level, and safety glasses are essential. Many plans can be completed with these basic tools.
- How many chickens per square foot do I need?
- Aim for a minimum of 2-4 square feet per standard-sized chicken inside the coop and 8-10 square feet per bird in the outdoor run. Always provide more space if possible to ensure comfort and reduce stress.
- Can I put a heat lamp in the coop during winter?
- Heat lamps can be a fire hazard due to dry bedding. If absolutely necessary for very young chicks or sick birds, ensure it’s securely mounted, far from flammable materials, and monitored. For mature birds, proper ventilation combined with sufficient insulation (deep litter method, straw bales) is generally preferred over supplemental heat.