

Transforming your garden into a thriving sanctuary for local wildlife doesn’t have to be complicated or costly. A DIY bird bath is one of the most rewarding projects you can undertake, offering a vital water source for birds while adding undeniable charm and tranquility to your outdoor space. This ultimate guide provides everything you need, from simple, quick projects you can build in under an hour to detailed, durable constructions and unique, creative designs. Get ready to enhance your garden, support avian visitors, and enjoy the satisfaction of a truly homemade feature.
TABLE OF CONTENTS
Why a DIY Bird Bath is a Must-Have for Your Garden
Imagine the gentle chirping and fluttering wings as your garden becomes a vibrant hub of activity. A DIY bird bath isn’t just a decorative element; it’s a critical resource that offers numerous benefits for both your local ecosystem and your personal well-being. Birds need reliable access to fresh water for drinking and preening, especially during dry spells or harsh winters. Providing this essential amenity helps them maintain their feathers, regulate body temperature, and stay hydrated.
Beyond the ecological advantages, a thoughtfully crafted bird bath instantly elevates your garden’s aesthetic. It introduces a focal point, a calming sound, and a dynamic element that attracts feathered friends, turning your backyard into a living, breathing artwork. There’s immense personal satisfaction in creating something beautiful and functional with your own hands, knowing it directly contributes to the health of your local wildlife. This guide will walk you through every aspect, ensuring your project is a success.
Before You Build: Essential Planning & Safety
Embarking on any DIY bird bath project requires careful consideration to ensure both its success and the safety of its future occupants and builders. Planning ahead saves time, prevents frustration, and ensures your bird bath serves its purpose effectively and safely.
Choosing the optimal location is paramount. Look for a spot that offers a clear line of sight for birds to spot predators, yet is close enough to cover (like shrubs or trees) for quick escape. Partial shade helps keep the water cooler and reduces algae growth, while visibility from your window allows for maximum bird-watching enjoyment. Avoid placing it too close to feeders, as spilled seed can contaminate the water, and keep it away from areas with heavy human or pet traffic.
Identify all necessary tools and materials beforehand to prevent interruptions. Depending on your chosen project, this might include basic hand tools, protective gear, or specialized items. Always adhere to fundamental safety guidelines when working with materials like concrete, glass, or power tools. Wear gloves, eye protection, and ensure proper ventilation. If using electrical components for heated baths or bubblers, always consult with a qualified electrician and follow local codes.
Choosing Materials: Sustainable & Bird-Friendly Options
Making your DIY bird bath both beautiful and beneficial means selecting materials that are sustainable and completely safe for birds. Many common household items can be ingeniously upcycled, reducing waste and giving your bird bath a unique character. Old dishes, terracotta saucers, shallow bowls, tires, or even hollowed-out logs can form the basin or base.
When choosing materials, prioritize non-toxic options. Natural stone, unglazed terracotta, and untreated wood are excellent choices. Avoid treated wood or materials that might leach chemicals into the water. If you need to seal or paint your bird bath, opt for non-toxic, food-grade, or bird-safe sealants and paints. Research products carefully to ensure they won’t harm visiting birds. Water conservation is also a key consideration; design your bird bath to minimize evaporation and consider methods for collecting rainwater to refill it.
Easy & Quick DIY Bird Bath Ideas (Build in Under an Hour!)
Not all DIY bird bath projects demand an entire weekend. For beginners or those seeking instant garden gratification, these simple ideas can be completed in an hour or less, adding charm and function with minimal effort.
Terra Cotta Pot Bird Bath
This classic, easy homemade bird bath is perfect for any garden.
- Materials: 2-3 terracotta pots (different sizes, e.g., one large, one medium, one small), 1 large terracotta saucer, strong waterproof adhesive (e.g., construction adhesive or silicone sealant).
- Quick Steps:
- Clean and dry all pots and the saucer thoroughly.
- Invert the largest pot and apply adhesive to its base.
- Center and adhere the next largest inverted pot on top.
- Repeat with the smallest pot, creating a tiered stand.
- Apply adhesive to the top of the smallest pot, then carefully center and attach the large terracotta saucer.
- Allow to cure completely before filling with water (check adhesive instructions).
- Estimated Time: 30-45 minutes (plus curing time).
How to Make a DIY Birdbath Using Old Pots
Upcycled Plate & Plant Saucer Bird Bath
Combine existing items for a charming and effective upcycled bird bath.
- Materials: 1 sturdy old dinner plate (shallow, no chips), 1 plastic or ceramic plant saucer (larger than the plate), strong exterior-grade adhesive.
- Quick Steps:
- Clean both the plate and saucer well.
- Apply a generous amount of adhesive to the center of the inverted plant saucer.
- Carefully center the dinner plate on top of the adhesive, ensuring it’s level.
- Apply a bead of adhesive around the rim where the plate meets the saucer for extra stability.
- Let it cure completely, then place it on a stable surface like a tree stump or a sturdy pedestal.
- Estimated Time: 20-30 minutes.
Hanging Bowl Bird Bath
Ideal for small spaces or to keep water elevated from ground predators.
- Materials: 1 shallow, sturdy plastic or metal bowl (about 10-12 inches wide, 1-2 inches deep), 3-4 lengths of strong, weather-resistant rope or chain (approx. 2-3 feet each), drill with appropriate bit (if drilling holes).
- Quick Steps:
- If your bowl doesn’t have holes, carefully drill 3-4 evenly spaced holes around its rim, about an inch down.
- Thread one end of each rope/chain through a hole and secure it with a knot or clip.
- Gather the loose ends of the ropes/chains together above the bowl and tie them into a sturdy knot, forming a hanging loop. Ensure the bowl hangs level.
- Hang from a strong tree branch or shepherd’s hook.
- Estimated Time: 15-25 minutes.
Step-by-Step Guides for Durable DIY Bird Baths
For those seeking a more robust and long-lasting feature, these detailed DIY bird bath projects offer superior durability and a more substantial presence in your garden. These step-by-step guides provide comprehensive instructions for impressive results.
Concrete Leaf Bird Bath
Create a stunning, natural-looking basin using a large leaf as a mold.
- Tools: Trowel, heavy-duty gloves, safety glasses, bucket for mixing, wheelbarrow (optional), heavy plastic sheeting.
- Materials: Large, sturdy leaf (e.g., rhubarb, hosta, burdock), bag of quick-setting concrete mix, plastic wrap, cooking oil spray, sand.
- Steps:
- Preparation: Find a large, undamaged leaf. Create a mound of sand (approx. 6-8 inches high, larger than your leaf) in your work area. Cover the sand mound with plastic wrap, smoothing out wrinkles.
- Leaf Placement: Lay your chosen leaf, vein-side up, over the plastic-covered sand mound. Spray the leaf generously with cooking oil; this prevents concrete from sticking.
- Concrete Mixing: In a bucket or wheelbarrow, mix your concrete according to package directions. It should be firm, like thick oatmeal, not too watery.
- Application: Carefully scoop concrete onto the center of the leaf, pressing it down firmly. Spread the concrete outwards, following the shape of the leaf, maintaining a thickness of about 1-2 inches. Build up the edges slightly to create a water basin.
- Shaping: Use your hands (with gloves) or a trowel to smooth the concrete, ensuring the basin is relatively level and deep enough to hold water (1-2 inches in the center is ideal).
- Curing: Cover the entire concrete leaf with plastic sheeting to keep it moist and allow it to cure slowly. Check the concrete package for specific curing times (usually 24-48 hours, but sometimes longer for full strength).
- Demolding: Once fully cured, carefully lift the concrete leaf. Peel away the plastic wrap and the leaf itself. You should have a beautiful, vein-patterned basin.
- Finishing: If desired, you can gently sand any rough edges. For extra durability and to seal pores, apply a non-toxic, pond-safe concrete sealer.
- Placement: Place your finished concrete leaf bird bath on a sturdy base in your chosen garden spot.
- Estimated Time: 1-2 hours of active work, plus 24-48+ hours curing.
How to make the perfect bird bath
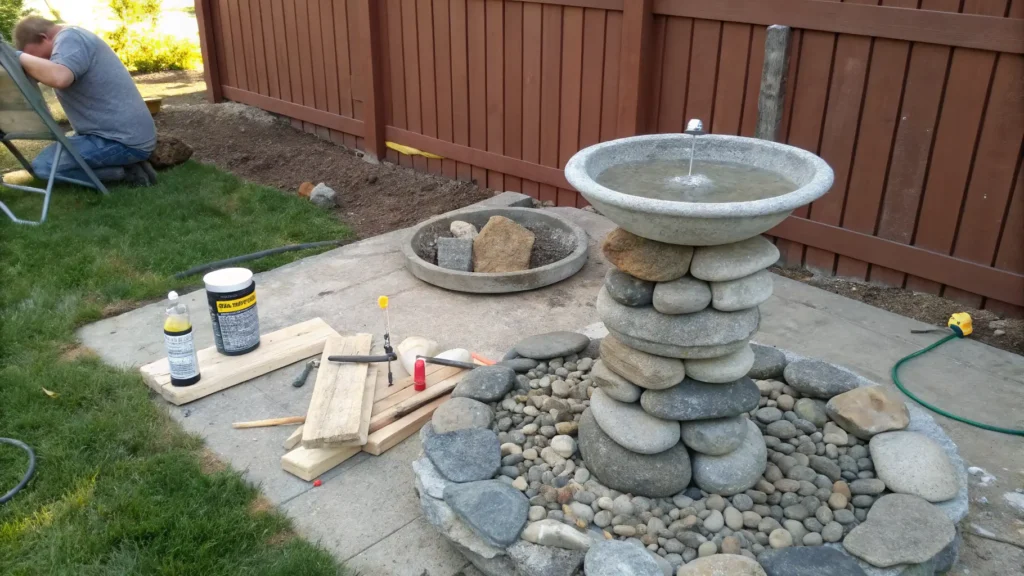
Stacked Stone Bird Bath
Achieve a natural, rustic look with a stacked stone bird bath.
- Tools: Trowel, heavy-duty gloves, level, chisel (optional, for shaping stones).
- Materials: Variety of flat, smooth stones (river stones, flagstones), large shallow basin (e.g., ceramic or concrete saucer), strong exterior-grade construction adhesive or mortar mix.
- Steps:
- Base Preparation: Choose a flat, stable area in your garden. If needed, create a small, level concrete pad or compact gravel base to ensure stability.
- First Layer: Select several large, flat stones to form the initial layer of your pedestal. Arrange them in a stable configuration.
- Adhere/Mortar: Apply a generous layer of construction adhesive or mortar between the first and second layers of stones. Ensure full contact.
- Stacking: Continue stacking stones, using progressively smaller ones as you build upwards. Vary the shapes and sizes for visual interest, ensuring each layer is level and securely adhered.
- Pillar Construction: Aim for a sturdy, slightly tapering pillar. Use a level periodically to check for plumb.
- Basin Placement: Once your stone pillar reaches the desired height (typically 2-3 feet), apply a thick layer of adhesive or mortar to the top.
- Attach Basin: Carefully center and press your shallow basin onto the top of the stone pillar. Ensure it’s level and well-seated.
- Curing: Allow the adhesive or mortar to cure completely, following manufacturer instructions, before filling with water. This is crucial for stability.
- Estimated Time: 2-4 hours of active work, plus curing time.
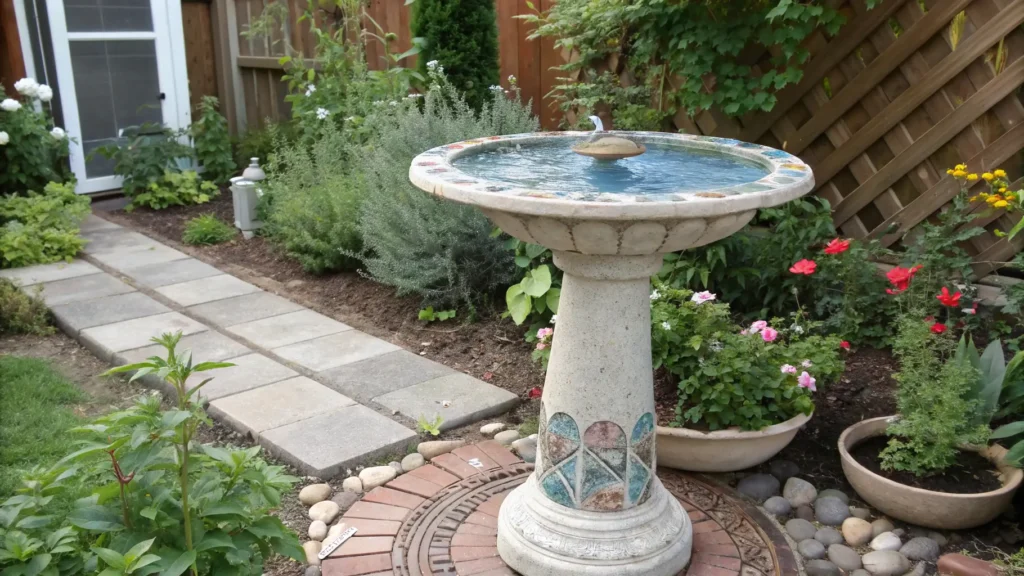
Creative & Aesthetic DIY Bird Bath Designs
Your DIY bird bath can be more than just functional; it can be a statement piece that perfectly complements your garden’s aesthetic. Here are some inspirational ideas focusing on design and integration.
Rustic Log Bird Bath
Embrace nature’s beauty with a bird bath carved from a log.
- Design Principle: Focus on natural materials, weathered textures, and organic shapes.
- Materials: A wide, sturdy log section (hardwood like oak or cedar preferred), chisel and mallet, wood sealer (food-grade/non-toxic).
- Integration: Perfect for woodland gardens, cottage gardens, or naturalized landscapes.
Modern Minimalist (Stacked Pavers/Concrete)
Clean lines and geometric shapes define this contemporary style.
- Design Principle: Simple forms, monochromatic colors (grays, whites), textured concrete, and a sense of understated elegance.
- Materials: Concrete pavers or blocks, pre-cast concrete basin, construction adhesive.
- Integration: Complements contemporary, urban, or Zen-inspired gardens.
Whimsical Teacup/Teapot Bird Bath
Add a touch of playful charm with an imaginative homemade bird bath.
- Design Principle: Repurposing antique or decorative ceramic teacups, teapots, and saucers. Focus on creating a narrative or a quirky arrangement.
- Materials: Vintage teacups, saucers, small teapot, strong waterproof adhesive, metal rods for stability (optional).
- Integration: Ideal for cottage gardens, whimsical spaces, or as a focal point in a seating area.
Mosaic Tile Bird Bath
Unleash your artistic side with a vibrant, personalized design.
- Design Principle: Using broken tiles, glass, or pottery shards to create intricate patterns or colorful scenes.
- Materials: Existing bird bath basin or a simple concrete base, mosaic tiles/shards, tile adhesive, grout, grout sealer.
- Integration: Adds a burst of color and personality to any garden style, especially effective in eclectic or Mediterranean-inspired spaces.
Choosing Your Perfect DIY Bird Bath: A Comparative Guide
With so many fantastic DIY bird bath options, how do you choose the right one for you? This comparative guide helps you weigh the pros and cons based on key factors, empowering you to select the best project for your skills, budget, and garden vision.
| DIY Bird Bath Type | Difficulty | Estimated Cost | Time Required | Durability | Best For | Unique Features |
|---|---|---|---|---|---|---|
| Terra Cotta Pot | Easy (1/5) | $ | < 1 hour (active) | Medium | Beginners, rental properties, quick refresh | Portable, customizable with paint |
| Upcycled Plate & Saucer | Easy (1/5) | $ | < 30 mins (active) | Low-Medium | Budget-conscious, small spaces | Resourceful, unique aesthetic depending on items used |
| Hanging Bowl | Easy (1/5) | $ | < 30 mins (active) | Medium | Small gardens, elevated from predators | Space-saving, often comes pre-made with hanging kits |
| Concrete Leaf | Medium (3/5) | $$ | 1-2 hours (active) + curing | High | Nature lovers, rustic gardens, focal points | Organic shape, highly durable, unique texture |
| Stacked Stone | Medium (3/5) | $$-$$$ | 2-4 hours (active) + curing | High | Naturalistic gardens, long-term features | Sturdy, integrates seamlessly with landscaping |
| Whimsical Teacup/Teapot | Medium (2/5) | $$-$$$ | 1-3 hours (active) | Medium | Cottage, eclectic, playful gardens | Charming, personality-driven, conversation starter |
| Modern Minimalist | Medium (3/5) | $$-$$$ | 2-4 hours (active) | High | Contemporary, Zen, urban gardens | Sleek, architectural, clean lines |
| Mosaic Tile | Hard (4/5) | $$$-$$$$ | 4-8+ hours (active) | High | Artistic, vibrant gardens, personalized | Highly customizable, decorative, durable with good seal |
Advanced DIY Bird Bath Features & Upgrades
Take your homemade bird bath to the next level with these thoughtful features and upgrades, designed to enhance both functionality and aesthetic appeal, catering to year-round use and specific garden needs.
How to Build a DIY Heated Bird Bath for Winter
Providing water during winter is crucial for birds when natural sources freeze.
- Considerations: Choose a shallow basin that won’t crack in freezing temperatures.
- Insulation: Insulate the base of your bird bath using materials like rigid foam insulation or straw bales to help retain heat.
- Low-Wattage De-icers: The safest and most effective method is to use a purpose-built, low-wattage electric de-icer (typically 50-150 watts) designed for bird baths. Ensure it’s outdoor-rated and has a grounded plug.
- Electrical Integration: Run an outdoor-rated extension cord to a GFCI-protected outlet. Bury the cord or secure it safely to prevent tripping hazards. Always prioritize safety and consult an electrician if unsure.
- Expert Insight: “Moving water, even just a slight ripple, is a powerful attractant for birds, and a heated bath can be a lifesaver in winter when other water sources are frozen solid.” – Avian Conservation Specialist.
Adding a Bubbler or Fountain to Your DIY Bird Bath
The sound and movement of water are irresistible to birds, signaling a fresh, flowing source.
- Small Pumps: Look for small, submersible solar-powered or electric pumps designed for small ponds or fountains.
- Simple Plumbing: Many pumps come with small tubing and fountain heads. Position the pump in the deepest part of your basin and direct the water flow to create a gentle bubbler or a small, trickling fountain.
- Water Movement: Ensure the water movement is gentle enough not to scare smaller birds or splash out too much water.
Integrated Planters or Lighting
Combine your bird bath with other garden features for a cohesive design.
- Planters: Design the base of your bird bath to include integrated planting pockets for succulents, herbs, or small flowering plants. This softens the look and attracts pollinators.
- Lighting: Incorporate low-voltage LED lighting (solar or wired) around or under the bird bath for a magical nighttime ambiance. This also helps birds locate it in twilight hours and adds a layer of security.
Maintenance & Care for a Long-Lasting Bird Bath
A well-maintained DIY bird bath will attract more birds and last for years. Regular cleaning and care are essential for keeping the water fresh and preventing the spread of diseases among your feathered visitors.
- Regular Cleaning Schedule: Aim to clean your bird bath every 2-3 days, especially in warmer weather. Algae and debris can accumulate quickly.
- Cleaning Methods:
- Empty & Scrub: Dump out old water, then use a stiff brush or scrub pad to remove any algae, dirt, or bird droppings. Avoid using harsh chemicals or detergents.
- Natural Solutions for Algae: For stubborn algae, a solution of 9 parts water to 1 part white vinegar can be effective and bird-safe. Rinse thoroughly with clean water afterward.
- Refilling: Always refill with fresh, clean water. Tap water is generally fine, but consider letting it sit for an hour or two to allow chlorine to dissipate.
- Seasonal Care:
- Summer Refresh: Clean more frequently due to faster algae growth and higher evaporation rates.
- Winterization: For non-heated baths, empty and dry them completely before freezing temperatures set in to prevent cracking. Store fragile bird baths indoors.
- Common Troubleshooting:
- Leaks: For small cracks in concrete or terracotta, use a non-toxic, pond-safe sealant. For larger leaks, consider replacing the basin.
- Pest Control: Standing water can attract mosquitoes. Ensure regular cleaning and consider adding a bubbler to disturb the water surface.
- Repairs: Re-adhere loose stones or decorative elements with appropriate outdoor-grade adhesive.
Frequently Asked Questions About DIY Bird Baths
Here are answers to some of the most common questions about creating and maintaining your own DIY bird bath.
Q: Is a DIY bird bath safe for birds? A: Absolutely, if you use bird-friendly materials (non-toxic paints/sealants, no sharp edges) and maintain it with regular cleaning. The safety of a DIY bird bath depends on careful construction and consistent care.
Q: What is the ideal depth for a bird bath? A: Birds prefer shallow water. The ideal depth is typically 1-2 inches in the center, gradually sloping up to the edges. This allows small birds to wade comfortably without feeling overwhelmed.
Q: How often should a bird bath be cleaned? A: Ideally, every 2-3 days, especially during warm weather. Daily rinsing and refilling are even better to ensure the freshest water and prevent disease.
Q: Can I use tap water in my DIY bird bath? A: Yes, tap water is generally safe. If you’re concerned about chlorine, you can let the water sit in a bucket for a few hours before filling the bath, allowing the chlorine to evaporate.
Q: How do I attract birds to a new bird bath? A: Ensure it’s in a safe, visible location. Adding a few small, smooth stones to the basin helps birds gauge depth. A bubbler or trickling sound can also be a powerful attractant. Patience is key!
Q: How do I fix a leaky DIY bird bath? A: For minor leaks, a non-toxic, waterproof sealant designed for ponds or outdoor use can often do the trick. Clean and dry the area thoroughly before applying. For larger cracks, you may need to replace the basin or reinforce it significantly.
Conclusion
Creating a DIY bird bath is a deeply satisfying project that offers immense benefits to both your garden and the local ecosystem. From quick, charming designs that come together in minutes to robust, lasting structures and innovative features like heating or bubblers, there’s a project for every skill level and aesthetic preference. By carefully planning, choosing bird-friendly materials, and committing to regular maintenance, you can provide an essential water source for your feathered friends while adding beauty and tranquility to your outdoor sanctuary. Take pride in knowing that your homemade bird bath is a beacon for wildlife and a testament to your creativity. Start building your perfect bird bath today and watch your garden come alive!