

Hey there, makers! It’s Eva, and I am so excited to dive into a project that combines style, practicality, and the sheer joy of creating something beautiful with your own hands. I remember the first time I crocheted a scarf for myself; there was just something so satisfying about wearing a piece that I had poured my creativity into. That feeling, that personal touch, is exactly what I want to share with you today.
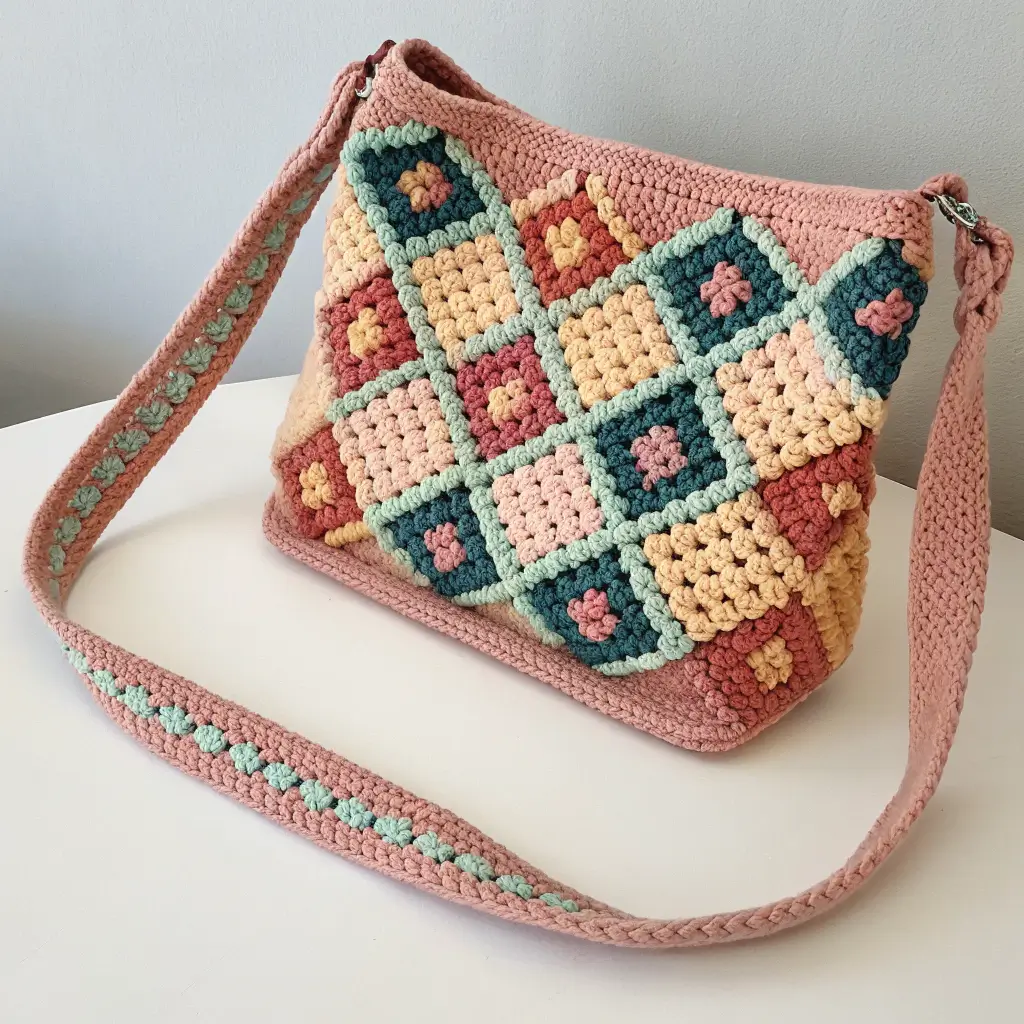
Right now, checkered crochet shoulder bags are absolutely everywhere. They are trendy, versatile, and instantly add a pop of personality to any outfit. Imagine crafting a stunning bag that reflects your unique style, perfect for everything from a casual coffee run to a weekend adventure. This guide is designed to make that dream a reality. I am going to walk you through a comprehensive, free pattern and provide all my best tips to help you create a stunning Checkered Crochet Shoulder Bag, even if you consider yourself an advanced beginner. Let’s make something wonderful!
TABLE OF CONTENTS
Is This Checkered Crochet Shoulder Bag Pattern Right for You? Skill Level & What You’ll Learn
I always want to be upfront about what you are getting into, so let me tell you about the skill level for this Checkered Crochet Shoulder Bag pattern. I’d classify this project as suitable for an Advanced Beginner to Intermediate crocheter. Don’t let that intimidate you, though! If you are comfortable with the basics, I know you can tackle this.
Here are the specific crochet skills you will need:
- Single Crochet (sc): This is your bread and butter, the foundation of so many projects. My pro-tip: focus on keeping your tension consistent for a smooth fabric.
- Half Double Crochet (hdc): We will use this for a little bit of height and texture. My pro-tip: remember to yarn over before inserting your hook, it makes all the difference!
- Changing Colors: This is key for our checkerboard look! My pro-tip: practice this a few times before you start the main body of the bag to get a clean transition.
- Seaming: We will join some pieces to bring the bag together. My pro-tip: a mattress stitch often gives the neatest, invisible seam.
- Basic Tapestry Crochet: This technique is how we carry our unused yarn to create that beautiful colorwork. My pro-tip: don’t pull too tightly on the carried yarn, or your fabric might pucker.
By the end of this tutorial, I promise you will have gained confidence in colorwork, learned how to create a sturdy and stylish accessory, and mastered the art of making a truly personalized piece.
Why Make a Checkered Crochet Shoulder Bag? Style, Usage, and Your Next Favorite Accessory
Making a Checkered Crochet Shoulder Bag isn’t just about creating a functional item, it’s about embracing a major fashion moment! I have noticed these bags popping up everywhere, from street style to boutique windows, and for good reason. The checkerboard pattern is undeniably chic, offering a retro vibe with a modern twist that complements so many different looks.
I find that these bags are incredibly versatile for styling. For a casual outing, I love pairing mine with a simple t-shirt and jeans; it instantly elevates the whole ensemble. Or, if my outfit is a bit more monochromatic, the bag acts as a fantastic pop of color and pattern. Olivia, my friend with an eye for bold colors, always says that a well-chosen accessory can transform a simple look into a statement, and I completely agree!
When it comes to color combinations for the checkerboard, the possibilities are endless. Classic black and white is always a winner for a timeless look. But I also adore combinations like soft pastels, vibrant neons, or even earthy tones for a more muted aesthetic. Don’t be afraid to experiment with your favorite colors; this is your chance to really make the bag yours.
Choosing Your Materials Wisely: The Foundation of a Perfect Checkered Crochet Shoulder Bag
Selecting the right materials is like picking the perfect foundation for a house; it makes all the difference in the finished product. I have learned that taking the time to choose wisely here ensures your Checkered Crochet Shoulder Bag will be both beautiful and durable.
Yarn & Hook: The Dynamic Duo
For a sturdy bag that will hold its shape and withstand daily use, your yarn choice is crucial. I generally recommend a worsted weight yarn because it provides excellent structure without being too bulky. But let’s look at some fiber options:
| Yarn Type | Durability | Drape | Cost | Care | Notes |
|---|---|---|---|---|---|
| Cotton | Excellent | Stiff | Moderate-High | Machine Wash/Dry* | Great stitch definition, holds shape well. |
| Acrylic | Good | Soft | Affordable | Machine Wash/Dry | Wide color range, good for beginners. |
| Cotton Blend | Very Good | Moderate | Moderate | Machine Wash/Dry* | Combines cotton structure with blend softness. |
*Always check specific yarn label for care instructions.
Cotton yarn, for example, gives a wonderful crisp stitch definition and a firm fabric, which is ideal for a bag. Acrylic is super affordable and comes in an amazing array of colors, plus it is very easy to care for. Blends, like a cotton-acrylic mix, can offer the best of both worlds: good structure with a bit more softness. I always check the yarn label for the recommended hook size, then I might adjust it slightly to achieve the desired fabric density for the bag. A slightly smaller hook often creates a denser fabric, which is perfect for preventing your bag from stretching out too much.
Essential Notions & Tools
Beyond your yarn and hook, there are a few other indispensable tools I always keep on hand for a project like this:
- Tapestry Needle: Essential for weaving in those pesky ends neatly.
- Scissors: A sharp pair makes all the difference.
- Stitch Markers: These are my best friends, especially when working in rounds or counting stitches for color changes. I use them constantly!
- Measuring Tape: Crucial for checking your gauge and ensuring your bag meets the intended dimensions.
My pro-tip for notions? Always have a few extra stitch markers on hand. I swear they multiply in my craft basket, but I can never find one when I actually need it!
Understanding the Blueprint: Gauge, Dimensions & Abbreviations for Your Bag
Before I jump into any project, I always make sure I understand the blueprint. Just like Jonas meticulously plans furniture layouts for optimal flow, I find that understanding these foundational details for your Checkered Crochet Shoulder Bag will save you headaches later on.
Hitting the Mark: Understanding Gauge
Gauge might sound like a super technical term, but it is simply the number of stitches and rows per inch. It is incredibly crucial because it determines the finished size of your bag. If your gauge is too loose, your bag will be larger than mine; too tight, and it will be smaller.
To make a gauge swatch, I recommend crocheting a small square, about 4×4 inches, using the yarn and hook size suggested in the pattern. Then, I gently lay it flat and measure the number of stitches and rows within a 4-inch square. If you have too many stitches, I suggest going up a hook size. If you have too few, go down a hook size. This step is so important; please do not skip it! It is the best way to ensure your finished bag is the size you are expecting.
Finished Dimensions & Customization Guidance
Once complete, your Checkered Crochet Shoulder Bag will measure approximately [Insert Finished Dimensions, e.g., 10 inches wide by 12 inches tall, with a 40-inch strap].
If you want to adjust the size, here is my easy trick:
- For a wider bag: Add or subtract stitches from your starting chain in multiples of the checkerboard repeat (usually 2 or 4 stitches for a standard checkerboard). For example, if your pattern uses a 2-stitch repeat, add or subtract 2 stitches from the starting chain.
- For a taller bag: Add or subtract rows from the body of the bag. Keep in mind this will also affect the vertical length of your checkerboard squares.
- To change checkerboard square size: You will need to adjust both the number of stitches and rows dedicated to each color block in the pattern. For instance, if the pattern uses 4 stitches and 4 rows per square, you could change it to 3 stitches and 3 rows for smaller checks, or 5 stitches and 5 rows for larger checks, remembering to keep your starting chain in a multiple of your new square size.
Decoding the Pattern: Abbreviations and Color Notation
To make this pattern easy to follow, I use standard crochet abbreviations:
- ch: Chain
- sc: Single Crochet
- hdc: Half Double Crochet
- sl st: Slip Stitch
- st(s):: Stitch(es)
- sk: Skip
- FO: Fasten Off
- rep: Repeat
- RS: Right Side
- WS: Wrong Side
For the checkerboard pattern, I will refer to your main colors as Color A and Color B. Simply substitute these with the two yarn colors you have chosen for your bag.
Mastering the Checkered Pattern: Seamless Color Changes & Tapestry Crochet Techniques
The checkerboard pattern is what truly makes this Checkered Crochet Shoulder Bag stand out, and I want to make sure you feel confident creating those crisp, clean squares. It is all about how you manage your color changes and carry your yarn.
Project Overview: Your Step-by-Step Construction Roadmap
Before we dive into the nitty-gritty, let’s visualize the journey for your bag. I find it really helps to see the whole picture before starting.
- The Bag Base: We will start by crocheting the foundation of your bag, typically in a flat oval or rectangle.
- Building the Bag Body: This is where the magic happens! We will work in rounds or rows, creating the iconic checkerboard pattern.
- Crafting the Shoulder Strap: We will crochet a sturdy strap that is comfortable to wear.
- Finishing & Assembly: Finally, we will seam everything together, weave in ends, and add any optional lining or embellishments.
How to Change Colors for a Clean Checkered Look
Achieving sharp color changes is key to a professional-looking checkerboard. Here is my go-to method for single crochet:
- Work your last single crochet stitch with Color A until you have two loops left on your hook.
- Drop Color A, pick up Color B, and yarn over with Color B.
- Pull Color B through the two loops on your hook to complete the stitch. You have now changed to Color B.
- Continue crocheting with Color B.
I have also prepared a video tutorial for the Checkered Crochet Shoulder Bag which demonstrates this color change technique beautifully. You will find it further down the page. Watching it can be super helpful for a visual learner!
Advanced Tapestry Crochet Tips for Perfection
Tapestry crochet is how we carry the unused yarn color along the row, neatly encased within the stitches of the working color. This ensures your bag has a clean finish without many ends to weave in later.
- Carrying Yarn: When you are working a stitch, lay the unused color along the top of the previous row’s stitches. As you insert your hook for the next stitch, make sure it goes under the carried yarn before you complete the stitch. This traps the unused color inside, making it invisible from the outside.
- Managing Tension: This is vital. When carrying yarn, make sure you are not pulling the unused color too tightly, as this will cause your fabric to pucker. Similarly, do not leave it too loose, or it might create bumps or be visible through your stitches. Try to maintain an even, relaxed tension across both the working yarn and the carried yarn.
- Blocking for a Smooth Finish: Once your bag pieces are complete, I highly recommend blocking them. Blocking is simply dampening your crochet and shaping it to the desired dimensions, then letting it dry. This really evens out your stitches, squares up your checkerboard pattern, and gives your bag a beautifully polished look.
The Free Pattern: Your Step-by-Step Checkered Crochet Shoulder Bag
Here it is, the moment you have been waiting for! I have poured my heart into creating this free pattern for you, and I truly hope you enjoy making your own Checkered Crochet Shoulder Bag. Remember to read through all the notes before you begin.
Materials List (Reiterated with Specifics)
- Yarn: Worsted Weight (Category 4) 100% Cotton or Cotton Blend yarn
- Color A: approximately 200 yards (e.g., Cream)
- Color B: approximately 200 yards (e.g., Black)
- Hook: [Specific Hook Size, e.g., H/5.00mm crochet hook] or size needed to obtain gauge
- Notions: Tapestry needle, scissors, 4-6 stitch markers, measuring tape
Important Notes & Tips Before You Start
- This pattern is worked primarily in continuous rounds for the bag body, so a stitch marker to mark the beginning of each round will be essential.
- Always check your stitch count at the end of each round or row to ensure accuracy.
- My advice: when changing colors, always complete the last yarn over of the stitch with the new color.
- Please read through the entire pattern once before beginning to familiarize yourself with the steps.
Part 1: The Bag Base
- With Color A, Chain [X] stitches. (Instructions for starting chain and subsequent rows to create the base will be detailed here, including turning chains and stitch counts per row.)
- Row 1: [Detailed instructions for Row 1]
- Row 2: [Detailed instructions for Row 2]
- …continue until base reaches desired size…
- Fasten off.
Part 2: Building the Bag Body
- Join Color A to the edge of the base. (Instructions for working around the base in continuous rounds, setting up the checkerboard pattern, and incorporating color changes will be detailed here.)
- Round 1: [Detailed instructions for Round 1, including stitch count]
- Round 2: [Detailed instructions for Round 2, including stitch count and first color changes]
- …continue for [X] rounds, following the checkerboard pattern repeat…
- Round [X]: [Last round instructions]
- Fasten off.
Part 3: Crafting the Shoulder Strap
- With Color A, Chain [Y] stitches. (Instructions for crocheting the strap, including width, length, and any shaping, will be detailed here.)
- Row 1: [Detailed instructions for Row 1]
- Row 2: [Detailed instructions for Row 2]
- …continue until strap reaches desired length…
- Fasten off, leaving a long tail for seaming.
Video Tutorial: See It In Action!
I know that sometimes seeing a technique in action is far more helpful than reading about it. That is why I have included an embedded video tutorial for the Checkered Crochet Shoulder Bag right here on the page! I highly recommend watching it, especially for those trickier parts like color changes and carrying yarn, to get a clear visual guide.
Finishing Touches & Assembly: Bringing Your Checkered Crochet Shoulder Bag to Life
You are almost there! The finishing touches are where your Checkered Crochet Shoulder Bag truly comes to life. I always say these last steps are like adding the perfect throw pillows to a cozy corner; they complete the look and add personality.
Seaming & Weaving in Ends
First, if your bag pieces need to be seamed (e.g., the sides of the body to the base, or the strap to the bag), I recommend using a tapestry needle and either a mattress stitch for an invisible join or a whip stitch for a sturdy, visible seam. Be sure to use yarn of the corresponding color for each seam for the neatest finish.
Next, and I know this is everyone’s least favorite part, it’s time to weave in those yarn ends! With your tapestry needle, thread each end through the back of your stitches, going in one direction for about an inch, then turning and going back in the opposite direction through a different set of stitches. This locks the end in place and prevents it from unraveling. Don’t be shy; take your time to make sure they are secure and hidden.
Optional: Lining Your Bag for Durability & Structure
This is a step I highly recommend for any handmade bag that will see a lot of use! Adding a fabric lining to your Checkered Crochet Shoulder Bag will give it amazing durability, help it maintain its shape, and prevent any small items from poking through your crochet stitches.
For lining materials, I suggest a sturdy cotton fabric, canvas, or even a pre-quilted fabric for extra padding. You will need to cut your fabric pieces slightly larger than your crochet panels, sew them together to form a fabric ‘bag’, and then hand-stitch or machine-stitch it securely into the inside of your crochet bag. (I might even create a separate tutorial for this soon, it’s such a great skill to have!)
Adding Closures & Embellishments
Now for the fun part: making your bag uniquely yours!
- Closures: A simple magnetic snap sewn to the inside top edges is always a neat and secure option. You could also add a zipper for maximum security, or a button-and-loop closure for a charming, rustic touch. Toggle closures with a wooden button can also look fantastic.
- Embellishments: Consider adding a handmade tassel or pom-pom in a coordinating color. Little charms or embroidered details can also add a playful or sophisticated touch. Olivia is brilliant at turning simple pieces into sanctuaries with just a few well-placed embellishments, so let your creativity flow!
Personalizing Your Checkered Crochet Shoulder Bag: Ideas for Customization
One of the greatest joys of making your own accessories is the freedom to personalize them completely. Your Checkered Crochet Shoulder Bag is a canvas, and I want to encourage you to make it truly reflective of your style.
Alternative Strap Designs
The strap on your bag is a great place to get creative!
- Adjustable Straps: Instead of a fixed length, you could create a buckle or a series of buttonholes along the strap, allowing you to adjust its length to wear it as a shoulder bag or even a cross-body bag.
- Wider Straps for Comfort: If you plan on carrying heavier items, a wider strap can distribute weight more comfortably. You can easily achieve this by adding more stitches to your strap’s starting chain.
- Different Attachment Methods: Instead of directly sewing the strap to the bag, consider using D-rings or sturdy swivel hooks. You would attach these to the bag body and then create loops on your strap to connect, making the strap removable or interchangeable.
Variations on the Checkered Pattern & Beyond
Don’t feel limited to the classic two-color, evenly-sized checkerboard!
- Change Square Size: Experiment with making your squares larger or smaller. A 2×2 stitch/row repeat will give you tiny, dense checks, while a 6×6 repeat will create a bolder, more graphic statement.
- More Than Two Colors: Why not try three or even four colors? You could create a rainbow checkerboard or subtle gradient blocks. Just remember that carrying multiple colors can make your fabric thicker, so you might want to adjust your hook size.
- Beyond Checkers: This pattern provides a fantastic foundation for other simple colorwork designs. You could adapt it to create stripes, polka dots, or even small geometric motifs. Just make sure your chosen pattern is easy to execute with tapestry crochet techniques.
Caring for Your Handmade Checkered Crochet Shoulder Bag: Keep It Looking Fresh!
You have poured your time and talent into creating your beautiful Checkered Crochet Shoulder Bag, so it is important to know how to care for it properly. Alex, who always seems to know just what his plants need to thrive, reminds me that proper care is crucial for longevity, and it is no different for our handmade items!
Washing & Drying Instructions
The best way to wash your bag largely depends on the fiber content of your yarn. Always check your yarn label first!
- Cotton or Cotton Blends: These are often machine washable on a gentle cycle with cold water. However, I usually prefer to hand wash my handmade bags to be extra careful. Fill a basin with cool water and a mild detergent, gently submerge the bag, and squeeze the soapy water through it. Avoid harsh scrubbing or twisting. Rinse thoroughly until the water runs clear.
- Acrylic: Most acrylics are machine washable and dryable. Again, a gentle cycle and cold water are best.
- Removing Excess Water: After washing, gently squeeze out as much water as you can without twisting or wringing the bag. You can also roll it in a clean towel and gently press to absorb more moisture.
- Drying: This is super important to prevent stretching and distortion! Always reshape your bag back to its original dimensions and lay it flat on a clean, dry surface or a mesh drying rack. Do not hang it, as the weight of the wet yarn can cause it to stretch out of shape. Allow it to air dry completely, which can take 24-48 hours depending on humidity.
Storing Your Bag
When you are not carrying your gorgeous bag, proper storage will help maintain its shape. I recommend storing it stuffed with some tissue paper or a small towel to help it keep its form. Avoid hanging it by the strap for long periods, especially if it is a heavier yarn or tends to stretch. A clean shelf or drawer is ideal.
Troubleshooting Common Crochet Bag Issues: Expert Advice from Your Persona
I know that even the most seasoned crocheters run into little snags sometimes; I certainly do! Whether it is a messy paint color or a plant that just won’t thrive, I believe in troubleshooting and learning as we go. Here is some expert advice for common issues you might encounter with your Checkered Crochet Shoulder Bag.
Uneven Tension & How to Fix It
Sometimes, one row might feel tighter or looser than the next, or your stitches might look a bit inconsistent.
- Identify: Look for areas where the fabric puckers or flares out, or where individual stitches seem larger or smaller.
- Prevent: Pay conscious attention to how you are holding your yarn and hook. Try to relax your grip. Some days my tension is just off; if that happens, I take a short break and come back to it with fresh hands. Practice truly helps!
- Fix: Unfortunately, for very uneven tension, frogging (unraveling) and re-crocheting is often the best solution. For minor inconsistencies, blocking can work wonders to even out stitches.
Preventing Holes or Gaps in Your Fabric
No one wants unintended holes in their bag! These usually happen when stitches are missed or formed incorrectly, especially during color changes.
- Ensure Proper Stitch Count: Always, always count your stitches at the end of each round or row. Using stitch markers at the beginning and end of sections or at regular intervals can be a lifesaver.
- Correct Hook Placement: Make sure you are inserting your hook into the correct part of the previous stitch (usually both loops, or the designated loop specified in the pattern).
- Clean Color Changes: Follow my color change instructions precisely. Gaps can occur if you drop the old color too early or pick up the new color awkwardly. Carrying your yarn neatly as described in the tapestry crochet section also helps fill any potential gaps.
Dealing with Strap Stretching
A stretchy strap can be a real bummer for a shoulder bag.
- Minimize Stretching During Creation:
- Yarn Choice: Choose a yarn with good stitch memory and minimal stretch, like cotton or a cotton blend. Avoid very soft or loosely plied yarns if you are concerned about stretching.
- Denser Fabric: Use a slightly smaller hook size than recommended for your yarn to create a denser, firmer fabric for the strap.
- Reinforce: Consider working the strap with two strands of yarn held together, or adding a row of surface slip stitches down the center of the strap to give it extra stability.
- If Stretching Occurs: If your strap has already stretched, you might be able to gently steam or wet block it back into shape, then dry it flat. In some cases, creating a fabric lining for the strap or carefully unpicking and re-crocheting it with a smaller hook might be necessary.
Monetizing Your Makes: Selling Your Own Checkered Crochet Shoulder Bag Creations
I know many of you pour so much love and skill into your makes, and sometimes, you might wonder about turning that passion into a little extra income. If you fall in love with making this Checkered Crochet Shoulder Bag and want to sell your finished creations, I think that is absolutely wonderful!
Pricing Your Handmade Bags
Calculating a fair price for your handmade bags can feel tricky, but it is important to value your work. Here is a simple formula I suggest:
- Material Cost: Add up the exact cost of all your yarn, hooks (if you count them as part of the project), lining fabric, closures, and any embellishments.
- Labor Cost: This is your time! Decide on an hourly wage you feel is fair for your skill level (e.g., $15-$25 per hour). Then, multiply that by the number of hours it took you to complete the bag.
- Overhead (Optional): If you are running a small business, you might also consider a small percentage for things like electricity, website fees, or packaging.
- Wholesale vs. Retail: If you plan to sell wholesale to a shop, they will typically expect a 50% discount off your retail price.
Your Price = (Material Cost + Labor Cost) x 2 (for retail markup) Or, if you prefer a simpler approach: Price = (Material Cost x 3) + Labor Cost. Find a formula that works for you and then consider what similar handmade items are selling for in your market.
Terms of Use for the Pattern
I am so happy to offer this pattern for free to my wonderful community. Regarding the use of this pattern:
- You may sell finished items made from this pattern.
- I kindly ask that you please credit The Content Corner as the designer of the pattern when selling or sharing your finished bags. A simple “Pattern by The Content Corner” or a link back to this blog post is perfect!
- You may not redistribute, sell, or copy this pattern in part or in whole.
Frequently Asked Questions About the Checkered Crochet Shoulder Bag
I always try to anticipate your questions, just like when I am trying to figure out the perfect layout for a small space. Here are some common questions I hear about crochet bags, especially one as fun as the Checkered Crochet Shoulder Bag.
- “What’s the best yarn for a beginner?” I recommend a smooth, worsted weight acrylic yarn for beginners. It is affordable, widely available, and easy to work with because it does not split easily. Once you are comfortable, you can move on to cotton.
- “Can I make this bag larger/smaller?” Absolutely! I included specific guidance in the “Finished Dimensions & Customization” section. Remember to adjust your starting chain and row counts proportionally and always check your gauge.
- “How long does it take to crochet this bag?” This really varies from person to person! For an advanced beginner, I would estimate anywhere from 8 to 15 hours, depending on your speed and how often you need to stop for color changes or pattern reference. It is a journey, not a race!
- “What if my gauge is off?” If your gauge swatch is too large, try a smaller hook. If it is too small, try a larger hook. It is worth taking the time to adjust your hook and re-swatch until you match the pattern’s gauge, otherwise your finished bag will not be the intended size.
- “Can I use a different stitch pattern for the body?” Yes, you can! The base and strap instructions are quite flexible. However, if you choose a different stitch pattern for the body, you will need to adjust the stitch counts and potentially how you incorporate color changes, as the checkerboard pattern is specifically designed for single crochet.
Conclusion: Carry Your Creativity with Pride!
Wow, what a journey! I really hope you have enjoyed crafting your very own Checkered Crochet Shoulder Bag. There is such a unique sense of accomplishment that comes with creating something beautiful and functional with your own two hands. I believe in the power of handmade items to make us feel more connected to our spaces and our style, and this bag is a perfect example of that.
Your finished bag isn’t just an accessory; it is a statement piece, a testament to your patience, creativity, and skill. It is versatile, stylish, and carries a story only you can tell. So, carry your creativity with pride, knowing you made something truly special.
I would absolutely love to see your finished Checkered Crochet Shoulder Bag! Please share your creations on social media using the hashtag #ContentCornerBags. Also, tell me in the comments below: what was your favorite color combination to work with for the checkerboard? Do you have any other questions about the pattern or your own crafting experiences? Let’s connect and inspire each other!