

That familiar feeling of dread. A science project is due, the instructions seem complicated, and you’re wondering where to even begin. I’ve been there, and I know how stressful it can be. But I’m here to tell you that learning how to make a plant cell model doesn’t have to be a headache. In fact, it can be a really fun, creative, and delicious activity.
This guide is designed to be your friendly helper, breaking everything down step-by-step. I’ll walk you through not just the how-to of building a great model, but also the simple science behind it. My goal is to turn this school assignment into an awesome hands-on project you’ll actually enjoy.
TABLE OF CONTENTS
What is a Plant Cell? A Quick Science Primer
So, what exactly is a plant cell? Think of it as the tiniest building block of all plant life, from a blade of grass to a giant redwood tree. Just like our bodies are made of trillions of cells, all plants are made of these microscopic powerhouses.
Each plant cell is like a miniature factory, with different parts working together to help the plant make food, grow, and stay strong. Understanding these basic functions is the first step toward building an accurate and impressive model.
Anatomy of a Plant Cell: Your Project Cheat Sheet
Before you start building, it helps to have a clear picture of what you’re making. I recommend finding a labeled plant cell diagram online to use as your guide. It will act as your blueprint. To make it even easier, I’ve put together this simple “cheat sheet” that explains what each part does and gives you an idea for how to represent it in your model.
| Organelle | Function & Model Idea |
|---|---|
| Cell Wall | The tough outer layer that gives the plant cell its rigid, boxy shape and provides protection. Model Idea: The box for a Jell-O model, or a hard licorice border. |
| Cell Membrane | A thin layer just inside the cell wall. It controls what goes in and out of the cell. Model Idea: A fruit roll-up or a thin layer of different colored frosting. |
| Nucleus | The “brain” of the cell. It contains all the genetic information (DNA) and controls the cell’s activities. Model Idea: A large gumball, jawbreaker, or a round piece of fruit like a plum pit. |
| Cytoplasm | The jelly-like substance that fills the cell and holds all the other organelles in place. Model Idea: The Jell-O itself, cake, or clear frosting. |
| Chloroplasts | These are the food factories. They use sunlight to make sugar for the plant (photosynthesis). They are what make plants green! Model Idea: Green jelly beans, green M&Ms, or peas. |
| Vacuole | A large, water-filled sac that stores water, nutrients, and waste. It helps keep the cell firm. Model Idea: A large gummy candy or a water balloon (for a non-edible model). |
| Mitochondria | The “powerhouses” of the cell. They convert sugar into usable energy. Model Idea: Orange or red Tic Tacs, Mike and Ikes, or small oval-shaped beans. |
Plant Cell vs. Animal Cell: Key Differences for Your Model
One of the quickest ways to impress a teacher is to show you know the difference between a plant cell and an animal cell. Getting this right is key to an accurate project. Plant cells have three key parts that animal cells don’t, and each one is very important.
| Feature | Plant Cell | Animal Cell | Why It’s Important for Plants |
|---|---|---|---|
| Cell Wall | Yes. A rigid outer layer. | No. Only has a flexible cell membrane. | The cell wall provides the structural support that allows plants to grow tall and stand upright without a skeleton. |
| Chloroplasts | Yes. Contains chlorophyll for photosynthesis. | No. Animals get energy from eating food. | Chloroplasts allow plants to make their own food from sunlight, which is the foundation of most food chains on Earth. |
| Vacuole | Yes. One large, central vacuole. | Maybe. If present, they are small and numerous. | The large central vacuole stores water and maintains pressure against the cell wall, keeping the plant from wilting. |
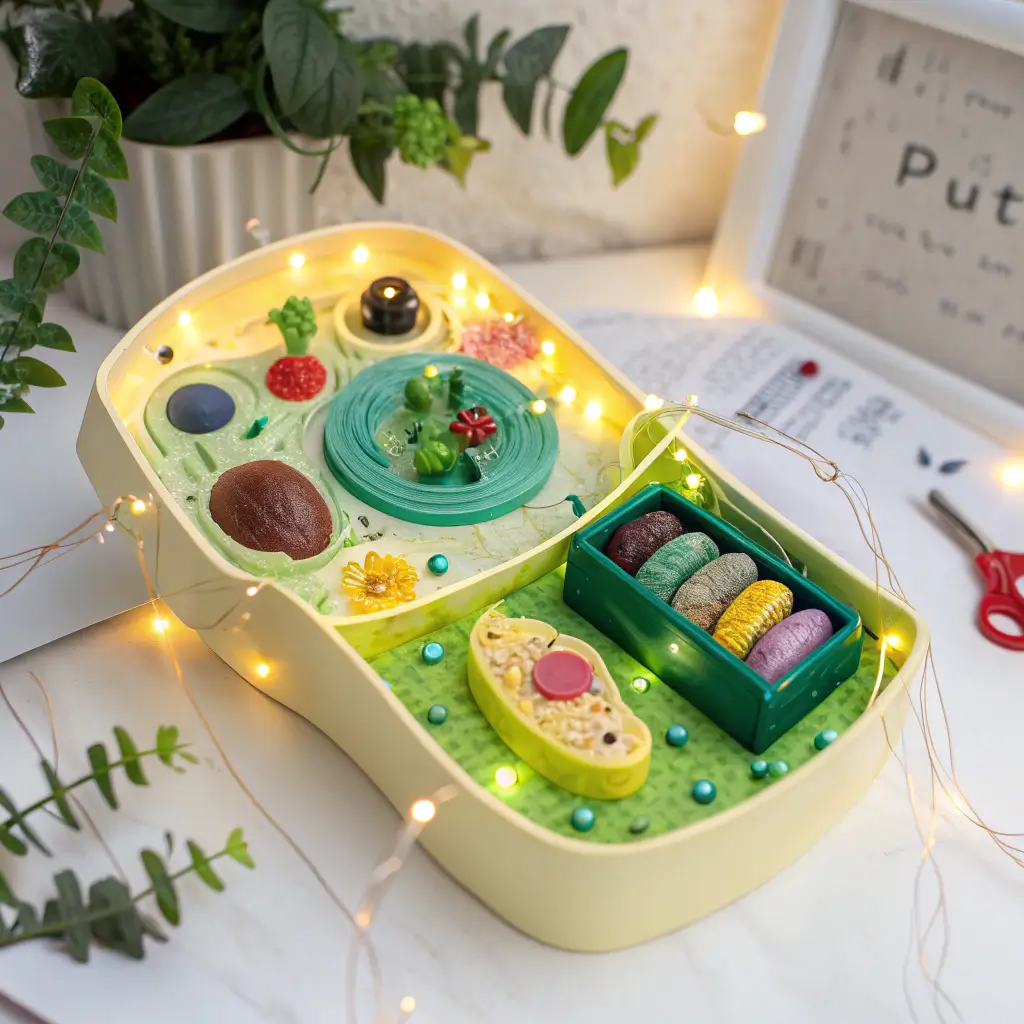
How to Make a Creative DIY Plant Cell Model (3 Fun Methods)
Now for the fun part: building it! You don’t need fancy lab equipment, just a few common household items. I’ll walk you through three of my favorite methods to create a plant cell model.
Method 1: The Edible Cake or Cookie Plant Cell Model
This is my personal favorite because you get to eat your homework! It’s perfect for visual learners and anyone with a sweet tooth.
Materials:
- A baked round or rectangular cake (or a large sugar cookie)
- White or light green frosting (for the cytoplasm)
- A different color frosting or a Fruit Roll-Up (for the cell membrane)
- Twizzlers or other rope-like licorice (for the cell wall)
- A gumball or jawbreaker (for the nucleus)
- Green jelly beans or M&Ms (for the chloroplasts)
- A large gummy bear or fruit slice (for the vacuole)
- Red or orange Tic Tacs or Mike and Ikes (for the mitochondria)
- Sprinkles
Instructions:
- Create the Base: Place your cooled cake or cookie on a flat tray. This will be the foundation of your cell.
- Add the Cytoplasm: Spread a thick, even layer of the light-colored frosting over the entire top of the cake. This represents the cytoplasm.
- Build the Walls: Use the licorice ropes to create a rectangular border around the edge of the cake. This is your rigid cell wall. Just inside that, use the Fruit Roll-Up or a line of different frosting for the flexible cell membrane.
- Place the Organelles: Gently press your candies into the frosting. Place the large jawbreaker (nucleus) near the center, the large gummy (vacuole) to one side, and scatter the green jelly beans (chloroplasts) and red Tic Tacs (mitochondria) throughout the frosting.
- Finishing Touches: Add some sprinkles to fill in the space and give your cytoplasm texture. Now it’s ready to be labeled!
Method 2: The 3D Clay or Play-Doh Plant Cell Model
If you want a model that lasts longer and is great for hands-on studying, clay is the way to go. It’s a very versatile material for school projects, whether you’re building a cell or an amazing DIY dinosaur costume. It really helps you visualize the 3D structure.
Materials:
- A styrofoam ball cut in half, or a clear, rectangular plastic container
- Modeling clay or Play-Doh in various colors (e.g., green, blue, yellow, red, brown, purple)
- A rolling pin and plastic knife (optional)
Instructions:
- Prepare Your Container: If using a container, this will represent your cell wall. If using a styrofoam half, that’s your base.
- Add the Cytoplasm: Press a large, flat layer of your main color (like light green or yellow) into the bottom of the container or onto the styrofoam base. This is the cytoplasm.
- Shape the Organelles: Use different colored clays to form each organelle. For example:
- Nucleus: A purple ball.
- Vacuole: A large, light blue oval.
- Chloroplasts: Small, flat green discs.
- Mitochondria: Small, red or orange ovals.
- Cell Membrane: A thin, rolled-out snake of a different color to line the inside of the cell wall.
- Assemble the Cell: Carefully place and press each clay organelle into the cytoplasm base. Refer to a diagram to make sure you’re placing them correctly. The vacuole should be large, and the nucleus prominent.
- Label Your Model: Once assembled, you can use small flags made from toothpicks and paper to label each part.
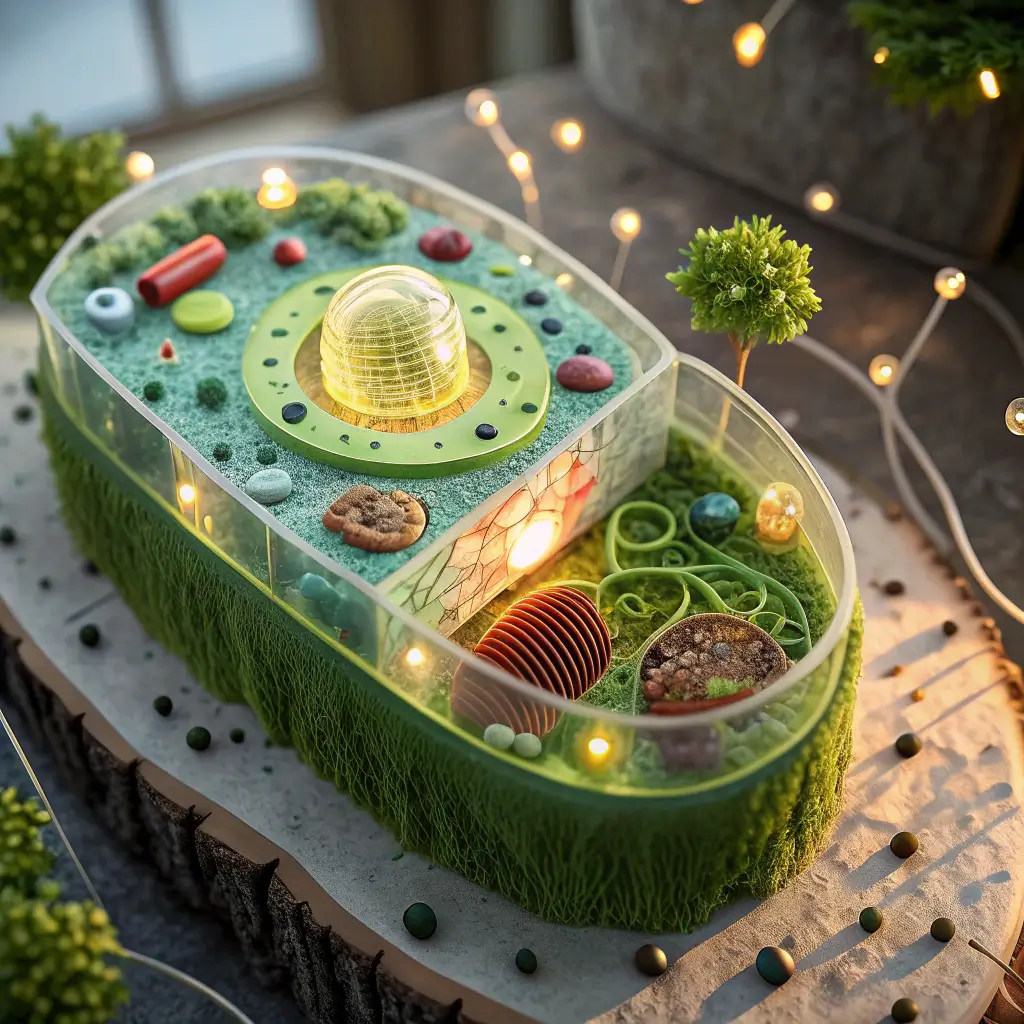
Method 3: The Classic Jell-O Plant Cell Model
This method is a science fair classic for a reason! The transparent Jell-O perfectly mimics the cytoplasm holding all the organelles.
Materials:
- One package of light-colored gelatin mix (like lemon or lime)
- A square or rectangular clear glass dish or plastic bag
- Various fruits and candies to represent organelles (grapes, mandarin oranges, raisins, gummy worms, etc.)
- Water
Instructions:
- Prepare the Jell-O: Prepare the gelatin mix according to the package directions, but use a little less water to make it firmer. The clear dish or bag will serve as the cell wall and membrane.
- First Pour: Pour about half of the liquid Jell-O mix into your container and place it in the refrigerator to set partially, for about 45-60 minutes. It should be thick but not completely solid.
- Add Your Organelles: Gently push your candy and fruit “organelles” into the semi-set Jell-O. This two-step process prevents everything from sinking to the bottom. Use a large piece of fruit for the vacuole, a round candy for the nucleus, and smaller items for the chloroplasts and mitochondria.
- Final Pour: Pour the remaining Jell-O mix over the top to cover the organelles completely.
- Set Completely: Return the container to the refrigerator and let it set for at least 4 hours, or until completely firm. Your wiggly, jiggly plant cell is now complete!
Pro-Tips for a Grade-A Plant Cell Model Project
Building the model is half the battle. To really take your project to the next level, here are a few extra tips I’ve learned. Mastering these creative skills can even help with other fun projects, like making stunning DIY watercolor cards.
- Label Everything Clearly: Use toothpicks and small paper flags to label each part of your
plant cell model. Neat handwriting goes a long way. - Create a “Key” or “Legend”: On a separate piece of paper or index card, create a key. List the name of each organelle next to a sample of the candy or a swatch of the clay color you used to represent it. This makes it super easy for your teacher to understand your model.
- Explain the Functions: Your presentation or report is just as important as the model. For each part you labeled, write a short sentence explaining what it does. This shows you didn’t just build it, you understand the science behind it.
- Take a Good Photo: Before you transport your project (especially if it’s edible!), take a few clear, well-lit photos from different angles. It’s great for your own records and serves as a backup just in case.
Don’t Want to DIY? Where to Buy a Plant Cell Model
I get it, sometimes life gets busy and you just don’t have time for a full-on craft project. If that’s the case, don’t worry! Buying a pre-made model is a perfectly good option.
These models are often highly detailed and durable, making them excellent study aids that you can use long after the project is done. They are also fantastic for teachers who need a reliable demonstration tool for the classroom. You can find excellent options on websites like Amazon or at specialty educational supply stores online.
Frequently Asked Questions (FAQ)
What are the 3 main parts of a plant cell? The three main parts that are often highlighted are the Cell Wall (for structure), the Cell Membrane (to control what comes in and out), and the Nucleus (the control center with the DNA).
What makes a plant cell different from an animal cell? The three biggest differences are that plant cells have a cell wall, chloroplasts (for making their own food), and one large central vacuole. Animal cells have none of these specific features.
What is the easiest plant cell model to make? I find that the cake or cookie model is often the easiest and quickest, especially for younger students. The materials are easy to find, the steps are straightforward, and the cleanup is delicious!
Let’s Get Building!
I hope this guide has shown you that making a plant cell model can be a fantastic and rewarding experience. It’s a chance to get creative, work with your hands, and make abstract science feel real and understandable. Remember, the goal is to have fun with the process and learn something along the way.
Now it’s your turn! Did you try one of these methods? Do you have another creative idea for an organelle? I would absolutely love to see what you create. Leave a comment below with your project ideas, ask any questions you still have, or even better, share a photo of your finished model