

There’s something magical about receiving a handmade card, isn’t there? In a world of digital messages, a physical card that someone took the time to create feels incredibly personal and special. I used to think that making beautiful, artistic cards was something only “real artists” could do, but I’m here to tell you that’s just not true. Making your own stunning DIY watercolor cards is so much easier than you think.
I remember feeling so intimidated by watercolors, but I promise, this guide will walk you through everything. We’ll cover choosing the right supplies, a few simple techniques, and some gorgeous designs you can create today. Even if you’ve never picked up a paintbrush before, you can do this.
TABLE OF CONTENTS
Why You’ll Love Making Your Own DIY Watercolor Cards
Before we dive into the how-to, I want to share a few reasons why I think you’ll fall in love with this little project. It’s about so much more than just the finished card.
- A Truly Personal Touch: Nothing says “I care about you” quite like a card you made by hand. You can customize colors and designs for the person you’re giving it to, making it a one-of-a-kind gift. A handmade card is just one of many wonderful DIY gift ideas for your husband or any loved one that shows you truly care.
- The Joy of Creating: There’s a wonderful, almost meditative quality to painting with watercolors. Watching the colors blend and flow on the paper is a simple joy, and it’s so much fun to see your idea come to life.
- A Relaxing Hobby: I find that painting is a great way to unwind after a long day. It allows you to focus on something creative and quiet your mind. It’s my go-to activity when I want to relax with a cup of tea.
- Affordable & Custom: Once you have a few basic supplies, you can create a whole suite of custom stationery for pennies. No more last-minute runs to the store for a generic card.
Choosing the Right Supplies for Your DIY Watercolor Cards
Walking into an art supply store can be overwhelming, but you don’t need to buy the most expensive gear to get started. Here are my personal recommendations for getting everything you need without breaking the bank.
Paper: The Foundation of Your Card
The right paper is probably the most important supply. Regular printer paper will just buckle and tear. You need something that can handle water. Specifically, look for paper that is at least 140 lb / 300 gsm. This weight ensures the paper stays sturdy.
You’ll find it in a few forms. Watercolor paper pads are large sheets you can cut down to size. Watercolor blocks have paper that is glued on all four sides, which is amazing for preventing buckling while you paint. For total beginners, I recommend starting with pre-made blank watercolor cards. They come scored and ready to fold with matching envelopes, which makes the whole process so simple.
Paints: Tubes vs. Pans
Next up is paint! You’ll mainly see two types: pan sets and tube paints. Both are great, but they have their differences. Here’s a quick breakdown to help you decide.
| Feature | Pan Sets | Tube Paints | My Beginner Recommendation |
|---|---|---|---|
| Form | Dry cakes of paint | Soft, paste-like paint | Pans are super easy for starting out; just add water and you’re ready to go. |
| Portability | Excellent | Good (requires a palette) | The compact nature of pan sets makes them perfect for small spaces or painting on the go. |
| Color Intensity | Good, requires water to activate | Excellent, highly concentrated | Tubes are great for mixing a large batch of one specific color, since the paint is so saturated. |
| Waste | Very little waste | Easy to squeeze out too much | With tubes, remember that just a tiny dab of paint goes a very long way. |
For your first set, I’d suggest a simple student-grade pan set. It’s the most straightforward and forgiving option.
Brushes & Other Essentials
You don’t need a dozen brushes. To start, I recommend getting just two or three basics. A round brush in a size 6 or 8 is perfect for everything from broad strokes to finer lines. A small flat brush is great for creating sharp edges and washes.
Here’s my pro-tip: you don’t need fancy, expensive brushes to get beautiful results. A good synthetic brush works wonderfully. You’ll also need a cup for water, some paper towels for blotting, and something to mix your colors on. A simple ceramic plate from your kitchen works perfectly as a palette.
Mastering Basic Watercolor Techniques Before You Start
Let’s practice a few simple techniques that will form the building blocks of all our DIY watercolor cards. Grab a scrap piece of watercolor paper and play around with these. It’s all about getting a feel for how the paint and water move together.
Wet-on-Dry Technique
This is exactly what it sounds like: you apply wet paint to dry paper. This technique gives you a lot of control and is perfect for creating crisp, defined shapes and details. If you want a sharp line or a clear shape, this is the way to do it.
Wet-on-Wet Technique
This is where the magic really happens. For this technique, you first brush a light layer of clean water onto your paper and then touch your brush with wet paint to the wet area. This is how you get those beautiful, soft, flowing effects where the colors bleed into each other effortlessly.
Creating a Simple Color Wash
A wash is just a smooth, even layer of color, which is a fantastic background for many card designs. You can create one by loading your brush with a good amount of watered-down paint and sweeping it across the paper in even, horizontal strokes.
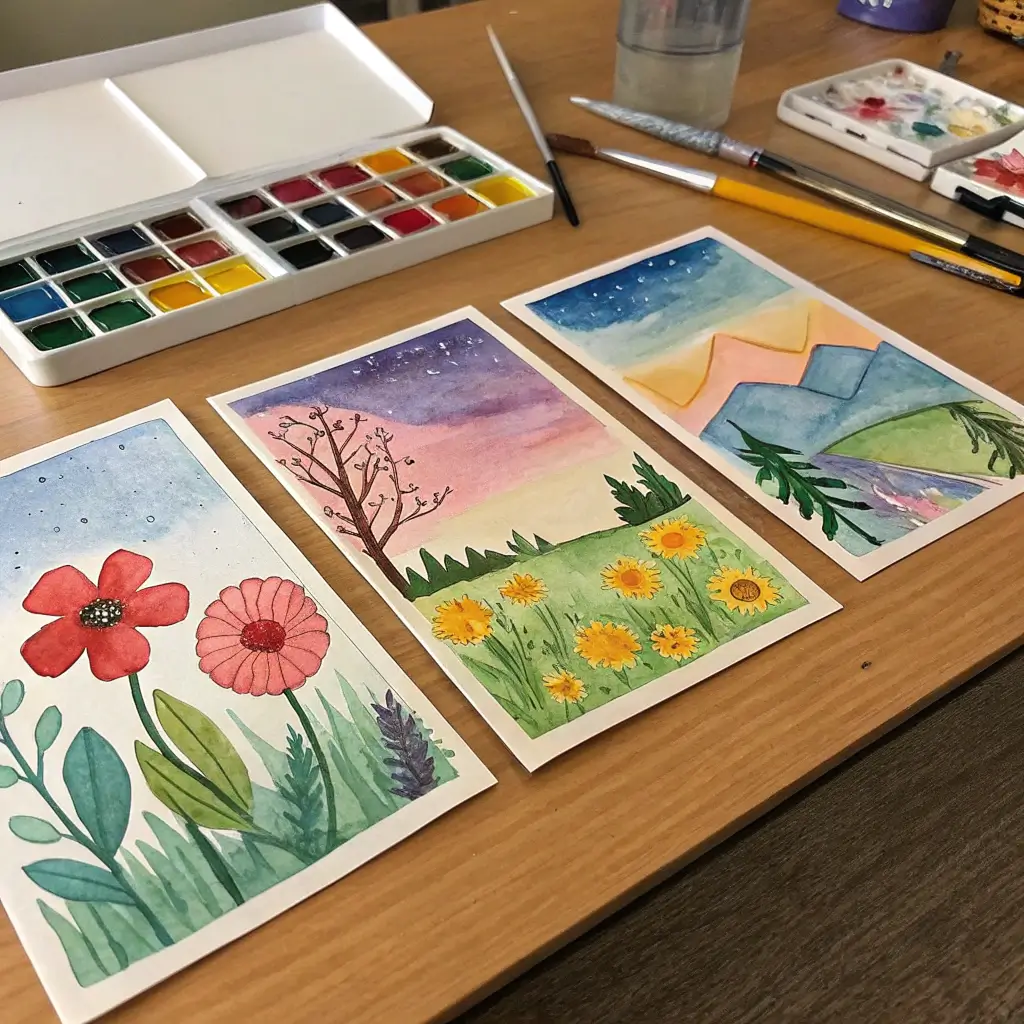
Step-by-Step DIY Watercolor Card Tutorials
Now for the fun part! I’ve broken down three different card designs, from super simple to a bit more creative. Pick one that speaks to you and let’s paint together. Remember, this isn’t about perfection; it’s about having fun.
Tutorial 1: The Simple Abstract Color-Wash Card (Perfect for Beginners)
- Prep Your Card: Use washi tape or artist’s tape to tape down the four edges of your card onto your desk. This creates a clean white border and helps prevent the paper from curling.
- Apply a Water Wash: Using your flat brush, apply a clean, even layer of water to the inside of the taped-off area. You want it glossy, but not puddled.
- Add Your Colors: Pick 2-3 colors you love. Activate them with water and, using your round brush, just touch the brush to the wet paper. Watch the colors bloom and blend. This is the wet-on-wet technique in action!
- Add a Little Sparkle: While the paint is still wet, you can splatter on a bit of metallic gold or white paint for a beautiful effect. Just load a little paint on your brush and tap it over the card. Let it dry completely before peeling off the tape.
Tutorial 2: The Elegant Loose Floral Card
- Create Your Petals: Using your round brush, load it with a nice floral color (like pink, red, or yellow). To create a petal, simply press the brush down to create a simple “C” shape.
- Build Your Flower: Group 4-5 of these C-shapes together in a circle to form a simple, open flower. Don’t worry about making them perfect; the “loose” style is all about suggestion. Create a few flowers on your card.
- Add Stems and Leaves: Clean your brush and mix a nice green. Using the tip of your brush, draw thin, slightly curved lines for stems connecting the flowers. For leaves, just press the body of the brush down once next to the stem.
- Finishing Touches: Add a few smaller dots or buds to fill out the design. Let it dry completely. This design looks lovely with a simple “hello” or “thank you” written in the corner.
Tutorial 3: The Modern Geometric Card (Using Masking Tape)
- Create Your Design: Use thin masking tape to create a geometric pattern on your card. You can make triangles, stripes, or a cool angular design. Make sure to press the edges of the tape down firmly.
- Paint Your Shapes: Using the wet-on-dry technique, paint inside the taped-off sections. You can use a different color for each shape or create a gradient effect within a single shape.
- Let it Dry: This is the most important step! Your paint must be 100% dry before you move on. If you’re impatient (like me!), you can use a hairdryer on a low setting.
- The Big Reveal: Slowly and carefully peel off the masking tape to reveal your crisp, clean lines. It’s so satisfying!
More Design Ideas for Your DIY Watercolor Cards
Once you get the hang of the basic techniques, you can mix and match them to create endless designs. Here are a few quick ideas to get your inspiration flowing:
- Birthday Cards: Paint a few simple balloon shapes using the wet-on-dry technique, a single colorful candle with a yellow flame, or a simple silhouette of a birthday cake.
- Thank You Cards: Loose botanicals are always a winner. You could also create a simple pattern with just green leaves or use a beautiful wet-on-wet color wash and write your message over it once it’s dry.
- Holiday Cards: Paint simple round ornaments for Christmas, soft pink hearts for Valentine’s Day, or a few loose autumn leaves in red, orange, and yellow for Thanksgiving. If you love seasonal crafts, these cards are a great companion to other fall projects, like these creative DIY pumpkin decorating ideas.
- Abstract Designs: Don’t be afraid to just play! Explore splatters, create beautiful gradients by blending colors, or sprinkle a little table salt onto your wet paint for a unique crystalized effect.
Finishing & Assembling Your Cards Like a Pro
That beautiful painting needs to become a card! These final steps will give your DIY watercolor cards a polished, professional look that will make them feel extra special. The satisfaction of creating a professional finish is a key part of many fun projects, from these cards to learning how to make your own DIY bag charms.
- Flattening Your Paper: Even with heavy paper, you might get a little bit of a wave. Once your painting is completely dry, just place it inside a heavy book and leave it overnight. It will be perfectly flat in the morning.
- Creating the Card Base: If you didn’t use a pre-made card, you can create your own base. Take a larger sheet of heavy cardstock, score it down the middle with a bone folder or the back of a butter knife, and fold it in half.
- Mounting Your Artwork: To attach your watercolor painting to the card base, I recommend using double-sided tape or a glue runner. These adhesives provide a strong bond without creating the bumps or wrinkles that wet glue can cause.
Frequently Asked Questions About DIY Watercolor Cards
As you get started, a few questions might pop up. Here are the answers to some of the most common ones I hear.
How do I prevent my watercolor paper from buckling?
The best way to prevent buckling is to use heavy paper, at least 140 lb / 300 gsm. For extra security, you can tape the edges of your paper down to a board or your desk with artist’s tape before you start painting. Or, as I mentioned, you can buy a watercolor block, which is specifically designed to keep paper flat as it dries.
My colors look muddy, what did I do wrong?
Muddy colors usually happen when you over-mix complementary colors (like orange and blue, or purple and yellow) directly on the paper while they are both wet. To avoid this, try to let one layer of color dry completely before adding a different color on top. It also helps to get in the habit of cleaning your brush and using fresh water between colors.
Can I fix a mistake on my watercolor card?
To a certain extent, yes! If the paint is still wet, you can often “lift” the color by dabbing it with a clean, damp brush and then blotting the area with a paper towel. But honestly, I encourage you to embrace the imperfections. Some of my favorite cards have “mistakes” that turned into happy accidents and just added to their unique charm.
How do I stop paint from bleeding under masking tape?
This is a great question. The key is to create a really tight seal with the tape. After you lay down your tape, use your fingernail or the edge of a credit card to press firmly along the edge where you’ll be painting. Another pro-tip is to try to brush your paint away from the tape edge rather than towards it.
Do DIY watercolor cards need to be sealed with a fixative?
For a card that will be kept in an envelope and displayed indoors, a fixative spray isn’t necessary. The most important thing to remember is that watercolor paints can be reactivated by water. So it’s a good idea to just let the person you’re giving it to know that they should keep it away from any liquids.
It’s Your Turn to Create!
I hope this guide shows you that anyone, and I truly mean anyone, can create beautiful and personal DIY watercolor cards. The goal isn’t to create a perfect masterpiece; it’s to enjoy the process, play with color, and make something from the heart.
Now I’d love to hear from you! Which card design are you most excited to try first? If you make one, please share a photo of your creation on social media and tag me; I’d be thrilled to see it. And if you have any questions at all, just drop them in the comments below. I’ll be right there to answer them. Happy painting