

Are your once vibrant Pothos leaves looking dull, growth stunted, or are roots peeking out from the drainage holes? You might be facing a common yet critical issue: a root-bound Pothos. This condition can severely impact your plant’s health, leading to nutrient deficiencies, water stress, and a general decline in vigor. Don’t worry you’re in the right place.
This ultimate guide will empower you to understand, diagnose, and expertly resolve a root-bound Pothos, transforming your struggling plant into a lush, thriving specimen. We’ll provide clear visual instructions, in-depth physiological explanations, and actionable expert advice on prevention and common mistakes. By the end, you’ll have all the knowledge to ensure your Pothos enjoys optimal plant health for years to come.
TABLE OF CONTENTS
Understanding “Root Bound” in Your Pothos
At its core, a Pothos is considered “root bound” when its root system has grown to fill the entire available space within its container size, often becoming a dense, tangled mass. Imagine a child trying to grow in clothes that are too small they become uncomfortable, restricted, and can’t develop properly. The same principle applies to your Pothos.
In nature, Pothos roots spread freely through the soil, seeking out water and nutrients. In a pot, however, their growth is physically restricted. As the roots proliferate, they start to circle the inside of the pot, intertwining with each other. Eventually, there’s more root than soil, leading to a host of problems. This overcrowding prevents proper absorption of essentials, making it harder for your pothos plant root bound to thrive.
Why a Root-Bound Pothos is a Serious Health Issue
Ignoring a root-bound Pothos isn’t just about aesthetics; it poses significant physiological threats to your plant’s well-being. Understanding these consequences highlights why prompt action is crucial.
- Nutrient Depletion: With limited soil volume, the available nutrients are quickly exhausted. The dense rootball has little access to fresh soil, leading to deficiencies that manifest as pale or yellowing leaves.
- Water Stress and Inefficient Absorption: The soil in a root-bound pot dries out extremely quickly, and even when watered, the dense roots struggle to absorb moisture efficiently. Water often runs straight through the pot, leaving the core root mass dehydrated. This leads to symptoms like wilting or drooping, even after recent watering.
- Stunted Growth: The plant simply doesn’t have the physical space to expand its root system, which directly limits its ability to grow new foliage. You’ll notice a significant slowdown in new leaf production and overall Pothos growth.
- Increased Susceptibility to Pests and Diseases: A weakened plant is a vulnerable plant. Nutrient-deficient and water-stressed Pothos are less resilient, making them easier targets for common houseplant pests and various fungal or bacterial diseases.
- Eventual Plant Decline: If left unaddressed, the cumulative stress from being root-bound can lead to irreversible damage, ultimately causing the Pothos plant root bound to wither and die.
How to Spot a Root-Bound Pothos: Key Signs & Symptoms
Knowing how do I know if my Pothos is root bound? is the first step to saving your plant. Here are the most common indicators that your Pothos needs a larger home:
- Roots Emerging from Drainage Holes: This is perhaps the most obvious sign. If you see roots pushing through the drainage holes at the bottom of the pot, your Pothos is definitely running out of space.
- Stunted Growth Despite Ideal Care: You’re providing plenty of light, water, and even fertilizer, but your Pothos just isn’t growing or producing new leaves. This stunted growth is a classic symptom of a constrained root system.
- Wilting/Drooping Leaves After Watering: Paradoxically, a root-bound plant can wilt quickly even after being watered. The dense roots can’t properly absorb the water, or the water drains too quickly to be effective.
- Rapid Soil Drying: The potting mix seems to dry out incredibly fast, requiring you to water much more frequently than before. This is because there’s very little soil left to retain moisture.
- Yellowing or Pale Leaves: As roots struggle to absorb nutrients, older leaves, in particular, may start to turn yellow or look generally pale due to deficiencies.
- Pot Becoming Visibly Distorted: In extreme cases, the pressure from the growing roots can cause plastic pots to bulge or crack.
Pothos Root Bound Symptom Checklist:
- Roots escaping drainage holes?
- Noticeable stunted growth?
- Leaves wilting shortly after watering?
- Soil drying out unusually fast?
- Yellowing leaves or general paleness?
- Pot showing signs of distortion (bulging/cracking)?
Confirming Root Bound Status: A Step-by-Step Inspection
While the symptoms provide strong clues, a quick inspection of the root ball offers definitive proof. This process is simple and won’t harm your plant if done carefully.
- Prepare Your Workspace: Choose a clean, flat surface. You might want to lay down newspaper or a tarp to catch any spilled soil.
- Gently Remove the Plant: Tilt the pot sideways. Place one hand on the soil surface, gently supporting the plant’s base between your fingers. With your other hand, lightly tap the bottom and sides of the pot to loosen the soil.
- Ease the Plant Out: Slowly pull the pot upwards, away from the plant. If it resists, don’t force it. You may need to use a clean knife to loosen soil around the edges of the pot.
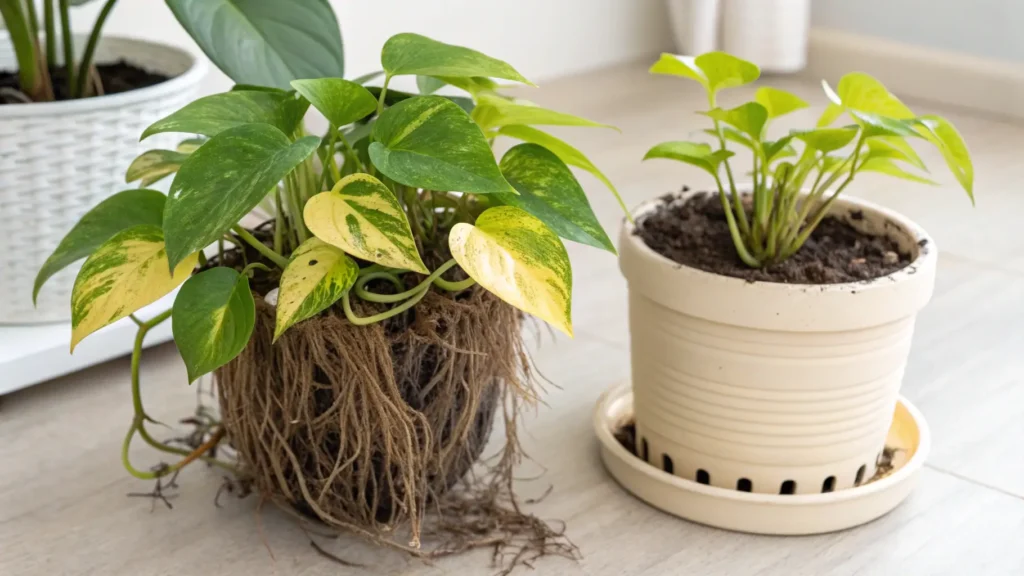
- Inspect the Root Ball: Once removed, examine the root system.
- Healthy roots will be white or light tan, spread throughout the soil, and relatively easy to tease apart.
- A root-bound Pothos will show a dense, tightly packed mass of roots, often circling the perimeter of the rootball. You’ll see more roots than soil, forming a solid shape of the pot.
- Brown, mushy roots indicate root rot, a separate issue often exacerbated by poor drainage in root-bound pots.
The Ultimate Fix: Repotting Your Root Bound Pothos
Once you’ve confirmed your Pothos is root bound, repotting Pothos is the definitive solution. This process will give your plant the space it needs to flourish.
When is the Best Time to Repot Your Pothos?
The ideal time to repot is during the Pothos growth period, typically in spring or early summer. This is when your plant is actively growing and can recover from the stress of repotting most effectively. Avoid repotting in late fall or winter when the plant is usually dormant, as it will have less energy to establish itself in its new pot. However, if your Pothos is severely root-bound and showing extreme distress, don’t wait repotting immediately is better than letting it decline further.
Choosing the Perfect Pot & Size
Selecting the right pot is critical for your Pothos’s future plant health.
- Material Considerations: Terracotta pots offer excellent breathability and help prevent overwatering, but plastic pots retain moisture longer, which can be beneficial in drier climates or for busy owners. Both work well, as long as they have good drainage holes.
- Size Matters: The general rule of thumb is to choose a new pot only 1-2 inches larger in diameter than the current one. For example, if your Pothos is in a 6-inch pot, move it to an 8-inch pot. Going too large can lead to excess soil retaining too much moisture, increasing the risk of root rot and slowing growth as the plant prioritizes filling the pot with roots before growing foliage.
- Drainage is Non-Negotiable: Always choose a pot with ample drainage holes at the bottom. Proper drainage is essential to prevent waterlogged soil and root rot.
Crafting the Ideal Soil Mix for Pothos
Pothos plants thrive in a well-draining, aerated potting mix. Avoid heavy, dense soils. You can buy a commercial houseplant potting mix and amend it, or create your own:
- Key Ingredients: A good mix typically consists of:
- High-quality Potting Mix: (e.g., all-purpose houseplant mix)
- Perlite: For aeration and improved drainage.
- Coco Coir or Peat Moss: To retain moisture and provide a light texture.
- (Optional) Orchid Bark or Horticultural Charcoal: For extra aeration and to help prevent compaction.
- Importance of Drainage and Aeration: The goal is a mix that allows excess water to drain quickly while still retaining enough moisture for the roots. This prevents the soil from becoming waterlogged, which suffocates roots and invites disease.
Step-by-Step Repotting Process
With your supplies ready, it’s time for the main event!
- Gather Supplies: New pot, fresh potting mix, clean pruners or scissors, watering can, newspaper/tarp.
- Prepare the New Pot: Place a small layer of fresh potting mix at the bottom of the new pot.
- Gently Untangle Roots: Carefully remove your Pothos from its old pot (as described in the inspection section). Gently loosen and untangle the circling roots at the bottom and sides of the rootball with your fingers. If the roots are extremely dense, you may use clean scissors to make 2-3 vertical cuts an inch or two deep into the root mass to encourage outward growth, but be gentle.
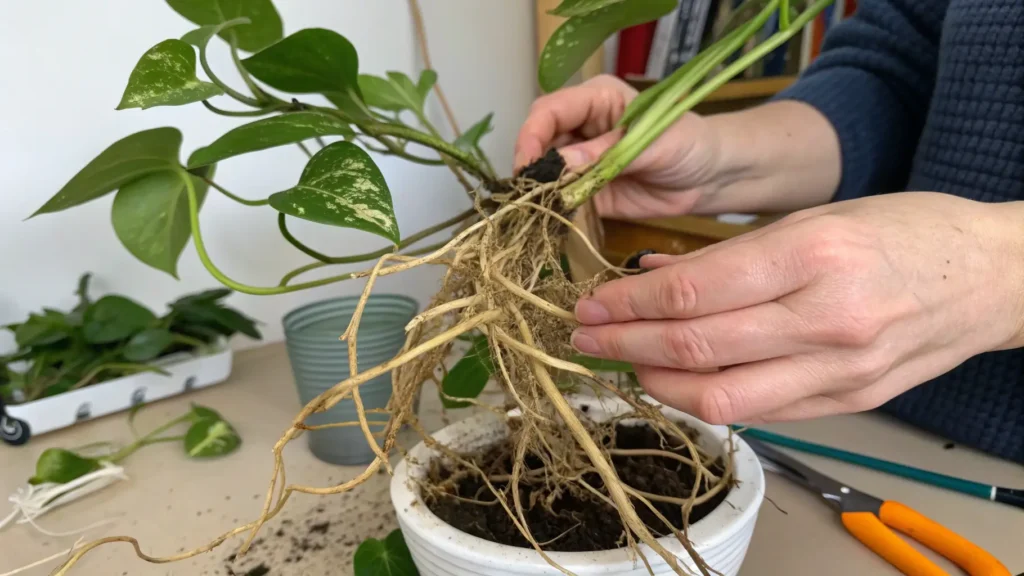
- Place the Plant: Center the Pothos in the new pot, ensuring the top of the rootball is about an inch below the rim of the pot. Adjust the amount of soil underneath as needed.
- Fill with Soil: Backfill around the rootball with fresh potting mix, gently tamping it down to remove large air pockets. Ensure the entire root system is covered. Do not bury the stem deeper than it was in its previous pot.
- Initial Watering: Water thoroughly until water drains from the bottom. This settles the soil and provides initial hydration.

Post-Repotting Care: Ensuring a Smooth Transition
The period immediately after repotting is crucial for recovery.
- Watering Schedule: Monitor the soil moisture carefully. Water when the top inch or two of soil feels dry. The plant might need slightly less frequent watering initially, as there’s more soil volume. Avoid overwatering.
- Light Adjustments: Place your repotted Pothos in a location with bright, indirect light. Avoid direct, harsh sunlight for the first few weeks, as this can add stress.
- Avoiding Fertilizer: Do not fertilize for at least 4-6 weeks after repotting. The fresh potting mix contains nutrients, and adding more too soon can burn fragile new roots.
- Monitoring for Stress: It’s normal for a Pothos to show some signs of stress (slight wilting, a dropped leaf) in the first week or two after repotting. As long as these symptoms aren’t severe or prolonged, your plant should recover well. Continue consistent plant care and patience.
Common Repotting Mistakes & How to Avoid Them
Even with the best intentions, repotting can go wrong. Being aware of these common pitfalls will help ensure a successful transition for your Pothos.
- Mistake: Repotting into a Pot That’s Too Large
- Why it’s a mistake: A pot that’s too big holds excessive moisture, leading to waterlogged soil and a high risk of root rot. The plant will also expend all its energy growing roots to fill the vast space, at the expense of developing foliage, resulting in slow top growth.
- How to prevent it: Choose a new pot only 1-2 inches wider in diameter than the old one. This provides enough room for growth without overwhelming the root system.
- Mistake: Damaging Roots During Removal/Untangling
- Why it’s a mistake: Ripping or harshly pulling roots can cause significant trauma, making it harder for the plant to recover and absorb water/nutrients.
- How to prevent it: Be gentle. Use your fingers to carefully loosen roots. If they’re tightly matted, make a few shallow vertical cuts with clean, sharp shears rather than tearing.
- Mistake: Using Inadequate Soil
- Why it’s a mistake: Dense, heavy soil lacks proper aeration and drainage, suffocating roots and promoting root rot.
- How to prevent it: Always use a high-quality, well-draining potting mix specifically formulated for houseplants, or amend a standard mix with perlite or orchid bark for improved texture and aeration.
- Mistake: Overwatering After Repotting
- Why it’s a mistake: Freshly repotted plants, especially in a larger pot, need less frequent watering initially. Overwatering can quickly lead to root rot.
- How to prevent it: Let the top 1-2 inches of soil dry out completely before watering again. Stick your finger into the soil to check moisture levels, rather than relying solely on a fixed watering schedule.
- Mistake: Immediate Fertilization
- Why it’s a mistake: New potting mix usually contains enough nutrients for several weeks. Fertilizing too soon can burn delicate, recovering roots.
- How to prevent it: Wait at least 4-6 weeks after repotting before resuming your regular fertilization routine.
Myth vs. Fact: Repotting Misconceptions
- Myth: You should water your plant immediately before repotting.
- Fact: A slightly dry potting mix helps the rootball hold together, making it easier to remove from the old pot. Water after repotting.
- Myth: Pothos roots should be perfectly clean before going into the new pot.
- Fact: While removing some old soil is good, trying to completely clean the roots can damage them. A little old soil clinging to the roots is fine.
Preventing Future Root Bound Issues for a Thriving Pothos
Solving a root-bound problem is great, but preventing it from happening again is even better. Proactive care ensures your Pothos remains healthy and happy.
- Regular Inspection: Make it a habit to check your Pothos for signs of being root bound every 6-12 months. This includes looking for roots emerging from drainage holes or feeling the base of the pot for bulging.
- Understanding Pothos Growth Rates: Pothos are relatively fast growers, especially during spring and summer. A young, actively growing Pothos might need repotting every 1-2 years, while mature, slower-growing plants might be fine for 2-3 years or even longer.
- Proactive Repotting Schedule: Don’t wait until your Pothos is severely stressed. Plan for a general repotting schedule based on its age and growth.
- Recognizing Early Signs: Pay attention to subtle changes like slightly stunted growth, faster soil drying, or a slight paling of leaves. Addressing these early signs can prevent a full-blown root-bound crisis.
Pothos Repotting Frequency Guide:
| Plant Size/Age | Recommended Repotting Frequency | Actionable Tip |
|---|---|---|
| Young (0-1 year) | Every 1 year | Check for roots from drainage holes after 6 months. |
| Adolescent (1-3 years) | Every 1.5 – 2 years | Plan for spring repotting; consider minor root pruning if very vigorous. |
| Mature (3+ years) | Every 2 – 3+ years | Inspect annually; only increase pot size if truly necessary, otherwise refresh soil. |
| Severely Root-Bound | Immediately! | Prioritize health; follow all repotting steps carefully for recovery. |
Pothos Root Bound FAQs
Here are answers to some frequently asked questions about Pothos Root Bound plants:
- Can I trim Pothos roots? Yes, judicious root pruning can be beneficial, especially for very mature, root-bound plants that you don’t want to move into a much larger pot. After carefully removing the plant, you can trim up to one-third of the outer, circling roots using clean, sharp scissors or pruners. This stimulates new root growth and can help rejuvenate an older plant.
- How long does it take for a Pothos to get root bound? The time it takes varies depending on the plant’s age, growth rate, and original container size. A young, fast-growing Pothos in a small pot might become root-bound in a year, while a mature plant in a larger pot might take 2-3 years or more. Regular inspection is key.
- Can a Pothos recover from being severely root bound? Absolutely! Pothos are incredibly resilient. With proper repotting and subsequent care, even a severely Pothos root bound plant can make a full recovery and return to vigorous growth. The key is to act promptly once you identify the issue.
- What if I don’t want to repot (e.g., I like the current pot size)? If you don’t want to move your Pothos into a larger pot, you can still address the root-bound issue. Remove the plant from its pot, gently loosen the outer roots, and carefully prune away about 25-30% of the root mass. Then, replenish the pot with fresh potting mix and replant your Pothos back into the same pot. This process is called “refreshing” and provides new nutrients and space without increasing the overall size.
Conclusion: Embrace Healthy Roots for a Happy Pothos
Understanding and addressing a Pothos root bound condition is a fundamental step in ensuring the long-term vitality of your beloved plant. From recognizing the subtle signs to confidently executing a successful repotting, you now possess the knowledge to transform your Pothos from struggling to thriving.
Remember, healthy roots are the foundation of a healthy plant. By providing ample space, nutrient-rich soil, and consistent care, you’re not just growing a plant; you’re cultivating a vibrant, resilient companion. Take what you’ve learned and apply it with confidence. We encourage you to share your Pothos success stories and journey in the comments below!