

Hey there, I’m Eva, and I’m so glad you’re here. Do you ever feel that incredible pull to give something truly special, something handmade, but then worry it might look a little, well, homemade? I know that feeling! There’s such joy in crafting a gift with your own hands, knowing the love and thought poured into it. I’ve always found that the most unique presents are the ones that tell a story, whether I’m receiving them or giving them.
That’s why I’m so excited to share 25 DIY Gifts That Look Store-Bought with you today. When I talk about a “store-bought” aesthetic, I mean a gift that radiates quality, a thoughtful finish, and impeccable presentation. It’s about gifts that look like they came from a charming boutique, not a rushed craft session. I’m confident that by the end of this, you’ll have a whole collection of amazing gift ideas and practical tips to create them.
TABLE OF CONTENTS
The Secret Sauce: How to Make Your DIY Gifts Look Store-Bought
I’ve learned that the real difference between a truly “homemade” gift and one that looks like it could be sold in a high-end shop often boils down to a few key principles. It’s not about being a master artisan; it’s about being intentional. These aren’t complicated rules, just simple shifts in approach that make all the difference.
Material Matters: Quality is Key
I always say, you can’t make a silk purse out of a sow’s ear, and the same goes for DIY gifts! Choosing good quality materials instantly elevates your finished product. Think about using premium fabric for a sewing project, rich, vibrant paints for a craft, or fresh, top-notch ingredients for an edible treat. For me, that means opting for food-grade jars for my hot cocoa mixes, non-toxic paints for indoor plants styling projects, and high-thread-count cotton for anything that involves fabric. A small investment in your raw materials can truly make a huge impact on the final look and feel of your gift.
Precision is Your Friend: Crafting with Care
After I choose my materials, my next focus is on the execution. Neatness is crucial if I want a polished, professional look. I always aim for clean cuts, even stitches, smooth and streak-free paint application, and accurate measurements. One of my biggest lessons has been the importance of allowing proper drying or curing times for glues, paints, and soaps. Rushing these steps almost always leads to a sloppy appearance that I really want to avoid.
Pro-tip: I’ve learned that patience is truly a virtue in crafting. If I take my time, the results always speak for themselves.
The Power of Presentation: Packaging Perfection
This is often where I see DIY gifts fall short, and it’s such an easy fix! Imagine buying something beautiful; the packaging is usually part of the experience, right? I apply that same logic to my handmade gifts.
- Containers: I carefully select the right container. Pretty jars, sleek tins, sturdy boxes, or even a charming little basket can instantly elevate a gift.
- Labels & Tags: I love designing and printing professional-looking labels and tags, or if I’m feeling particularly artistic, I’ll use my neatest handwriting. This adds so much to the perceived value.
- Wrapping: Thoughtful wrapping is a must for me. I use soft tissue paper, elegant ribbons, natural twine, or a perfectly tied bow to add that special touch.
- Personal Touches: A small, handmade card or a subtle embellishment makes the gift feel even more personal and complete.
- Consider the Recipient: I always try to tailor the presentation to the individual, thinking about what they’d appreciate most.
Mastering the Art of Store-Bought Style: Essential Tips for Every Project
I’ve found that even with the best intentions, DIY projects can sometimes throw a curveball. These are my go-to strategies to keep things looking polished and professional, no matter what I’m making.
Troubleshooting Common DIY Challenges
I’ve definitely had my share of craft disasters! Here are some common pitfalls I’ve encountered and how I handle them:
- Messy Glue: I’ve learned to use glue sparingly and clean up any residue immediately with a damp cloth or cotton swab before it dries. Less is always more with adhesive.
- Uneven Paint: For a smooth, streak-free finish, I always apply several thin coats instead of one thick one. Quality brushes and proper drying time between coats are my best friends.
- Bath Bombs Crumbly: If my bath bombs aren’t holding their shape, it usually means the mixture is too dry. I add a tiny bit more liquid (witch hazel or water, just a spray!) until it feels like damp sand.
- Imperfections: Sometimes a tiny flaw adds “character,” but I’ve also learned when to simply redo something. If an imperfection distracts from the overall quality, I don’t hesitate to start that part over. My goal is always to create something I’m genuinely proud to give.
Sustainable DIY Gifting: Thoughtful & Eco-Friendly
I care deeply about our planet, and that extends to my gifting. I believe I can create beautiful, meaningful gifts while also being kind to the environment.
- Using upcycled or repurposed materials: I often save old jars, fabric scraps, or even pretty tins to give them a new life as part of a gift.
- Choosing eco-friendly supplies: I try to opt for natural dyes, biodegradable glitter, or ethically sourced materials whenever possible.
- Creating gifts that are consumable or have a long, useful life: Edible treats, handmade soaps, or a durable item like a custom planter are perfect examples of gifts that minimize waste.
- Sustainable packaging ideas: I love using reusable fabric wraps, brown paper with twine, or even a cute reusable tote bag instead of single-use wrapping paper.
Batch Gifting Brilliance: Making Multiples Efficiently
When I need to make several gifts, especially around the holidays, I’ve found that an assembly-line approach saves me so much time and helps maintain quality across all my creations.
- Assembly-line approach: I do all the prep work first (cutting, measuring), then all the creation steps (mixing, painting), and finally all the packaging at once.
- Standardizing materials and processes: I use the same type of jars or the same ribbon for a consistent, professional look across all gifts.
- Efficient shopping: I make a master list and buy all my materials at once.
- Keeping notes: I always jot down what worked (and what didn’t!) for future batch projects.
25 DIY Gifts That Look Store-Bought: Unveiling the Ideas
I’m so excited to finally share these ideas with you! I’ve carefully picked gifts that, with a little attention to detail, truly look like they could be bought in your favorite boutique.
Delicious & Edible Delights
I think edible gifts are truly special, especially for the foodies in my life. The key here is that gourmet presentation; it makes all the difference in making these treats look high-end.
1. Gourmet Hot Cocoa Mix Jars
I love layering quality ingredients in a pretty jar; it instantly creates a luxurious feel.
- Store-Bought Tip: I use high-quality cocoa, mini chocolate chips, and mini marshmallows. Layering them neatly and adding a professional-looking printed label with instructions and a cute ribbon makes them look so chic.
- You’ll Need: Mason jar, cocoa powder, sugar, mini chocolate chips, mini marshmallows, optional crushed peppermint or cinnamon stick.
- Quick Steps: Layer ingredients in order. Seal tightly. Decorate with label and ribbon.
- Skill Level: Beginner | Time: 15-30 min | Cost: $
- Perfect For: Coworkers, teachers, neighbors | Best For: Christmas, winter birthdays, thank-you gifts.
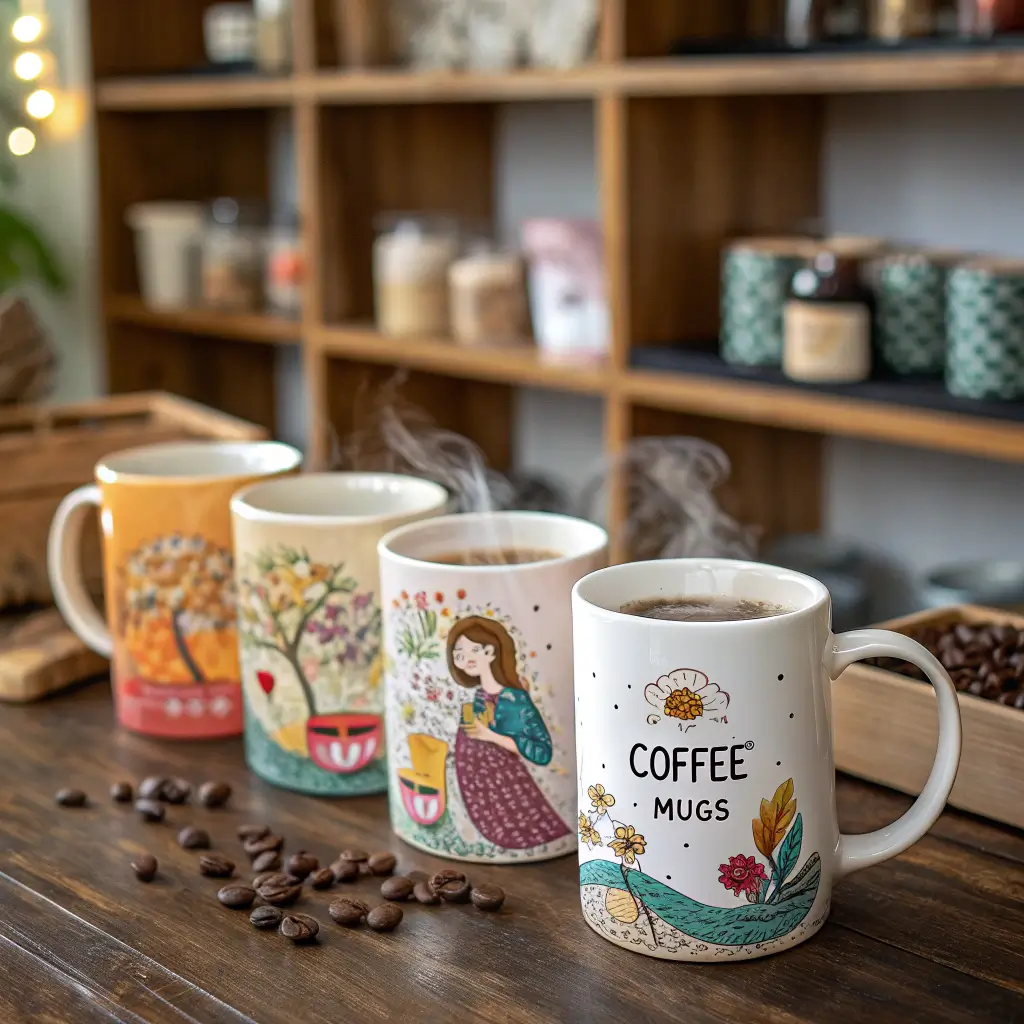
2. Customized Coffee Mugs
I’ve found that personalized mugs can look incredibly professional with the right techniques.
- Store-Bought Tip: I always use oil-based paint markers (Sharpie brand is popular) for crisp lines. Baking them according to the marker instructions ensures durability. Keeping my designs simple and clean is key.
- You’ll Need: Plain ceramic mug, oil-based paint markers, oven.
- Quick Steps: Clean mug. Draw/write design. Air dry. Bake to set.
- Skill Level: Beginner-Intermediate | Time: 1-2 hours (including drying/baking) | Cost: $
- Perfect For: Friends, family, coffee lovers | Best For: Birthdays, housewarmings, just because.
3. Artisanal Spice Blends or Infused Sugars
I think a unique, homemade blend makes for such a delightful and practical gift.
- Store-Bought Tip: I use fresh, whole spices where possible and grind them finely. Packaging them in small, airtight spice jars with corks or screw tops and designing an elegant label with the blend name and ingredients really elevates them.
- You’ll Need: Fresh spices (e.g., smoked paprika, cumin, garlic powder, chili flakes for a taco blend), small jars, label paper.
- Quick Steps: Measure and combine spices. Store in airtight jars. Label.
- Skill Level: Beginner | Time: 30 min | Cost: $
- Perfect For: Home cooks, foodies | Best For: Hostess gifts, housewarmings, holidays.
4. Decadent Chocolate Bark or Truffles
It’s actually so easy to make impressive, gourmet-looking chocolates, I promise!
- Store-Bought Tip: I always use high-quality chocolate. Tempering chocolate (if I’m feeling ambitious!) gives a professional snap and shine. I love adding sophisticated toppings like sea salt, dried fruit, or crushed nuts. Packaging them in a clear cellophane bag tied with a ribbon, or a small box with tissue paper, completes the look.
- You’ll Need: High-quality chocolate, various toppings (nuts, dried fruit, sprinkles, sea salt), baking sheet, parchment paper.
- Quick Steps: Melt chocolate. Spread on parchment. Sprinkle toppings. Chill until firm. Break into pieces.
- Skill Level: Beginner-Intermediate | Time: 1-2 hours | Cost: $$
- Perfect For: Anyone with a sweet tooth | Best For: Valentine’s Day, holidays, thank-you gifts.
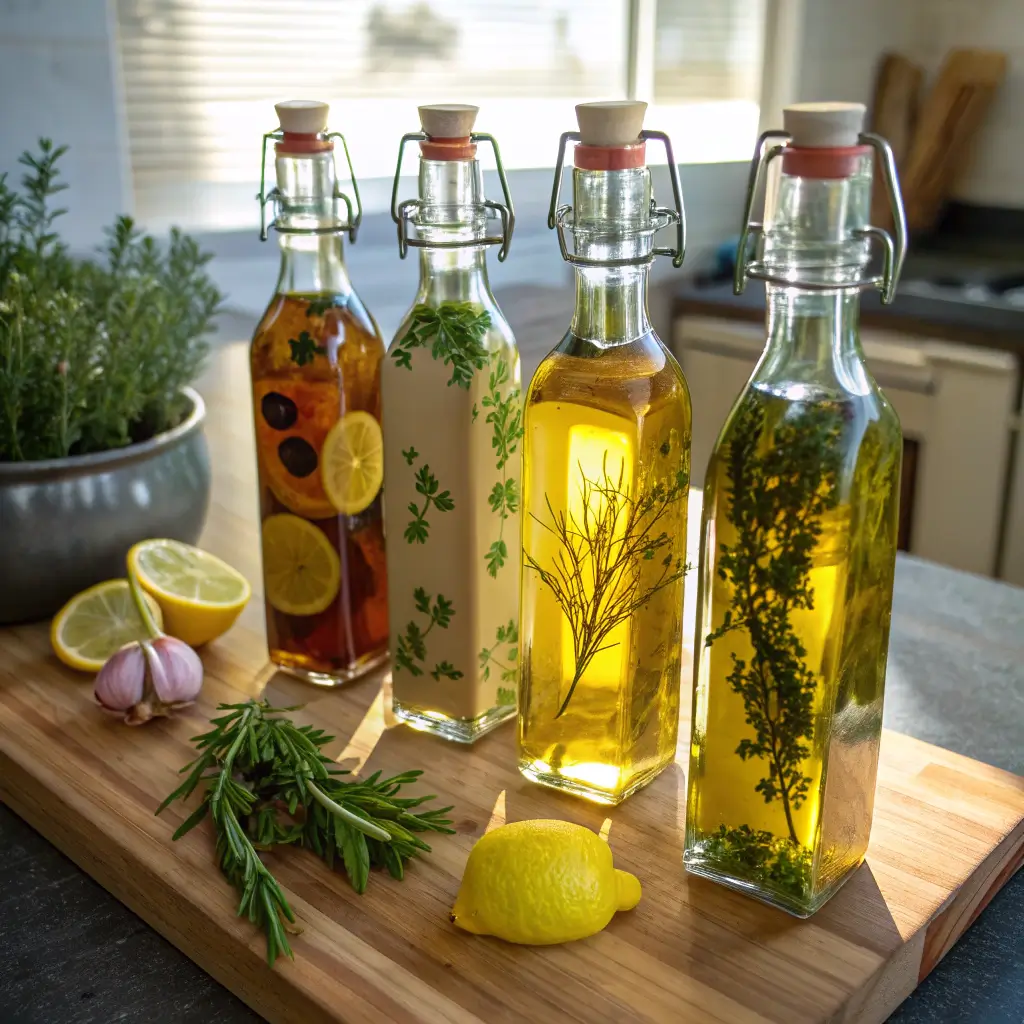
5. Homemade Infused Olive Oils or Vinegars
I find such elegance in the simplicity of these gourmet kitchen staples.
- Store-Bought Tip: I use attractive, clean glass bottles with airtight stoppers or corks. I make sure my ingredients are fully submerged to prevent spoilage and add a handwritten or printed label detailing the infusion and recommended uses.
- You’ll Need: Good quality olive oil or vinegar, fresh herbs (rosemary, thyme), garlic, chili flakes, clean glass bottles.
- Quick Steps: Sterilize bottles. Add herbs/spices. Fill with oil/vinegar. Seal. Allow to infuse for 1-2 weeks.
- Skill Level: Beginner | Time: 15 min (prep) + infusion time | Cost: $$
- Perfect For: Chefs, food enthusiasts, hostesses | Best For: Housewarmings, holidays.
6. Hand-Dipped Candied Nuts
A simple coating can truly transform nuts into an irresistible treat, I’ve found.
- Store-Bought Tip: I always ensure an even coating and allow them to cool completely on parchment paper to prevent sticking. Packaging them in small, clear bags or jars with a tasteful label looks fantastic.
- You’ll Need: Assorted nuts (pecans, walnuts), sugar, spices (cinnamon, nutmeg), egg white, baking sheet, parchment paper.
- Quick Steps: Whisk egg white. Toss nuts with egg white and sugar/spice mixture. Bake until crunchy.
- Skill Level: Beginner | Time: 1 hour | Cost: $
- Perfect For: Snack lovers, office gifts | Best For: Holidays, party favors.
7. Layered Baking Mix Jars (e.g., Cookies, Brownies)
These visually appealing jars promise a delicious experience, and I think they look so welcoming.
- Store-Bought Tip: I layer ingredients precisely for a clean, attractive look. I always include a professional-looking tag with baking instructions, often suggesting adding a wet ingredient (egg, butter) to complete the mix.
- You’ll Need: Mason jar, dry baking ingredients (flour, sugar, cocoa powder, chocolate chips), recipe tag.
- Quick Steps: Layer dry ingredients neatly in the jar. Seal. Attach recipe tag.
- Skill Level: Beginner | Time: 20-40 min | Cost: $
- Perfect For: Busy friends, college students, neighbors | Best For: Holidays, birthdays.
8. Homemade Fruit Jams or Jellies
There’s such charm in a beautifully preserved homemade spread, I think.
- Store-Bought Tip: I use fresh, seasonal fruit and sterilize my jars thoroughly. Attractive lids and labels, perhaps a fabric cover over the lid secured with twine, add to the gourmet feel.
- You’ll Need: Fresh fruit, sugar, pectin, lemon juice, canning jars, water bath canner.
- Quick Steps: Prepare fruit, cook with sugar/pectin. Ladle into sterilized jars. Process in water bath.
- Skill Level: Intermediate | Time: 2-3 hours | Cost: $$
- Perfect For: Food connoisseurs, breakfast lovers | Best For: Hostess gifts, holidays, housewarmings.
9. Infused Vodkas or Syrups
I love suggesting unique flavor combinations for a sophisticated, adult gift.
- Store-Bought Tip: I always use sleek, clean bottles. Infusing with whole ingredients (e.g., vanilla beans, citrus peels, berries) and creating custom labels with the flavor and suggested cocktails makes them look truly high-end.
- You’ll Need: Good quality vodka or simple syrup, infusing ingredients (vanilla beans, citrus peel, berries, herbs), clean bottles.
- Quick Steps: Add infusing ingredients to vodka/syrup. Let sit for 3-7 days. Strain. Bottle. Label.
- Skill Level: Beginner | Time: 15 min (prep) + infusion time | Cost: $$$
- Perfect For: Cocktail enthusiasts, friends | Best For: Birthdays, holidays, bachelor/bachelorette parties.
10. Gourmet Popcorn Kits
An elevated popcorn experience makes such a fun, thoughtful present, I’ve found.
- Store-Bought Tip: I package unpopped kernels in a nice bag or jar. I include small, well-sealed containers of gourmet seasonings (e.g., truffle salt, nutritional yeast, chili lime powder) and maybe a unique oil (coconut, avocado).
- You’ll Need: Unpopped popcorn kernels, small jars/bags of seasonings, small bottle of oil, clear bag or box for assembly.
- Quick Steps: Assemble all ingredients neatly into a kit. Add a fun label with instructions.
- Skill Level: Beginner | Time: 30 min | Cost: $
- Perfect For: Movie lovers, families | Best For: Housewarmings, birthdays, family game night.
Spa & Self-Care Indulgences
I think luxurious, homemade spa items can truly feel like a high-end treat, perfect for pampering someone special.
11. Luxurious Bath Bombs
Vibrant colors and essential oils can make these feel truly indulgent, I’ve discovered.
- Store-Bought Tip: I ensure a smooth, dense press to prevent crumbling. I use vibrant, skin-safe colors and high-quality essential oils. Packaging individually in shrink wrap or small boxes with tissue paper and a custom label makes them feel so special.
- You’ll Need: Baking soda, citric acid, Epsom salts, cornstarch, essential oils, cosmetic-grade colorant, molds.
- Quick Steps: Mix dry ingredients. Mix wet ingredients separately. Combine, press into molds. Dry thoroughly.
- Skill Level: Intermediate | Time: 1-2 hours (plus drying) | Cost: $$
- Perfect For: Stress-relief seekers, pampering friends | Best For: Mother’s Day, birthdays, self-care kits.
12. All-Natural Lip Balms
I love creating smooth, nourishing balms in sleek packaging; they’re such a practical gift.
- Store-Bought Tip: I use a smooth, creamy recipe and fill tubes or small tins neatly without drips. Creating minimalist, professional-looking labels with ingredients and flavor really makes them shine.
- You’ll Need: Beeswax, coconut oil, shea butter, essential oils (e.g., peppermint, lavender), lip balm tubes or tins.
- Quick Steps: Melt oils and beeswax. Add essential oils. Pour into containers. Let cool.
- Skill Level: Beginner | Time: 30-45 min | Cost: $
- Perfect For: Anyone, especially those with chapped lips | Best For: Stocking stuffers, party favors, thank-you gifts.
13. Hand-Crafted Soap Bars
I’ve found that different molds and additives can truly create unique, high-end soaps.
- Store-Bought Tip: I use a quality melt-and-pour base or learn cold process for a truly artisan feel. Incorporating natural additives like oatmeal, coffee grounds, or dried herbs, and using attractive molds, makes them special. I wrap them in simple paper or cellophane with a custom band label.
- You’ll Need: Melt & pour soap base, essential oils, colorants, dried herbs/exfoliants, soap molds.
- Quick Steps: Melt soap base. Add oils/colorants/additives. Pour into molds. Let cure/harden.
- Skill Level: Intermediate | Time: 1-2 hours (plus curing) | Cost: $$
- Perfect For: Those who appreciate natural products | Best For: Housewarmings, holidays, hostess gifts.
14. Exfoliating Sugar Scrubs
A simple scrub can feel so luxurious with the right texture and scent, I’ve discovered.
- Store-Bought Tip: I ensure the sugar-to-oil ratio is perfect – not too oily, not too dry. Using a wide-mouth jar and topping it with a pretty label and a small scoop makes it look so inviting.
- You’ll Need: Sugar (white or brown), coconut oil or olive oil, essential oils, optional food coloring, wide-mouth jar.
- Quick Steps: Combine all ingredients. Mix well. Spoon into jars. Label.
- Skill Level: Beginner | Time: 15-30 min | Cost: $
- Perfect For: Self-care enthusiasts, anyone needing pampering | Best For: Mother’s Day, birthdays, spa kits.
15. Rich Body Butters or Lotions
I love to emphasize the nourishing qualities and creamy texture of these homemade lotions.
- Store-Bought Tip: I always aim for a smooth, whipped consistency and package them in attractive, air-tight jars. Creating elegant labels that convey natural ingredients and luxury is essential for that store-bought feel.
- You’ll Need: Shea butter, coconut oil, almond oil, essential oils, hand mixer, clean jars.
- Quick Steps: Melt butters/oils. Chill slightly. Whip until fluffy. Add essential oils. Spoon into jars.
- Skill Level: Intermediate | Time: 1-2 hours | Cost: $$
- Perfect For: Skincare lovers, those with dry skin | Best For: Birthdays, holidays, baby showers.
16. Relaxing Bath Salts
I’ve found that a mix of salts and essential oils can create such a therapeutic experience.
- Store-Bought Tip: I use high-quality Epsom salts and sea salts. Adding dried flowers (lavender, rose petals) for visual appeal, and packaging them in glass jars with a cork or a nice pouch with a ribbon, makes them truly special.
- You’ll Need: Epsom salts, sea salt, essential oils, dried herbs/flowers, optional natural colorant, jars or pouches.
- Quick Steps: Combine salts, essential oils, and dried elements. Mix. Store in airtight container.
- Skill Level: Beginner | Time: 15-30 min | Cost: $
- Perfect For: Anyone needing to unwind | Best For: Stress relief, self-care gifts, spa kits.
Charming Home & Personalized Treasures
I think gifts that add beauty and a personal touch to any home are so thoughtful. With brilliant design advice, quality craftsmanship truly makes these items shine, I’ve observed.
17. Personalized Planters or Vases
I love suggesting creative ways to customize these home decor items.
- Store-Bought Tip: I use clean, simple terracotta pots or glass vases. Stenciling, hand-painting with ceramic paints, or applying decoupage gives a polished look. Ensuring a smooth, even finish and sealing appropriately is key.
- You’ll Need: Plain planter/vase, ceramic/acrylic paints, stencils/brushes, sealant.
- Quick Steps: Clean surface. Apply design (paint/decoupage). Let dry. Seal.
- Skill Level: Intermediate | Time: 2-4 hours (including drying) | Cost: $$
- Perfect For: Plant lovers, home decorators | Best For: Housewarmings, birthdays, Mother’s Day.
18. Elegant Scented Candles
I’ve learned that carefully chosen scents and containers can create such a luxurious candle.
- Store-Bought Tip: I use quality wax (soy or beeswax), high-grade fragrance oils or essential oils, and clean-burning wicks. Pouring neatly into attractive containers (e.g., recycled glass jars, ceramic bowls) and adding a professional label with burn time and scent notes makes them look truly high-end.
- You’ll Need: Soy wax flakes, wicks, wick clips, essential/fragrance oils, heat-safe containers, double boiler.
- Quick Steps: Melt wax. Add oils. Secure wick. Pour wax. Let set. Trim wick.
- Skill Level: Intermediate | Time: 1-2 hours (plus setting) | Cost: $$
- Perfect For: Anyone who enjoys ambiance | Best For: Hostess gifts, holidays, relaxation gifts.
19. Custom Embroidered Wall Art or Hoop Art
I think delicate stitching can truly transform a simple hoop into a decorative piece.
- Store-Bought Tip: I use good quality fabric (linen, cotton) and neat, consistent stitches. Framing in a clean embroidery hoop or a small picture frame, and choosing simple, elegant designs or personalized monograms, creates a professional look.
- You’ll Need: Embroidery floss, fabric, embroidery hoop, needle, pattern (optional).
- Quick Steps: Transfer design. Stitch carefully. Secure fabric in hoop. Finish back neatly.
- Skill Level: Intermediate-Advanced | Time: 4+ hours | Cost: $
- Perfect For: Home decorators, new parents, anyone appreciating handmade art | Best For: Housewarmings, baby showers, birthdays.
20. Chic DIY Jewelry (Earrings, Necklaces)
I advise selecting quality materials and practicing techniques for professional-looking accessories.
- Store-Bought Tip: I use quality findings (sterling silver, gold-filled) and beads (glass, semi-precious stones). Practicing wire wrapping or beading for clean finishes is crucial. Presenting them in a small jewelry box or on a card makes them feel truly special.
- You’ll Need: Jewelry pliers, wire, beads, findings (earring hooks, clasps), jump rings.
- Quick Steps: Design piece. Assemble using appropriate tools and techniques.
- Skill Level: Intermediate | Time: 1-3 hours | Cost: $$-$$$
- Perfect For: Fashion-forward friends, jewelry lovers | Best For: Birthdays, Mother’s Day, anniversaries.
21. Hand-Painted Coaster Sets
I love highlighting how simple ceramic tiles can become stylish home accents.
- Store-Bought Tip: I use ceramic tiles as a base. Painting with acrylics or alcohol inks, then sealing thoroughly with a waterproof, heat-resistant sealant, gives a polished look. Adding cork or felt pads to the bottom to protect furniture is a must for me.
- You’ll Need: Ceramic tiles, acrylic/alcohol inks, brushes, clear sealant spray, cork/felt pads, strong adhesive.
- Quick Steps: Clean tiles. Paint design. Let dry. Apply sealant. Attach pads.
- Skill Level: Intermediate | Time: 2-4 hours (including drying) | Cost: $
- Perfect For: Home entertainers, new homeowners | Best For: Housewarmings, holidays.
22. Photo Transfer Coasters or Magnets
I think cherished photos can be beautifully preserved on practical items like these.
- Store-Bought Tip: I use high-quality printed photos. Ensuring a smooth transfer and multiple layers of sealant for durability and a professional finish is absolutely key here.
- You’ll Need: Photos (laser printed), Mod Podge, ceramic tiles/wooden blanks, brushes, clear sealant, cork/felt pads or magnet backing.
- Quick Steps: Prepare surface. Apply Mod Podge, place photo face down. Let dry completely. Peel paper. Seal. Attach backing.
- Skill Level: Intermediate | Time: 3-5 hours (drying is key) | Cost: $
- Perfect For: Grandparents, family members, sentimental friends | Best For: Anniversaries, birthdays, Father’s/Mother’s Day.
23. Clay Trinket Dishes
I love guiding you on creating unique, functional dishes for small treasures.
- Store-Bought Tip: I recommend oven-bake clay for easy clay crafting. Shaping neatly, smoothing edges, and painting with metallic or pastel acrylics, then sealing with a glossy varnish, gives a polished, ceramic-like look.
- You’ll Need: Oven-bake clay, rolling pin, knife/cutters, acrylic paints, brushes, glossy sealant.
- Quick Steps: Roll out clay. Cut/shape dish. Bake as directed. Paint. Seal.
- Skill Level: Beginner-Intermediate | Time: 2-3 hours (including baking/drying) | Cost: $
- Perfect For: Jewelry wearers, desk organizers | Best For: Teenagers, friends, Mother’s Day.
24. Monogrammed Journals or Notebooks
I always emphasize the elegance of a custom-designed stationery item.
- Store-Bought Tip: I start with a good quality plain journal. Using heat transfer vinyl, hand-stitching, or professional-grade fabric paint for the monogram, and ensuring placement is precise and the finish is clean, makes all the difference.
- You’ll Need: Plain journal/notebook, heat transfer vinyl/fabric paint/embroidery floss, iron/brushes/needle.
- Quick Steps: Prepare journal surface. Apply monogram using chosen method.
- Skill Level: Beginner-Intermediate | Time: 1-2 hours | Cost: $
- Perfect For: Writers, students, planners | Best For: Graduation, birthdays, new job gifts.
25. Framed Pressed Flowers or Botanical Art
I think this is such a beautiful way to preserve nature’s beauty in a timeless piece of art.
- Store-Bought Tip: I press flowers evenly and completely, then arrange them artfully on high-quality paper. Using a nice frame with a mat gives it a gallery-worthy look.
- You’ll Need: Fresh flowers/leaves, flower press or heavy books, acid-free paper, picture frame with mat.
- Quick Steps: Press flowers for several weeks. Arrange on paper. Frame carefully.
- Skill Level: Beginner (pressing) – Intermediate (arrangement) | Time: 30 min (prep) + weeks (pressing) | Cost: $$-$$$
- Perfect For: Nature lovers, home decorators | Best For: Anniversaries, housewarmings, Mother’s Day.
Frequently Asked Questions About 25 DIY Gifts That Look Store-Bought
I often get asked these questions, and I’m happy to share my thoughts!
- What are the best materials to ensure a high-quality finish for DIY gifts? I always prioritize quality, food-grade materials for edibles, like good cocoa and fresh spices. For crafts, I opt for non-toxic, durable paints, high-quality fabrics, and clean-burning waxes. Investing a little more in your base materials always pays off for a high-quality finish.
- How can I personalize a gift without it looking amateur? My trick is to keep it simple and clean. A neat monogram, a single, crisp design, or a professional-looking label with a personalized message. Precision in application and high-quality finishes make all the difference, rather than overcrowding the item with too many elements.
- How do I package different types of gifts (e.g., food, fragile crafts) to look professional? For food, I always use airtight, food-grade containers like mason jars or sealed bags, then add an elegant label and ribbon. For fragile crafts, I use sturdy boxes with plenty of tissue paper or bubble wrap, and then I’ll wrap the box itself in lovely paper or a ribbon. The key is to protect the item while making the wrapping part of the gift experience.
- What are some common mistakes to avoid when making DIY gifts? I find the most common mistakes are rushing the process, using low-quality materials, or neglecting the presentation. Always allow proper drying times, use the best materials you can, and put as much care into the packaging as you do the gift itself.
- Are there specific tools that help achieve a store-bought look? Absolutely! A good pair of sharp scissors or a craft knife for clean cuts, quality paintbrushes for smooth finishes, measuring tools for precision, and a reliable glue gun (used sparingly!) are invaluable. For items like jewelry, proper jewelry pliers are a must.
- What are some easy homemade gift ideas if I’m short on time? If I’m really short on time, I lean into projects like Infused Olive Oils (mostly infusion time, quick prep), Gourmet Hot Cocoa Mix Jars, or Layered Baking Mix Jars. They involve simple assembly and still look incredibly thoughtful and polished.
- What is a good last-minute gift idea that still looks thoughtful? Homemade Infused Olive Oils, Artisanal Spice Blends, or even Luxurious Bath Bombs (if you have the ingredients on hand!) are fantastic. The key is to focus on elegant packaging and a neat presentation, which can be done quickly even for a last-minute gift.
Conclusion: Your Journey to Store-Bought Style Starts Now!
I truly hope I’ve shown you that creating stunning, professional-looking DIY gifts is entirely within reach for anyone. It’s not about being a crafting genius; it’s about putting thought into your materials, being precise with your work, and then presenting your gift beautifully. With these steps, your handmade gifts won’t just look homemade; they’ll genuinely look like something you bought from a charming little shop.
So, go ahead, pull out your supplies, and start making! I’d love to hear which of these 25 DIY Gifts That Look Store-Bought you’re most excited to try. What are your own “secret” tips for making handmade gifts look incredible? Share your favorite DIY gift ideas in the comments below, or feel free to ask me any questions you have. I’m always here to help you make your home feel more like you.